Chapters
Guide › Set up
Your team, roles and PINs
Everyone who works with Sofrito has their own PIN. They type it to unlock a till or a handheld, to clock in and out, and, for managers, to approve something another person may not do alone. Every action is recorded under the name of the person who did it. What each person may do depends on their role. The owner and managers set up the team and the roles in the back office. The sections on signing in, the time clock and manager approval are for everyone.
Before you start
- Create your restaurant. See Create your restaurant.
- To change people, your role needs Manage the team. To change roles, it needs Manage roles and permissions. A new restaurant gives both to the Owner role. The Manager role has the first but not the second.
Open the team list
- In the back office, select Team & roles.
- Select Team.
The list shows everyone on the team with their role, whether they are On shift or Off shift, how to contact them and their Hourly wage. A yellow No PIN badge means that person can't sign in yet. Use the search box to find someone by name, role, email or phone.
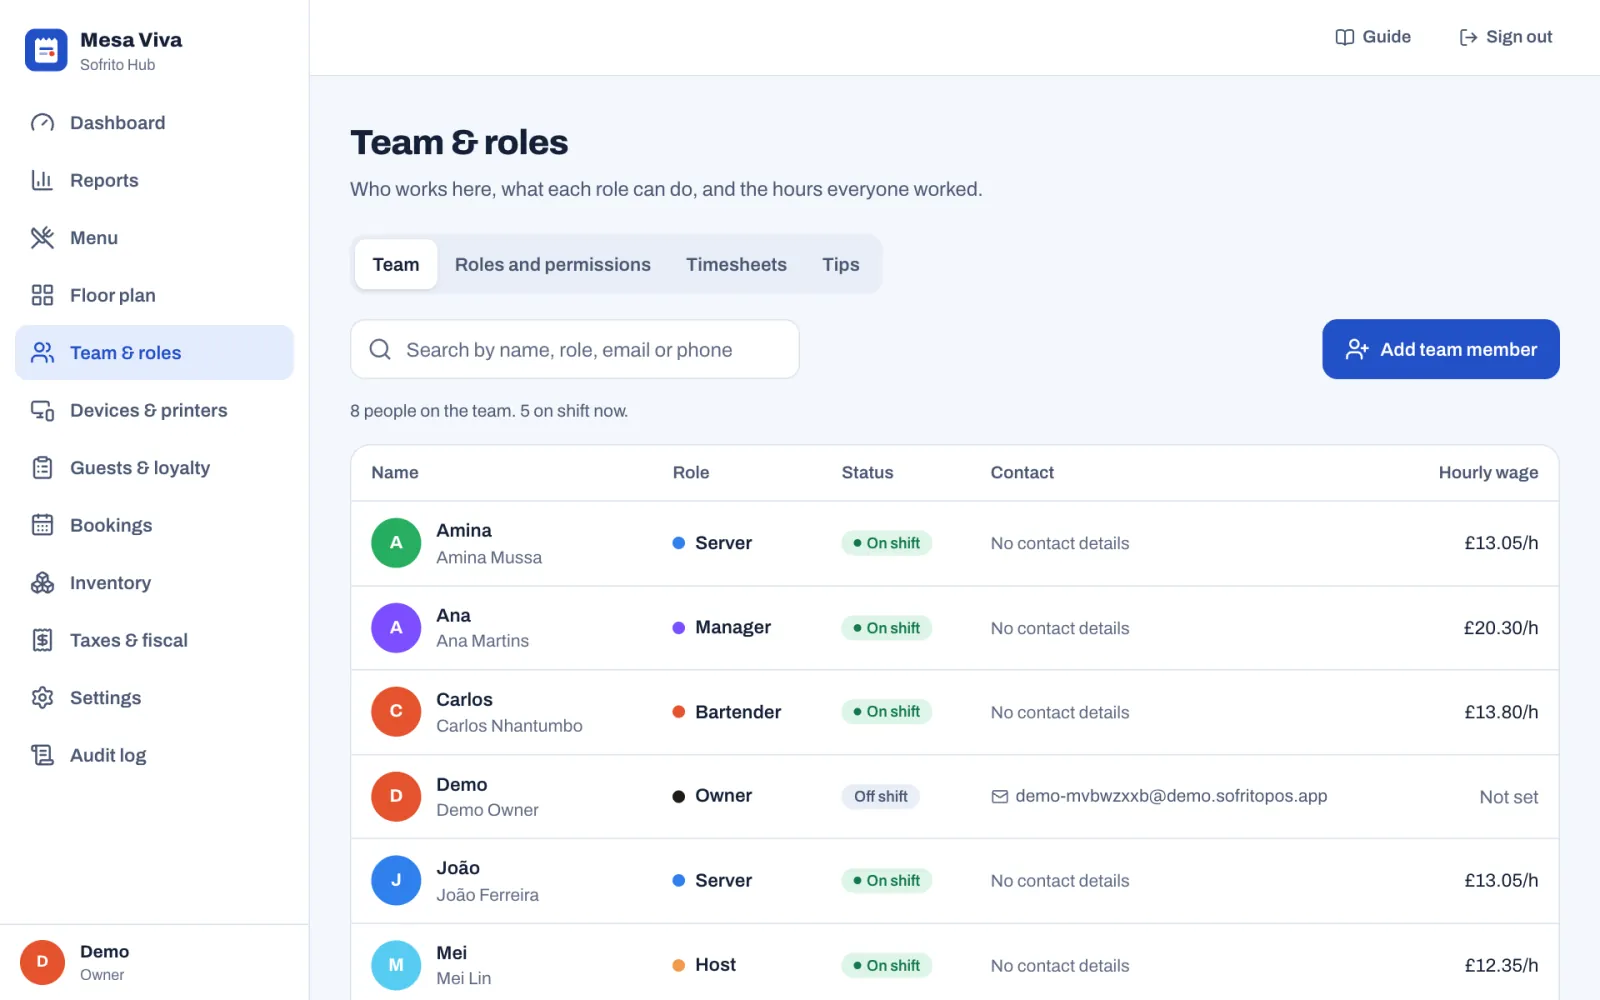
Add a team member
- In Team & roles › Team, select Add team member.
- Type their First name and Last name.
- Optional: type a Name on the POS. It is shown on the lock screen, orders and receipts. If you leave it empty, Sofrito uses the first name.
- Under Role, choose what they do. New people start as Server.
- Under PIN, type a PIN of 4 digits in PIN, then type it again in Type the PIN again.
- Optional: add their Email and Phone.
- Optional: under Pay, type their Hourly wage. Sofrito uses it for the labour cost on timesheets and in reports.
- Optional: choose a Colour. Their initials appear in this colour on the lock screen and on orders.
- Select Add to team.
They can sign in as soon as they have a PIN.
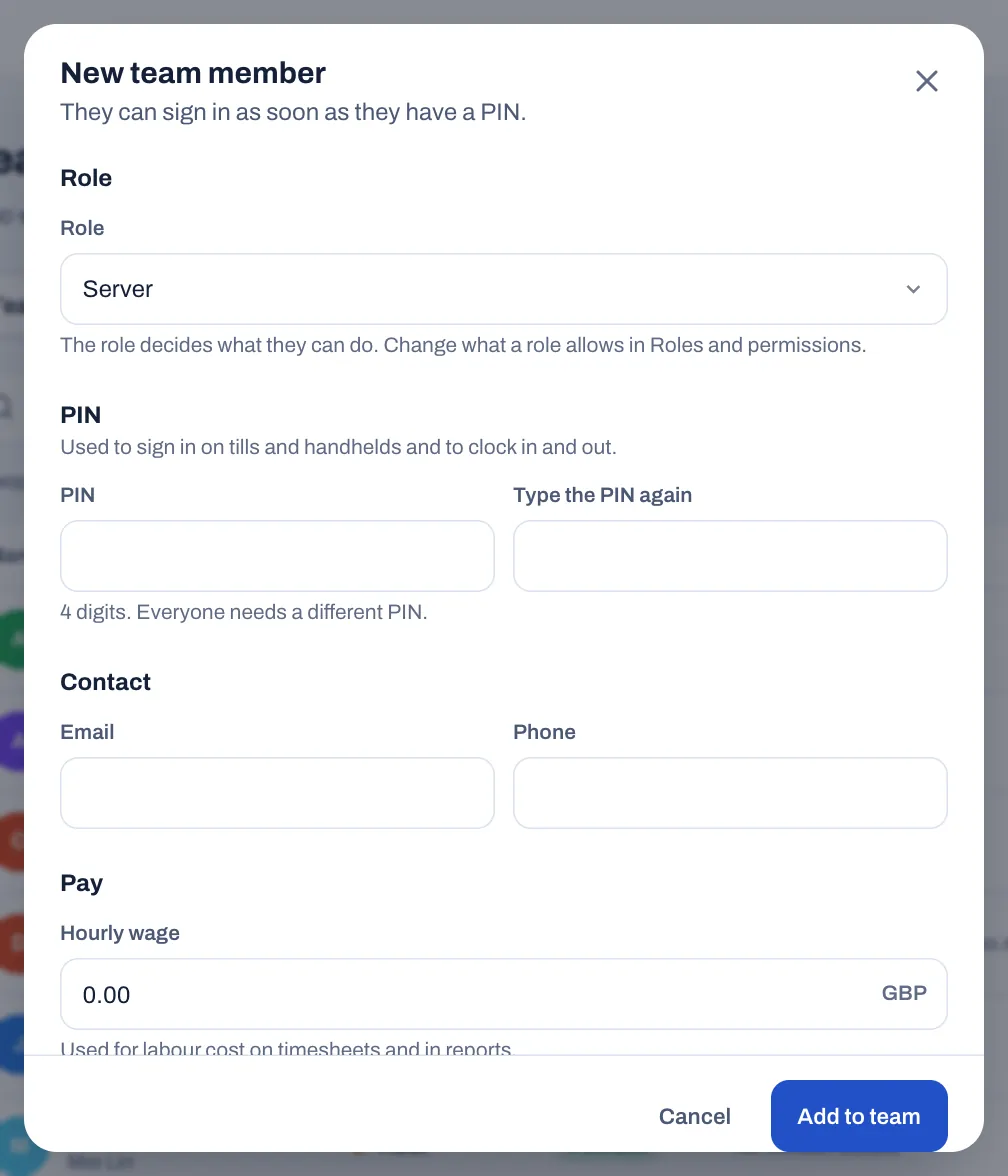
Everyone needs a different PIN. If you choose one that someone else already has, Sofrito says "Someone else already uses this PIN. Choose another one." If your restaurant has more than one location, the form also asks under Locations where the person can sign in.
Change a PIN
Do this when someone forgets their PIN or thinks someone else knows it. Sofrito never shows a PIN once it is saved, so nobody can look it up.
- In Team & roles › Team, select the person.
- Under PIN, select Reset PIN.
- Type the new PIN in New PIN, then again in Type the PIN again.
- Select Save.
To leave the PIN as it was, select Keep the current PIN before you save. Only an owner can change an owner's details, including their PIN.
Let someone use the back office
People whose role includes Open the back office can manage the restaurant from any browser with their email and a password.
- In Team & roles › Team, select the person.
- Make sure they have an Email. It is what they sign in with.
- Under Back-office sign-in, select Set password.
- Type a Password of at least 8 characters.
- Select Save.
They then choose Sign in to the back office on the Sofrito start screen and use their email and password. Back-office sign-in only appears when the person's role can open the back office.
The back office also opens on a till or a handheld: tap Back office under the PIN pad of the lock screen, or tap More, then Back office, once you are signed in. Anyone can walk up to a till, so it never stays signed in to the back office:
- If the person signed in on the till may open the back office, it opens as them. Otherwise it shows "Someone with back-office access enters their PIN.": that person types their PIN, or taps Use email and password instead. A PIN whose role can't open the back office gets "Your role can’t open the back office."
- It locks after 5 minutes without a touch, whatever the till's own lock time, and whenever the till locks. Sign out locks the till, and POS goes back to it.
To stay signed in, for example on the office computer, use Sign in to the back office in a browser that isn't paired as a till.
Change someone's role
- In Team & roles › Team, select the person.
- Under Role, choose the new role.
- Select Save.
Some changes are blocked to keep the restaurant safe:
- You can't change your own role.
- Only an owner can make someone an owner. Other people don't see the Owner role in the list.
- The restaurant always needs at least one owner, so the last owner keeps their role.
Stop someone signing in for a while
Use this for someone on leave, or while you find out what happened.
- In Team & roles › Team, select the person.
- Turn off Can sign in.
- Select Save.
They can't sign in until you turn it back on. The team list then has an Inactive view where you find them. You can't turn off your own sign-in.
Archive someone who has left
- In Team & roles › Team, select the person.
- Select Archive, then Tap again to archive.
Sofrito removes the person from the team, deletes their PIN and signs them out on every device. Their orders, shifts and other records stay in your reports and in the audit log. You can't archive yourself or the last owner.
Understand roles
A role is a set of permissions. Everyone with the same role gets the same access, so you change it once, for all of them. Sofrito creates these roles for a new restaurant:
| Role | What it can do when you start |
|---|---|
| Owner | Everything. The owner role always has every permission and can't be changed, so nobody can lock the restaurant out of its own system. |
| Manager | Everything except Manage roles and permissions and Subscription and billing. |
| Server and Bartender | Take orders and payments, move orders and tables, apply the restaurant's discounts, mark dishes sold out, look up guests, run bookings and seat guests, open and close the cash drawer and print the shift report (X). |
| Cashier | The same as a server, without moving orders and tables or applying discounts. |
| Host | Bookings, the waitlist, seating guests at their tables and guest profiles on the till. |
| Kitchen | The kitchen display and marking dishes sold out. A Kitchen PIN doesn't open tills or handhelds, but it clocks in and out on them. |
Only owners and managers have Change other people’s orders when you start. A server who adds to, voids or discounts a check that someone else opened needs a manager's PIN. A check with nothing on it yet, such as one a host opened when seating guests, is different: whoever adds its first items takes it over, without a manager. Taking payment never needs one, so a cashier can settle anyone's check.
To see the roles, select Team & roles › Roles and permissions. Each card shows how many people have the role and how many of the 39 permissions it has.
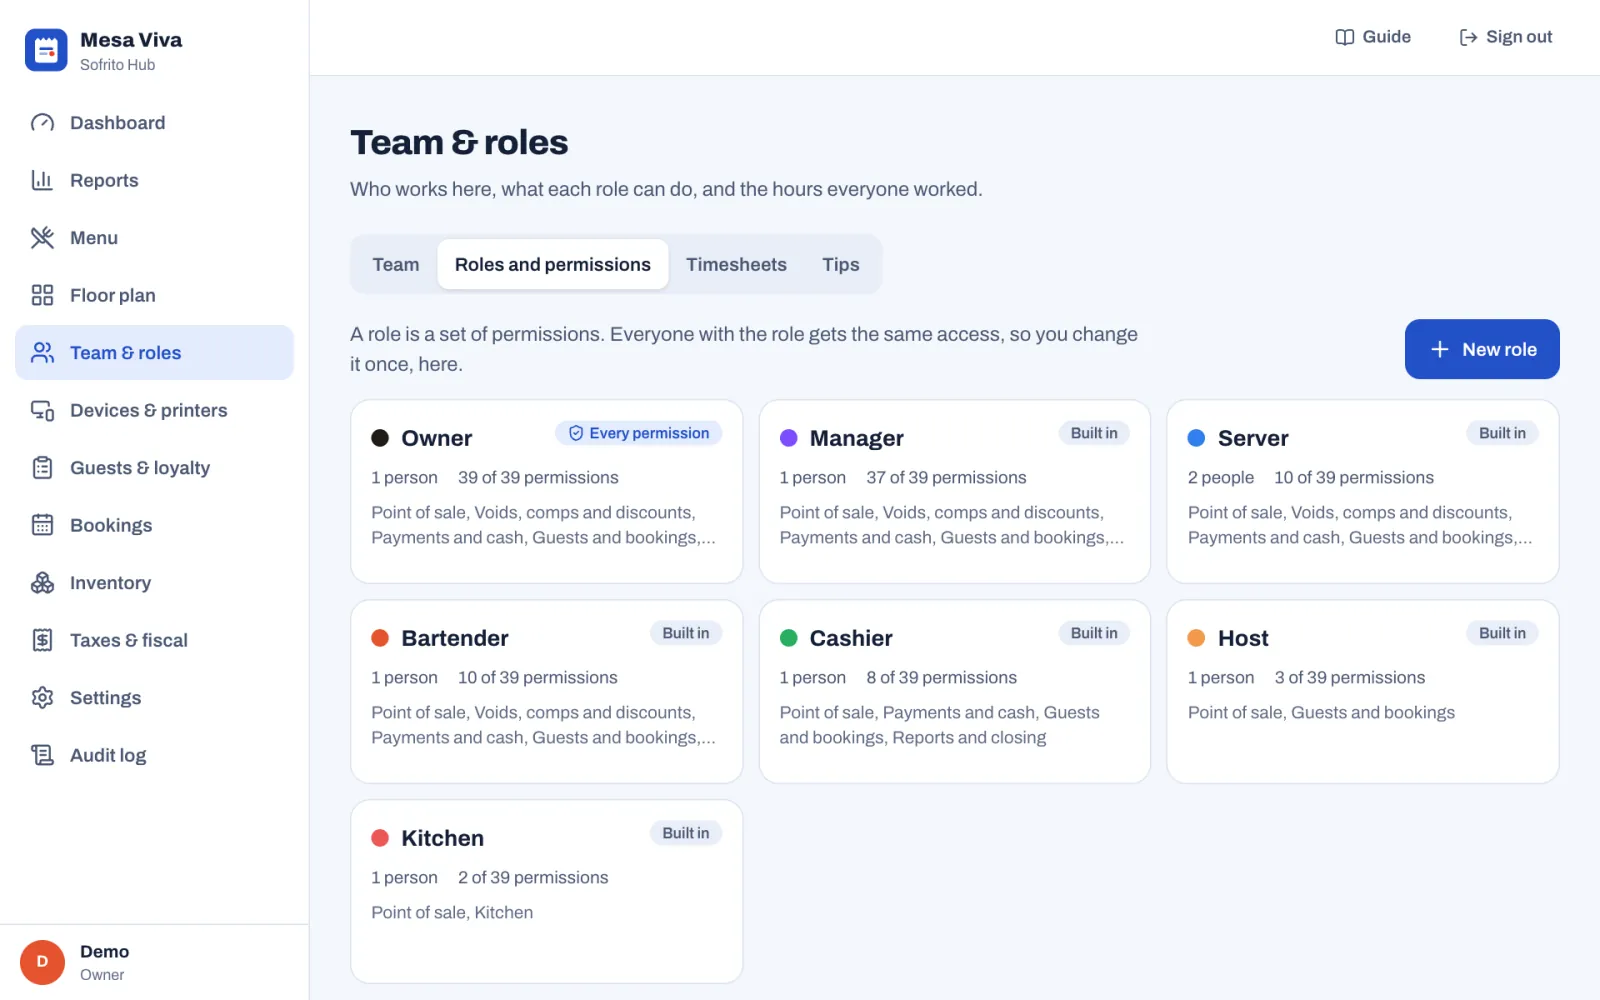
Change what a role can do
You need Manage roles and permissions. Without it you can look at roles but not change them.
- Select Team & roles › Roles and permissions.
- Select the role.
- Tick the permissions the role should have and untick the others. Select all and Clear all change a whole group at once.
- Select Save.
The change applies to everyone with the role. You can rename the role and change its Role colour in the same place. You can't remove Open the back office or Manage roles and permissions from your own role, so you can't lock yourself out.
Permissions with the Manager can approve badge are the ones a manager can grant on the spot. When someone without the permission tries one of these actions, Sofrito asks a manager to approve it there and then with their PIN. See Approve an action with your PIN.
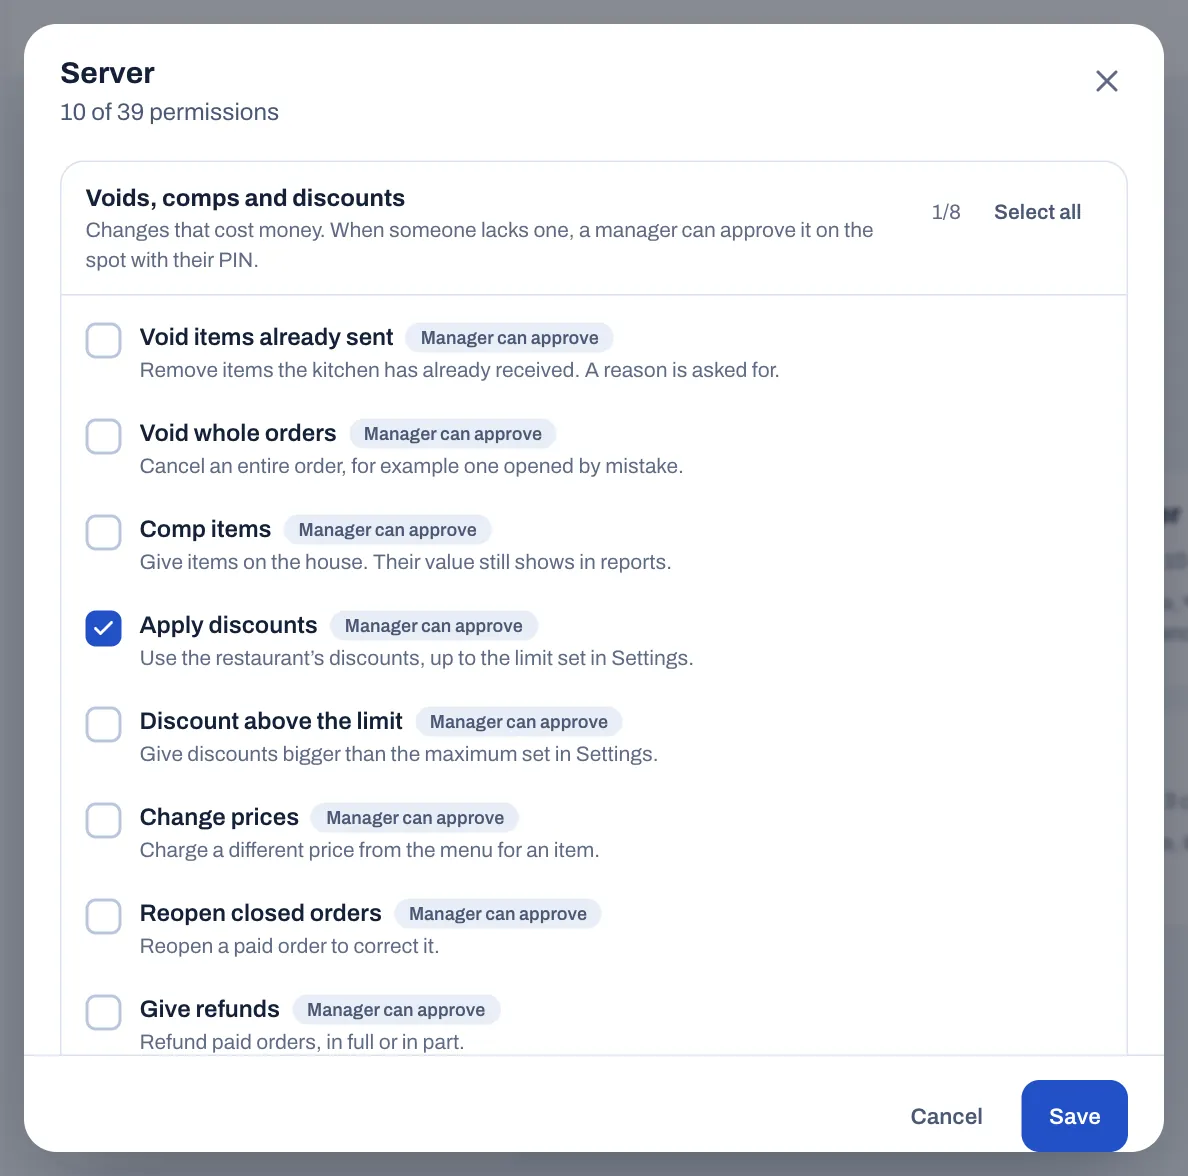
Create a role
Create a role when one of the built-in roles doesn't fit, for example a head waiter who may comp items.
- Select Team & roles › Roles and permissions.
- Select New role.
- Type the Role name.
- Under Start from, choose Same as an existing role to copy its permissions, or No permissions to start empty.
- Pick a Role colour.
- Tick the permissions the role should have.
- Select Create role.
If you tick back-office permissions but not Open the back office, Sofrito warns you: without it those pages stay out of reach.
To remove a role you made, move everyone with it to another role first. Then open the role and select Remove role, then Tap again to remove. The built-in roles can't be removed.
Know what each permission allows
These are the 39 permissions, in the groups the role editor shows. A ✓ in the last column means a manager can approve the action with their PIN for someone who doesn't have it.
Point of sale
| Permission | What it allows | Approve |
|---|---|---|
| Use the POS | Sign in on tills and handhelds. Without it, the person's PIN is refused there. | |
| Open orders | Start new orders and tabs and add items to them. | |
| Change other people's orders | Add to or change orders that another server opened: items, voids, comps, discounts, service charges, guests, the name, moving, handing over, splitting and merging. Sending, printing the check and taking payment don't need it, and nor do orders from online ordering. Nor does a check with nothing on it yet: whoever adds its first items takes it over. | ✓ |
| Move orders and tables | Move an order to another table or hand it over to another server. | ✓ |
| Mark dishes as sold out | Mark a dish sold out (86) or set how many are left, on every screen at once. |
Voids, comps and discounts
| Permission | What it allows | Approve |
|---|---|---|
| Void items already sent | Remove items the kitchen has already received. A reason is asked for. | ✓ |
| Void whole orders | Cancel an entire order, for example one opened by mistake. | ✓ |
| Comp items | Give items on the house. Their value still shows in reports. | ✓ |
| Apply discounts | Use the restaurant's discounts, up to the limit set in Settings › Security. | ✓ |
| Discount above the limit | Give discounts bigger than that limit. | ✓ |
| Change prices | Charge a different price from the menu for an item. | ✓ |
| Reopen closed orders | Reopen a paid order to correct it. | ✓ |
| Give refunds | Refund paid orders, in full or in part. | ✓ |
Payments and cash
| Permission | What it allows | Approve |
|---|---|---|
| Take payments | Charge by cash, card and the other payment methods. | |
| Void payments | Cancel a payment that was recorded by mistake. | ✓ |
| Open and close the cash drawer | Start the drawer with a float and count it at the end of the shift. | |
| Pay-ins, pay-outs and drops | Put cash into or take it out of the drawer outside a sale, including tips paid out from the drawer. | ✓ |
| Open the drawer without a sale | Open the cash drawer when nothing is being paid (No sale). | ✓ |
Guests and bookings
| Permission | What it allows | Approve |
|---|---|---|
| Bookings and waitlist | Create, change and seat bookings, seat walk-ins and run the waitlist. | |
| Look up guests | See and edit guest profiles from the till. | |
| Manage guests and loyalty | Edit guests, adjust points, and import, export or erase guest data. |
Kitchen
| Permission | What it allows | Approve |
|---|---|---|
| Use the kitchen display | For the kitchen team. A paired kitchen display works without anyone signing in, so anyone at the pass can bump tickets. |
Reports and closing
| Permission | What it allows | Approve |
|---|---|---|
| Print shift reports (X) | See and print the takings so far without closing the day. | |
| Close the day (Z) | Lock the day's totals and print the closing report. | ✓ |
| View reports | Sales, dishes, team performance and the dashboard. | |
| View the audit log | See who did what and when, including voids and approvals. | |
| Export data | Download sales documents and tax files such as SAF-T. |
Team
| Permission | What it allows | Approve |
|---|---|---|
| Edit timesheets | Correct other people's clock-in and clock-out times, breaks and declared cash tips. | |
| Manage the team | Add people, set PINs and wages, archive former staff, and see timesheets and tips. | |
| Manage roles and permissions | Create roles and decide what each one can do. |
Back office
| Permission | What it allows | Approve |
|---|---|---|
| Open the back office | Needed for every back-office page. | |
| Edit the menu | Dishes, prices, categories, modifiers and stations. Also discounts, service charges, price levels and reasons in Settings. | |
| Edit floor plans | Areas, tables and seats. | |
| Manage inventory | Stock, recipes, suppliers and purchase orders. | |
| Manage devices and printers | Pair tills, kitchen screens and printers, and unpair a device from its own More screen. | |
| Manage payment methods | Turn payment methods on or off and set them up. | |
| Taxes and fiscal settings | Tax rates, document series and fiscal compliance. | |
| Restaurant settings | Receipts, tipping, security, loyalty and other house rules. | |
| Subscription and billing | Change the Sofrito plan and payment details. |
Sign in with your PIN
Every till and handheld starts on the lock screen. It shows the time and a PIN keypad. On a till it also shows the team under Who’s working?, with a green dot next to everyone who is clocked in.
- Make sure Enter your PIN is selected at the top of the keypad.
- Type your PIN.
The till opens as soon as you type the fourth digit. If the PIN is wrong, the dots turn red, shake and clear: type it again.
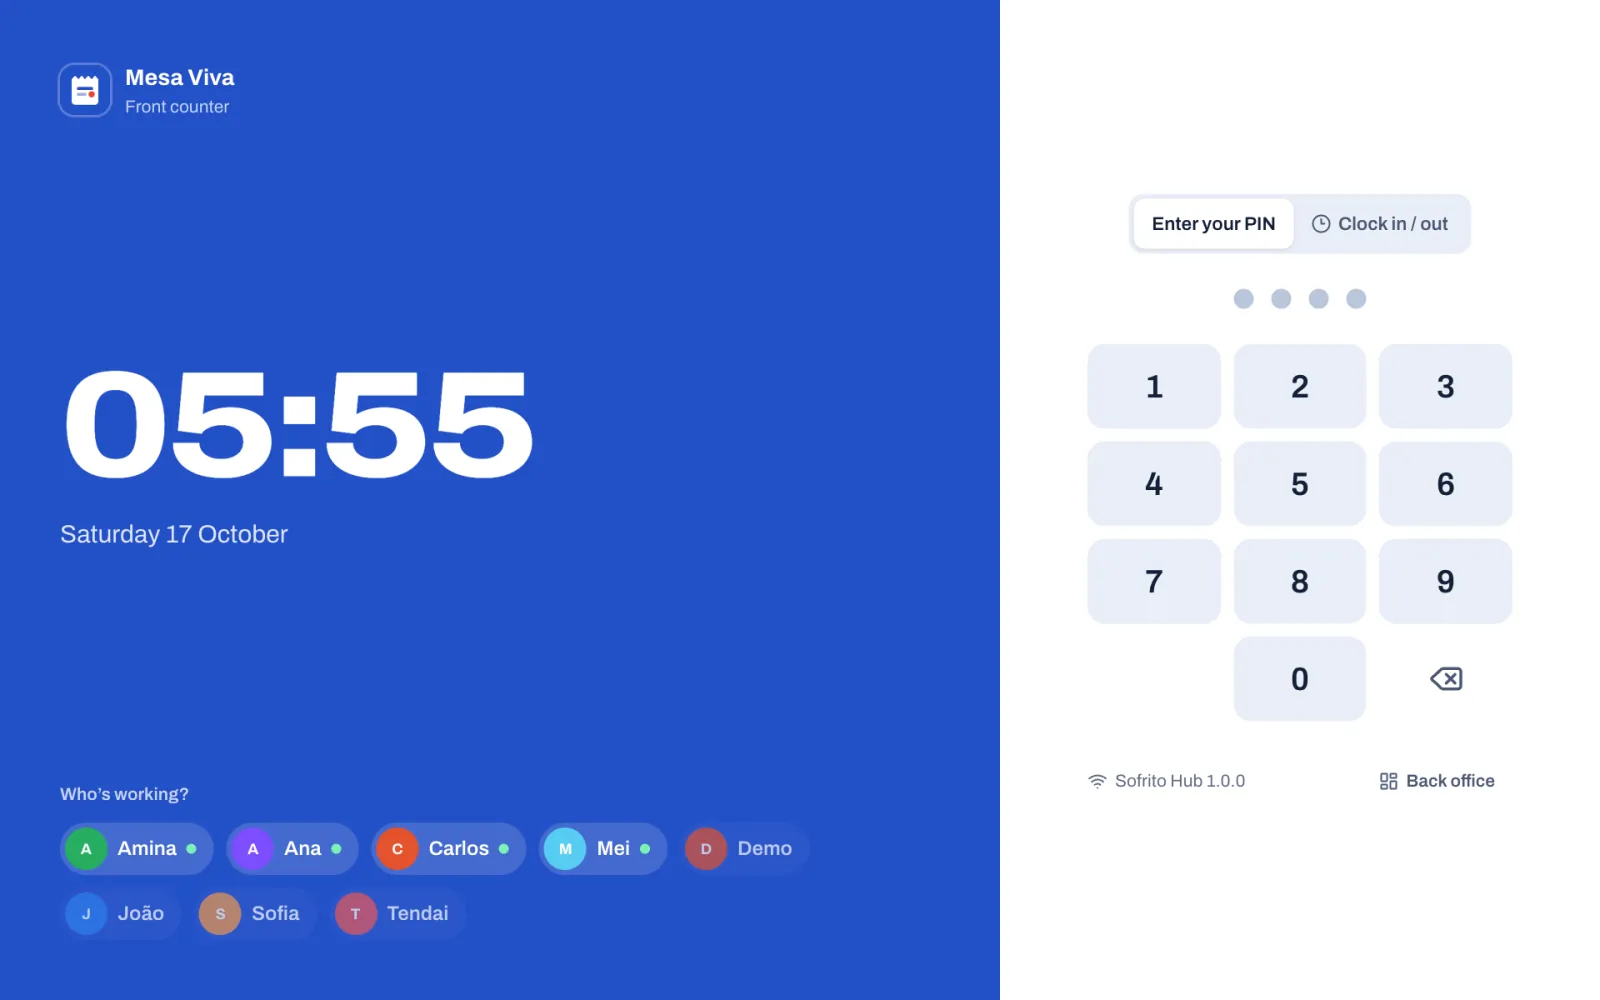
A PIN only opens a device that its role works on. A Kitchen PIN typed on a till shows "Kitchen can’t sign in on this device."
Kitchen displays, customer displays and pickup boards have no lock screen. They work as soon as they are paired.
Lock the till between people
When you step away, tap Lock at the bottom of the left-hand bar on a till, or tap your initials at the top of a handheld. The next person signs in with their own PIN.
Sofrito also locks by itself. To choose when:
- In the back office, select Settings › Security.
- Under Lock when nobody uses it, choose how long a till may sit untouched before it goes back to the PIN screen: from 30 seconds to 30 minutes, or Never. A new restaurant starts with 90 seconds.
- Turn on Lock after each payment for shared terminals at a bar or counter.
- Select Save changes.
Clock in and out
Clocking in records when your shift starts. It doesn't sign you in.
- On the lock screen of any till or handheld, tap Clock in / out.
- Type your PIN.
The device confirms, for example "Ana clocked in", and on a till a green dot appears next to your name. If you have already signed in, you can tap More, then Clock in, instead.
At the end of your shift, do the same again: tap Clock in / out on the lock screen and type your PIN, or tap More, then Clock out. When Ask for a tip is on in Back office › Settings › Tips, Sofrito then opens Cash tips for this shift:
- Type the tips guests left you in cash. Tips added to a card payment are counted already.
- Tap Declare with the amount, for example Declare £12.00, or tap No cash tips.
To take a break while you are clocked in, sign in, tap More, then Unpaid break or Paid break. Tap End break when you come back. Unpaid breaks are taken off the hours worked; paid breaks count as hours worked. The same card has Declare cash tips, to record cash tips before you clock out.
Check and correct timesheets
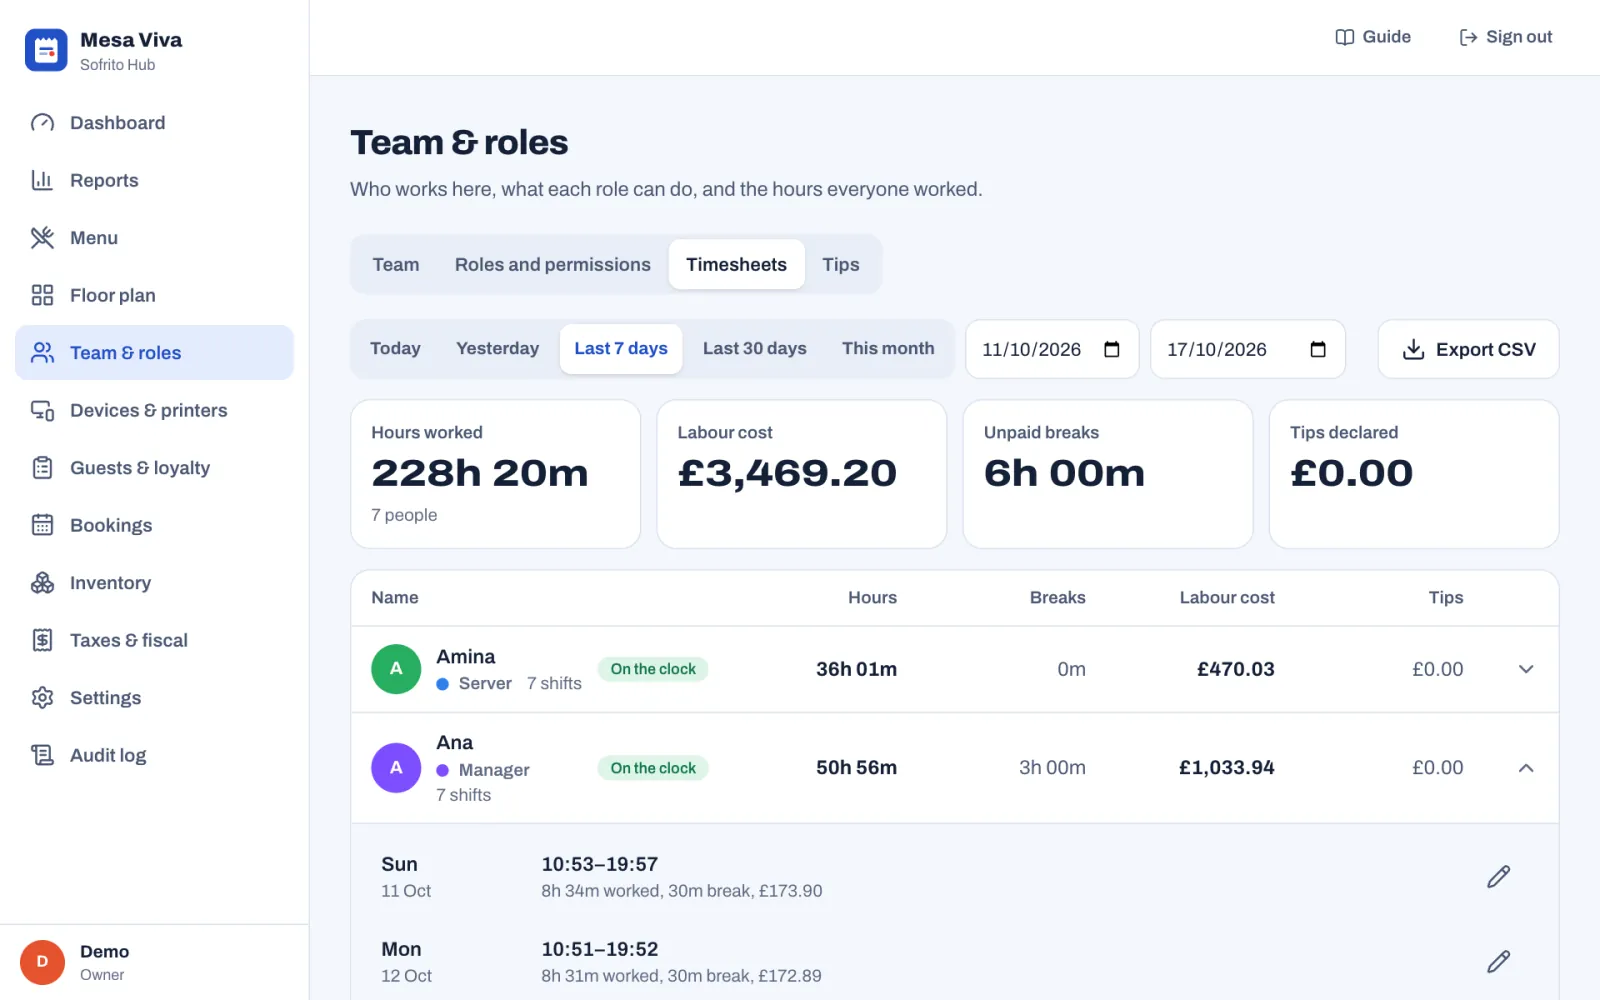
- In the back office, select Team & roles › Timesheets.
- Choose the dates: Today, Yesterday, Last 7 days, Last 30 days, This month, or your own dates in the two date boxes.
The top of the page totals Hours worked, Labour cost, Unpaid breaks and Tips declared. Below, each person has a row with their hours, breaks, labour cost and tips. Select a row to see each shift. On the clock marks someone who hasn't clocked out yet, and Over 12 hours marks a shift that may have been left open by mistake.
To correct a shift, you need Edit timesheets:
- Select the person's row, then the pencil next to the shift.
- Change Clocked in or Clocked out. If the person forgot to clock out, select Clock out now or type the time.
- Under Breaks, set each break to Unpaid or Paid if it was recorded wrongly.
- Change Cash tips declared if the person declared the wrong amount.
- Under Note, say why the times changed, for example "Forgot to clock out". A note is required when you change a time.
- Select Save.
Sofrito keeps the old and new times, and who changed them, in the audit log. A shift can't be in the future or longer than 24 hours.
To send hours to your payroll or accountant, select Export CSV. The file has one line per shift with the role, business date, times, hours, unpaid breaks, hourly wage, labour cost, tips and notes.
See who is owed tips
Tips that guests add to their payments are owed to the team. Team & roles › Tips shows who is owed what, and what has been paid. You need Manage the team to open it.
- In the back office, select Team & roles › Tips.
- Choose the dates, for example Last 7 days.
The tiles show the Tips taken on payments, what was Paid out, what is Still to pay, and the Tips declared in cash, which staff keep. Each person's row shows their hours, the tips On their orders, what is Due to them, what they Declared in cash, what was Paid out and what is Still to pay.
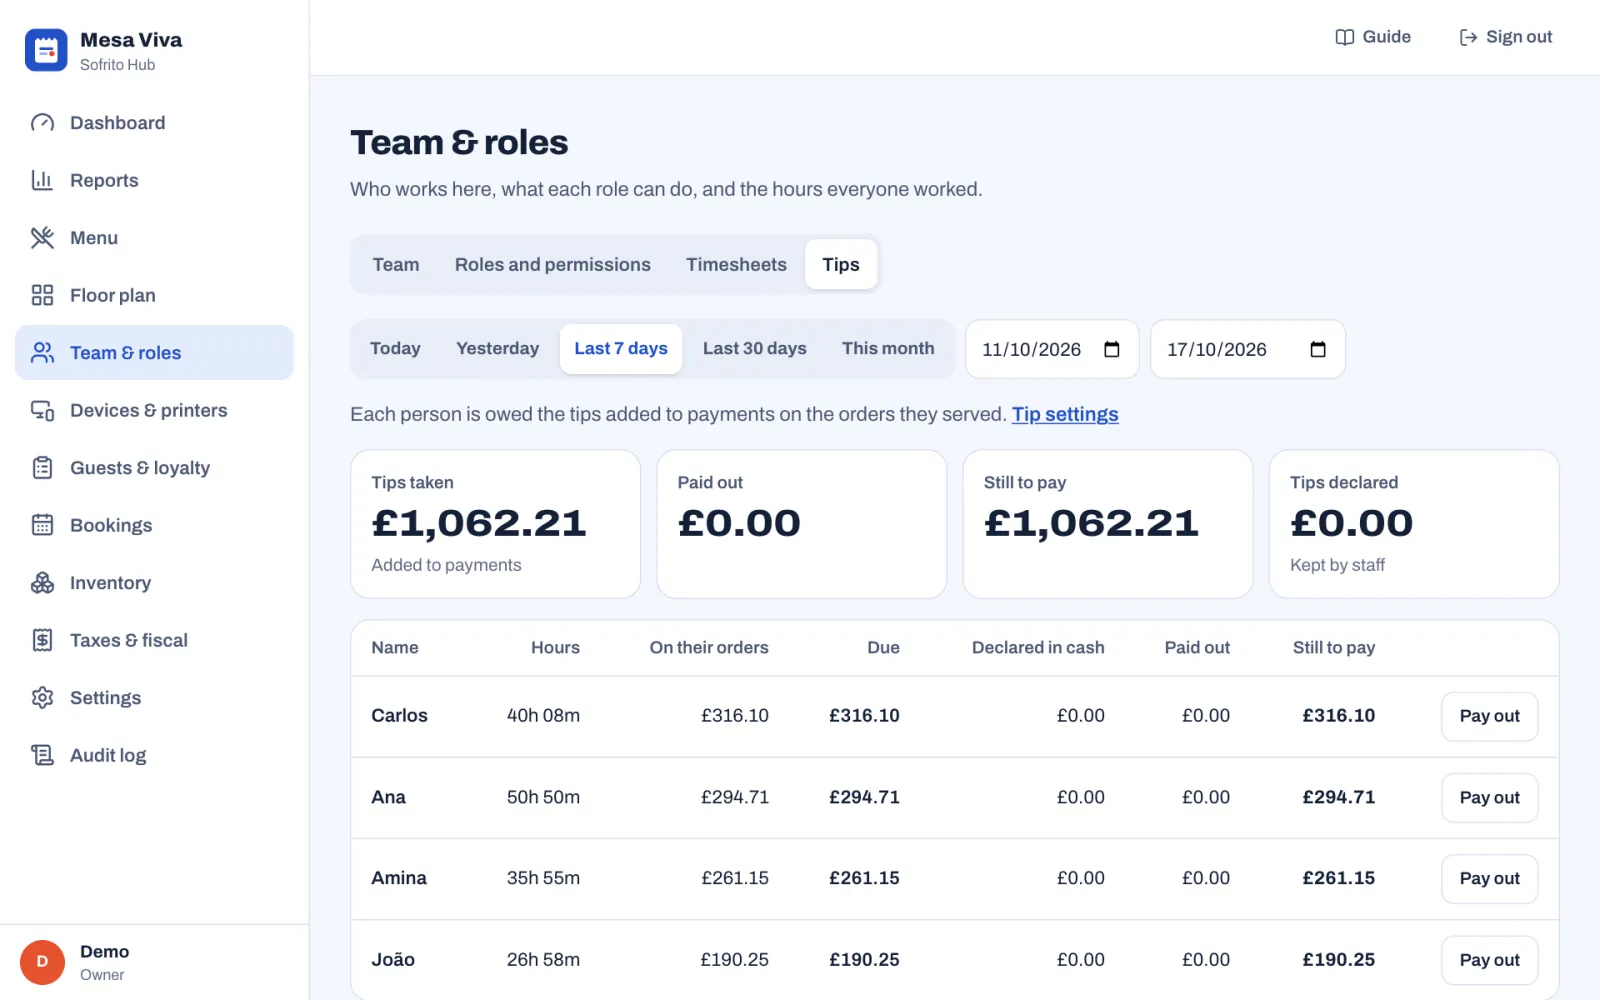
Each person is owed the tips added to payments on the orders they served. With Pool tips on in Settings › Tips, each day's tips are shared by the hours each person worked, and the Due column shows each person's Share of the pool. A service charge marked Counts as a tip is owed with the tips.
Pay out next to a person pays them, from the cash drawer or with their wages. Paying from the drawer needs Pay-ins, pay-outs and drops, and paying with wages needs Manage the team. For the steps, see Pay out tips.
Approve an action with your PIN
When someone tries something their role doesn't allow, and the permission has the Manager can approve badge, the till asks for approval instead of refusing.
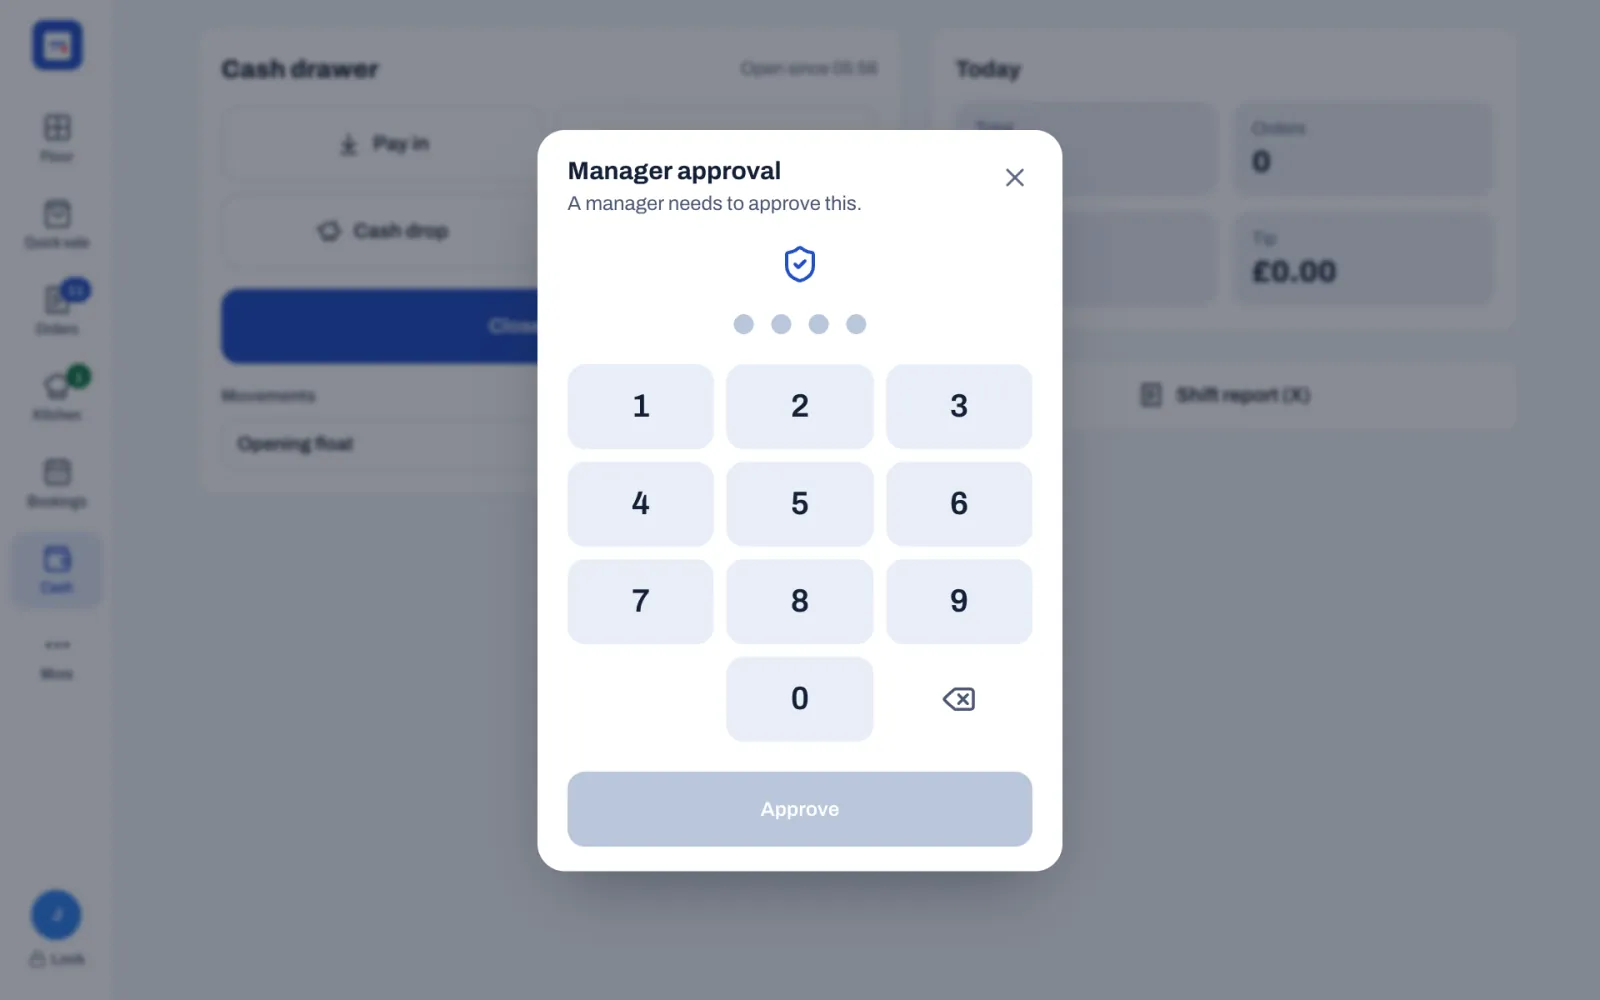
- The person who asked hands you the till. It shows Manager approval and "A manager needs to approve this."
- Type your PIN.
- Tap Approve.
The action goes ahead and is recorded with both names: the person who asked and the person who approved. "Manager" means anyone whose role has that permission, so an owner can approve too. If the PIN is wrong, the pad says "Wrong PIN."; if your role doesn't have the permission, it says, for example, "Ana can’t approve this."
Two settings decide how often staff need a manager:
- In the back office, select Settings › Security.
- Under Discounts up to, type the biggest discount, in per cent, that staff may give on their own. A new restaurant starts with 10%. Bigger discounts need Discount above the limit or a manager's PIN.
- Under Reasons, choose whether staff must say why they void an item, give one free or refund money: Ask why an item is voided, Ask why an item is free and Ask why money is refunded. All three start on.
- Select Save changes.
You choose the reasons staff can tap in Settings › Reasons. For voids, refunds and the rest of the approval work during service, see Voids, discounts, refunds and approvals.
Before you go live
- Remove the sample data if you added it, and add your real team.
- Give everyone their own PIN, and ask them not to share it. A shared PIN puts one person's name on another person's voids and refunds.
- Give each person the smallest role that lets them do their job. Keep Owner for the people who own the business.
- Give a back-office password only to people who need the back office.
- Type everyone's Hourly wage, so timesheets and reports show your labour cost.
- Decide whether tips are pooled, and who pays them out and how often.
- When someone leaves, archive them the same day.