Chapters
Guide › Run service
Bookings and the waitlist
This chapter covers taking, changing and cancelling a booking, the statuses a booking goes through, seating guests when they arrive, the waitlist for walk-ins, planning the day in the back office, and the booking settings. Hosts and anyone at the till take and seat bookings. Managers plan the day in the back office and choose the booking times.
Before you start
- Your tables are on the floor plan: see Draw your floor plan.
- Take bookings is on in Back office › Settings › Bookings. It is on in a new restaurant: see Choose your booking times and table times.
- Your role needs Bookings and waitlist. Hosts, servers, bartenders, cashiers, managers and owners have it in a new restaurant: see Your team, roles and PINs.
Find the bookings
- On the till: tap Bookings. On a phone, if Bookings is not in the bottom bar, tap More, then Bookings.
- In the back office: select Bookings.
- On the floor plan: from 30 minutes before a booking (Hold the table in the booking settings), its table shows the booking time in purple while it is free, and Reserved with the time in the list view. On a wide screen, a Bookings column at the side lists the next bookings of the day. Neither shows while Take bookings is off.
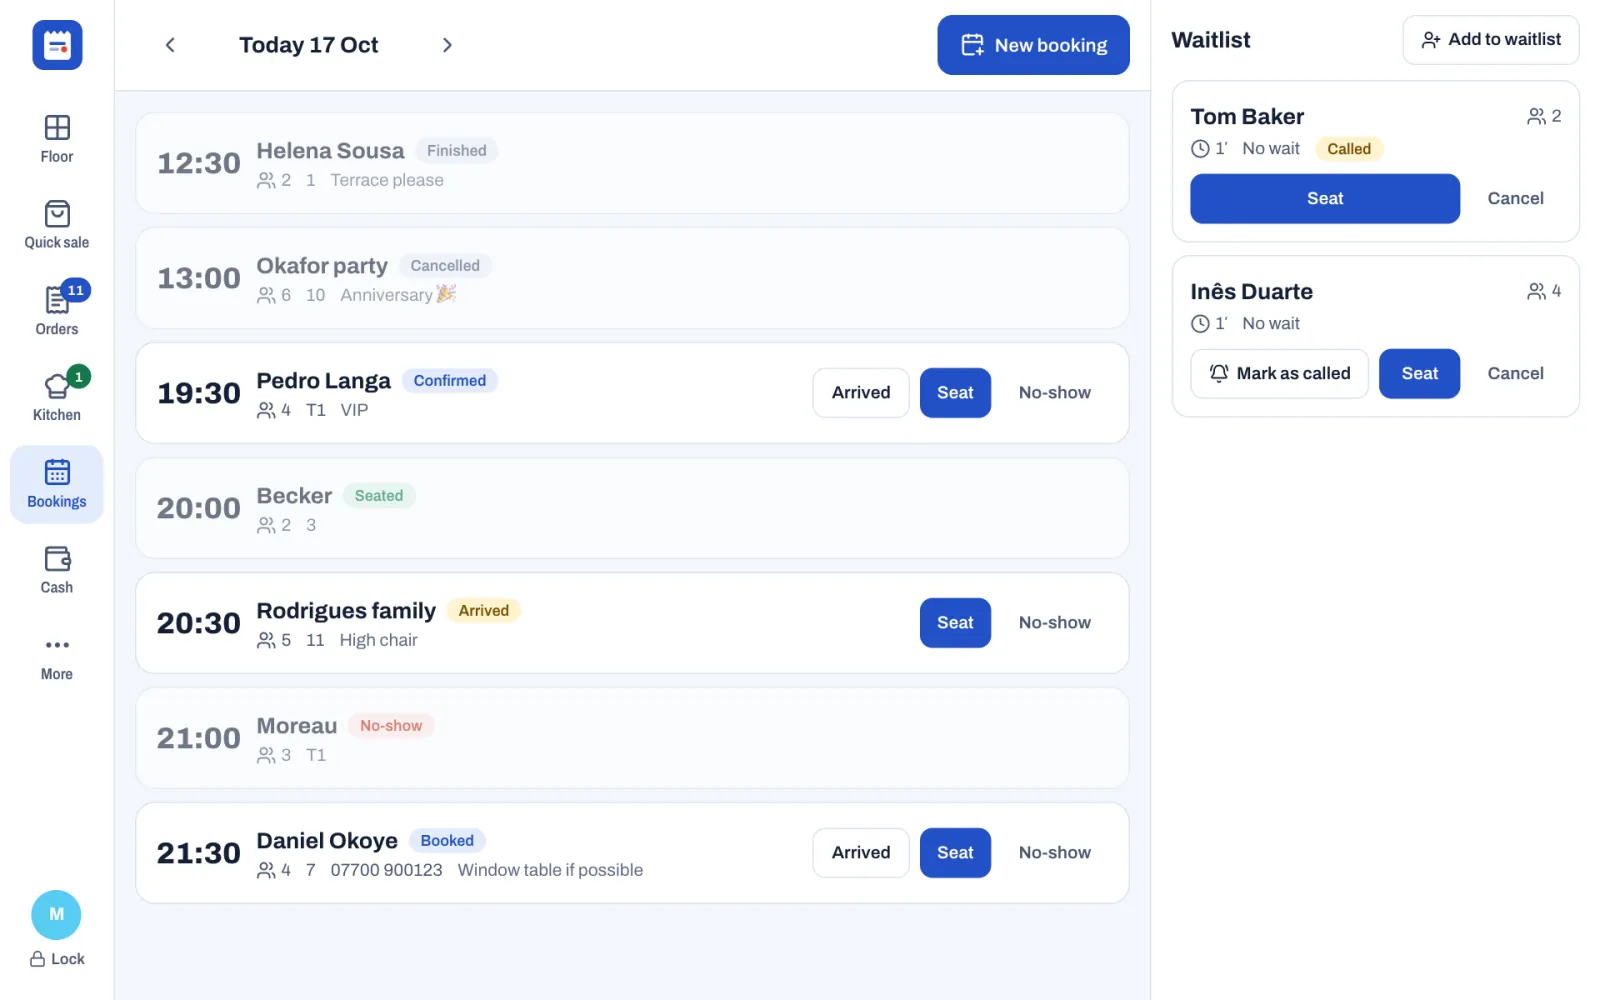
The Bookings screen on the till opens on today. The bookings are in time order, each with its time, the guest's name, a status badge, the party size, the tables, the phone number and the notes. Bookings that are already seated, finished, cancelled or no-shows are greyed out. The Waitlist is on the right, or under the bookings on a phone.
Take a booking on the till
- Tap Bookings. To book another day, tap the arrows on each side of the date until it shows that day.
- Tap New booking.
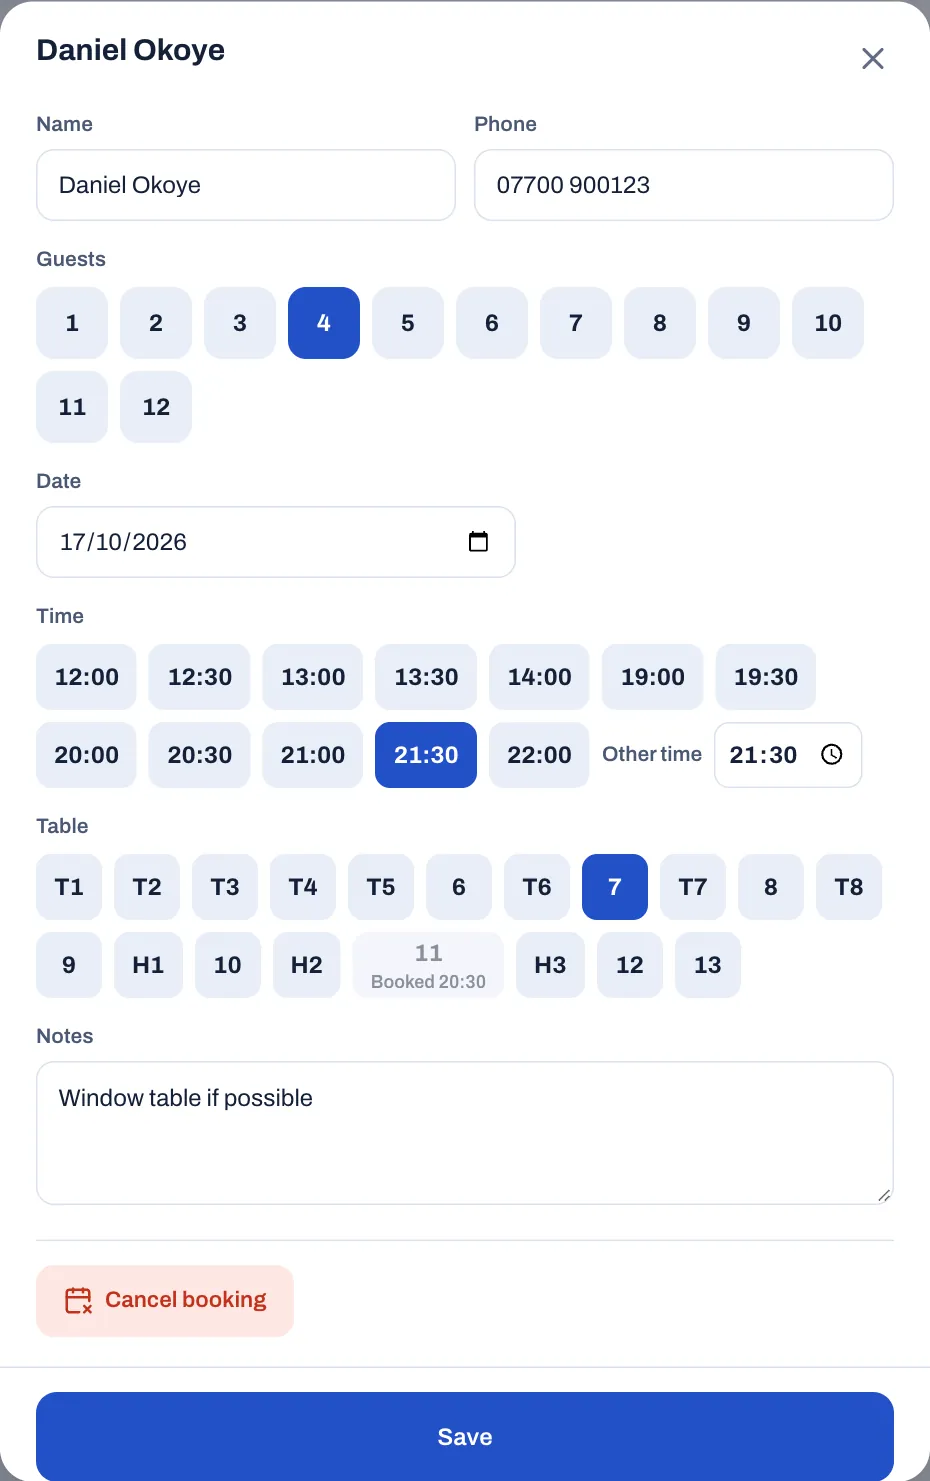
- Type the guest's Name and Phone.
- Under Guests, tap the party size.
- Check the Date. It starts on the day shown on the Bookings screen.
- Under Time, tap the time, or type another time in the Other time box after the times.
- Under Table, tap a table to hold it for them, or leave it empty. Sofrito lists the tables that fit the party. A table already booked at that time shows when, for example "Booked 20:30", and can't be chosen. Tap more than one table for a large party.
- Under Notes, type anything the team should know, for example "High chair" or "Allergic to nuts".
- Tap Save. It works once the booking has a name and a time.
The times and party sizes come from the booking settings. In a new restaurant, the till offers times from 12:00 to 14:00 and from 19:00 to 22:00, every half hour, and parties of 1 to 12. To add an email address or tags, use the back office.
If you change the date or time after choosing a table, and the table is booked at the new time, it turns red and the window says, for example, "Already booked at that time: 7. Choose another table or time." Save stays off until you do. If someone else books the table in the meantime, Sofrito doesn't save the booking and says who has it, for example "That table is already booked for Becker at that time."
Change, move or cancel a booking on the till
To change a booking, tap it in the list, change what you need and tap Save. To move it to another day, change its Date. The till keeps what only the back office edits, such as the link to the guest's profile, the email address, the source, the tags and the table time.
To cancel a booking that is still to come:
- Tap the booking in the list.
- Tap Cancel booking, then Tap again to cancel it.
Sofrito says "Booking cancelled". The booking stays in the list, greyed out, with the badge Cancelled, and its tables are free for other bookings.
Take a booking in the back office
The back office has every detail of a booking.
- Select Bookings, then New booking.
- Under Guest, type the Name, Phone and Email. While you type, Sofrito suggests matching guests under Is this one of your guests?. Select one to link the booking to the guest's profile, with their visits, spend and allergies. See Guests, loyalty and gift cards.
- Under When, set the Party size, the Date and the Time.
- Table time is how long the table is held: 1h 30m in a new restaurant, unless you change it here or in the booking settings. The time it ends shows underneath, for example "Until 22:00".
- Under Source, choose how the booking came in: Phone, Online, Walk-in, Email or Other.
- Under Tables, choose one or more tables, or select the suggestion, for example Use 9: the smallest table that fits and is free at that time. Tables that are already booked at that time can't be chosen.
- Under Notes and tags, add notes and tags such as Birthday, Anniversary, VIP, High chair, Window table or Wheelchair access.
- Turn on Already confirmed with the guest if you have confirmed it. Leave it off if you still need to call or message them.
- Select Create booking.
To change a booking, select it in the Timeline or the List, change what you need and select Save.
Follow a booking from booked to finished
| Status | Meaning |
|---|---|
| Booked | Taken, but not confirmed with the guest yet. |
| Confirmed | You have confirmed it with the guest. |
| Arrived | The guests are here, for example waiting at the bar. |
| Seated | The guests are at their table. |
| Finished | The guests have left. |
| No-show | The guests didn't come. |
| Cancelled | The guest cancelled. |
On the till, a booking that is still to come has three buttons: Arrived (until they have arrived), Seat and No-show.
A seated booking becomes Finished by itself when its check is paid and closed, or voided. If the party split the bill, it finishes with the last of their checks.
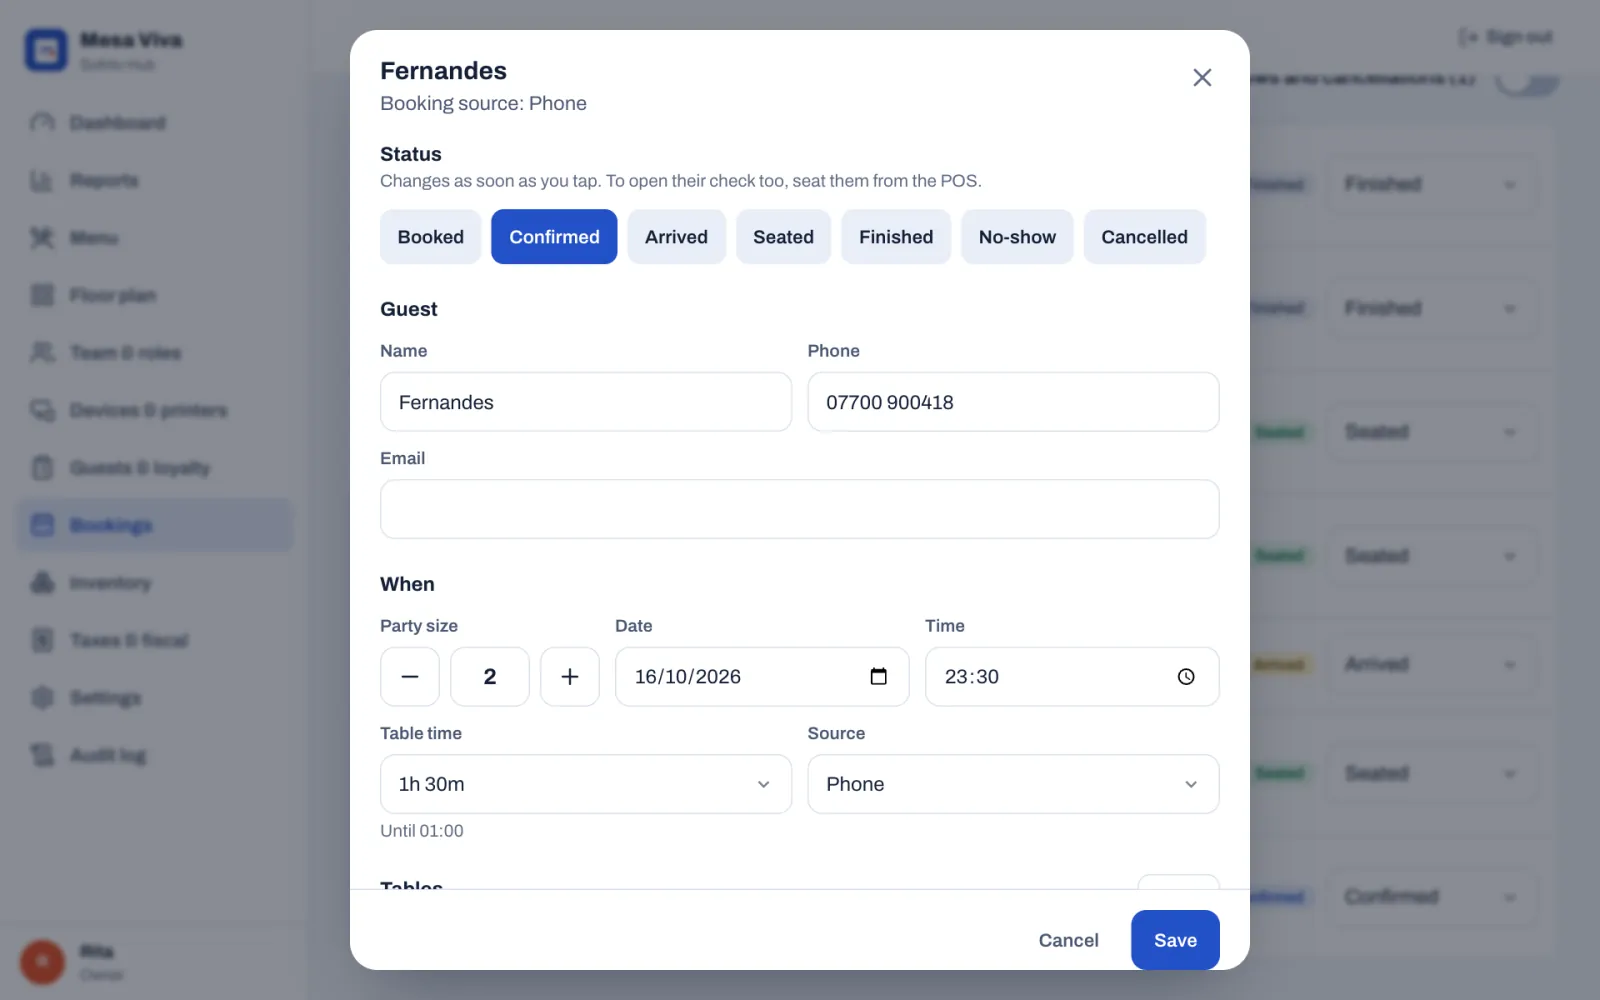
In the back office, open the booking: the Status buttons at the top change it as soon as you select one. In the List view you can also change the status from each row.
A booking holds its tables while it is Booked, Confirmed, Arrived or Seated. Marking it No-show or Cancelled frees the tables for other bookings.
Seat a booking
When the guests arrive:
- On the till, tap Bookings.
- If they wait at the bar first, tap Arrived.
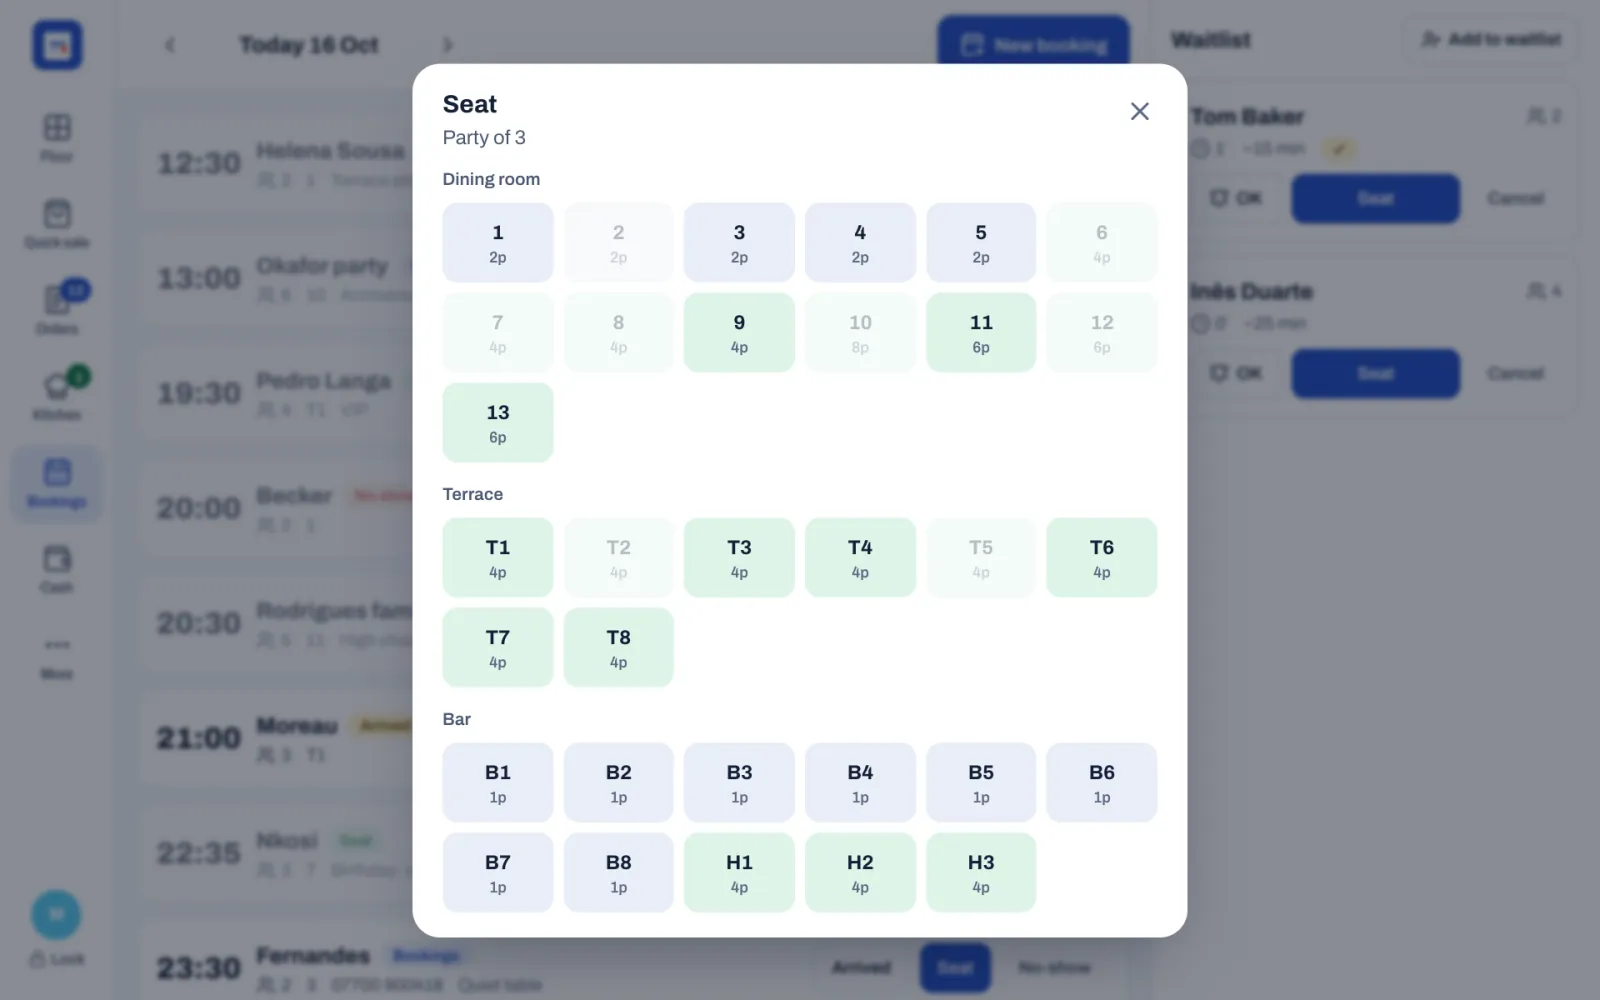
- When their table is ready, tap Seat. The Seat window shows the party size and the tables of each area. Tables in use are greyed out, and the tables big enough for the party are green.
- Tap the table.
Sofrito opens a check on that table with the guest's name and the number of guests, shows the order screen, and marks the booking Seated. If you chose a different table from the one booked, the booking moves to it, and the table it held is free for other bookings. Someone whose role can't take orders, such as a host, stays on the floor plan instead. The booking's notes reach the kitchen with the first ticket of each station, as a note for the whole order. If the booking is linked to a guest's profile, so is the check, and the guest's allergies show on the check and on every kitchen ticket: see Guests' allergies.
Marking a booking Seated in the back office only changes its status. To open the check too, seat the booking on the till.
Mark a no-show
If the guests don't come, tap No-show on the till, or select No-show in the back office. In the back office, a booking that is still Booked or Confirmed 15 minutes after its time shows Late, so you know whom to call.
Keep a waitlist for walk-ins
When the room is full, put walk-ins on the waitlist instead of turning them away.
On the till:
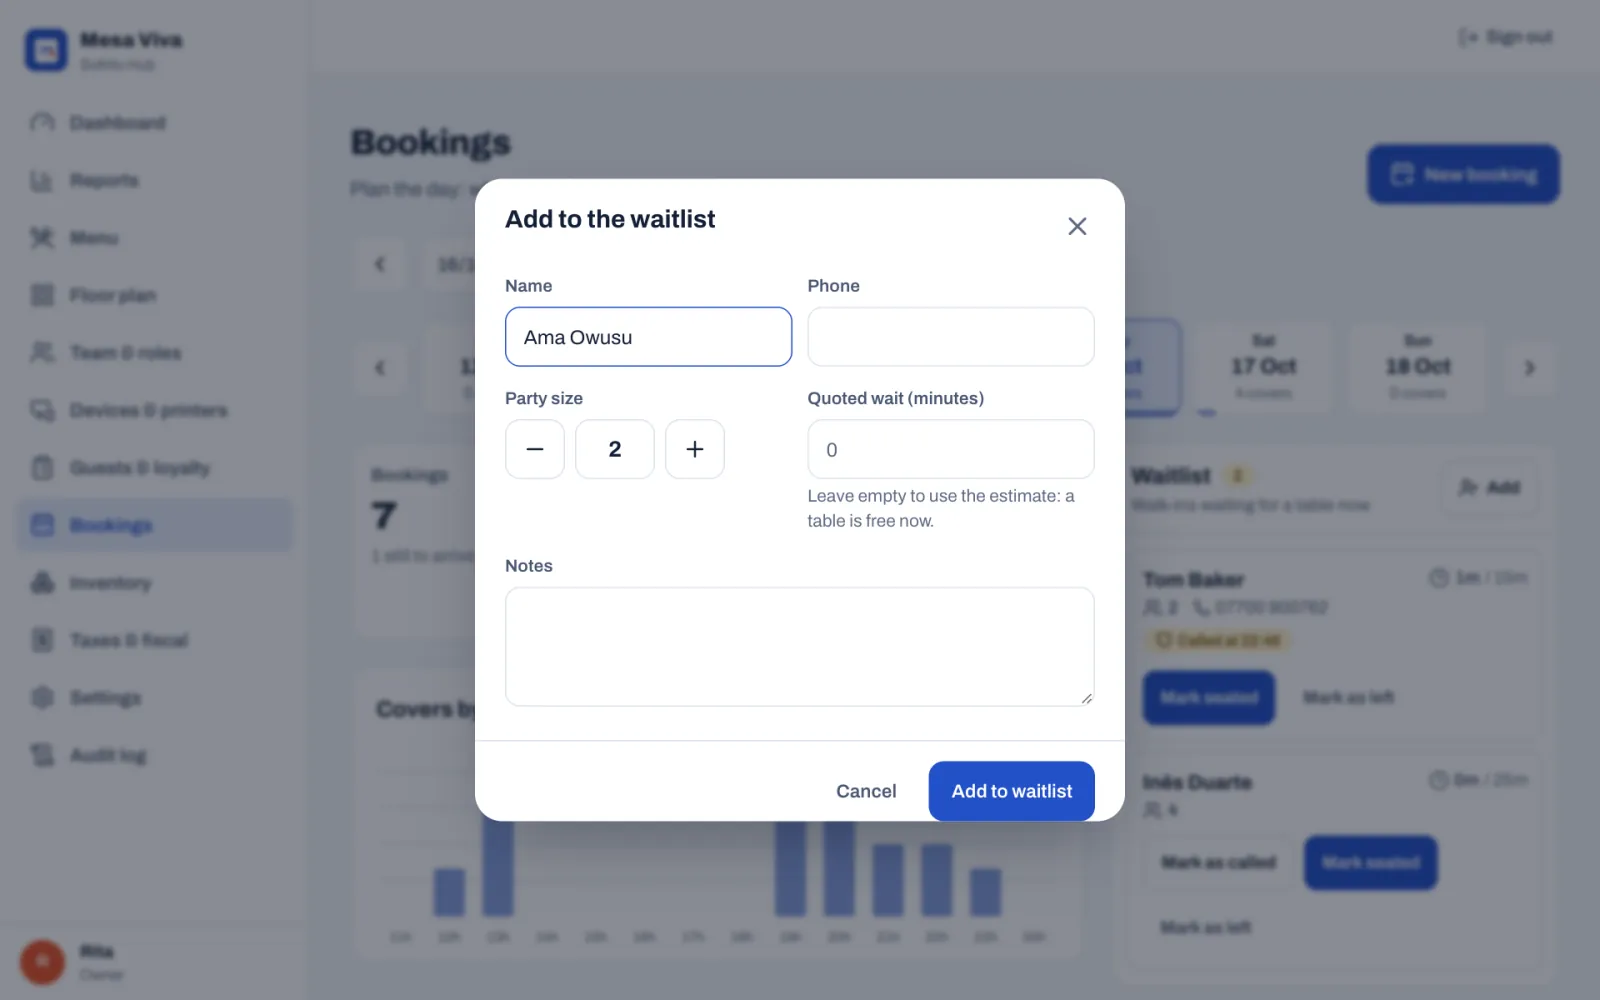
- Tap Bookings, then Add to waitlist.
- Type the guest's Name and Phone.
- Tap the party size, from 1 to 10.
- Tap Add.
Sofrito works out how long they will wait from the parties ahead of them and how long tables have been taking, and shows it as, for example, ~15 min. When enough tables are free, it shows No wait. Each party shows how long it has been waiting.
When a table is about to be free:
- Call or text the guest. Sofrito doesn't send the message for you.
- Tap Mark as called. The button goes, and a Called badge shows that you have called them.
- When they come back, tap Seat and tap the table. Sofrito opens a check on it and goes back to the floor plan.
- If they give up and leave, tap Cancel.
In the back office, the Waitlist is on the Bookings page for today. Add opens Add to the waitlist, where you can also type the Quoted wait (minutes) you gave the guest and Notes. Leave the quoted wait empty to use Sofrito's estimate. Each party shows the minutes waited against the minutes quoted, in red when they have waited longer. Mark as called records the time you called them, for example "Called at 22:46". Mark seated and Mark as left take them off the list, without opening a check.
Plan the day in the back office
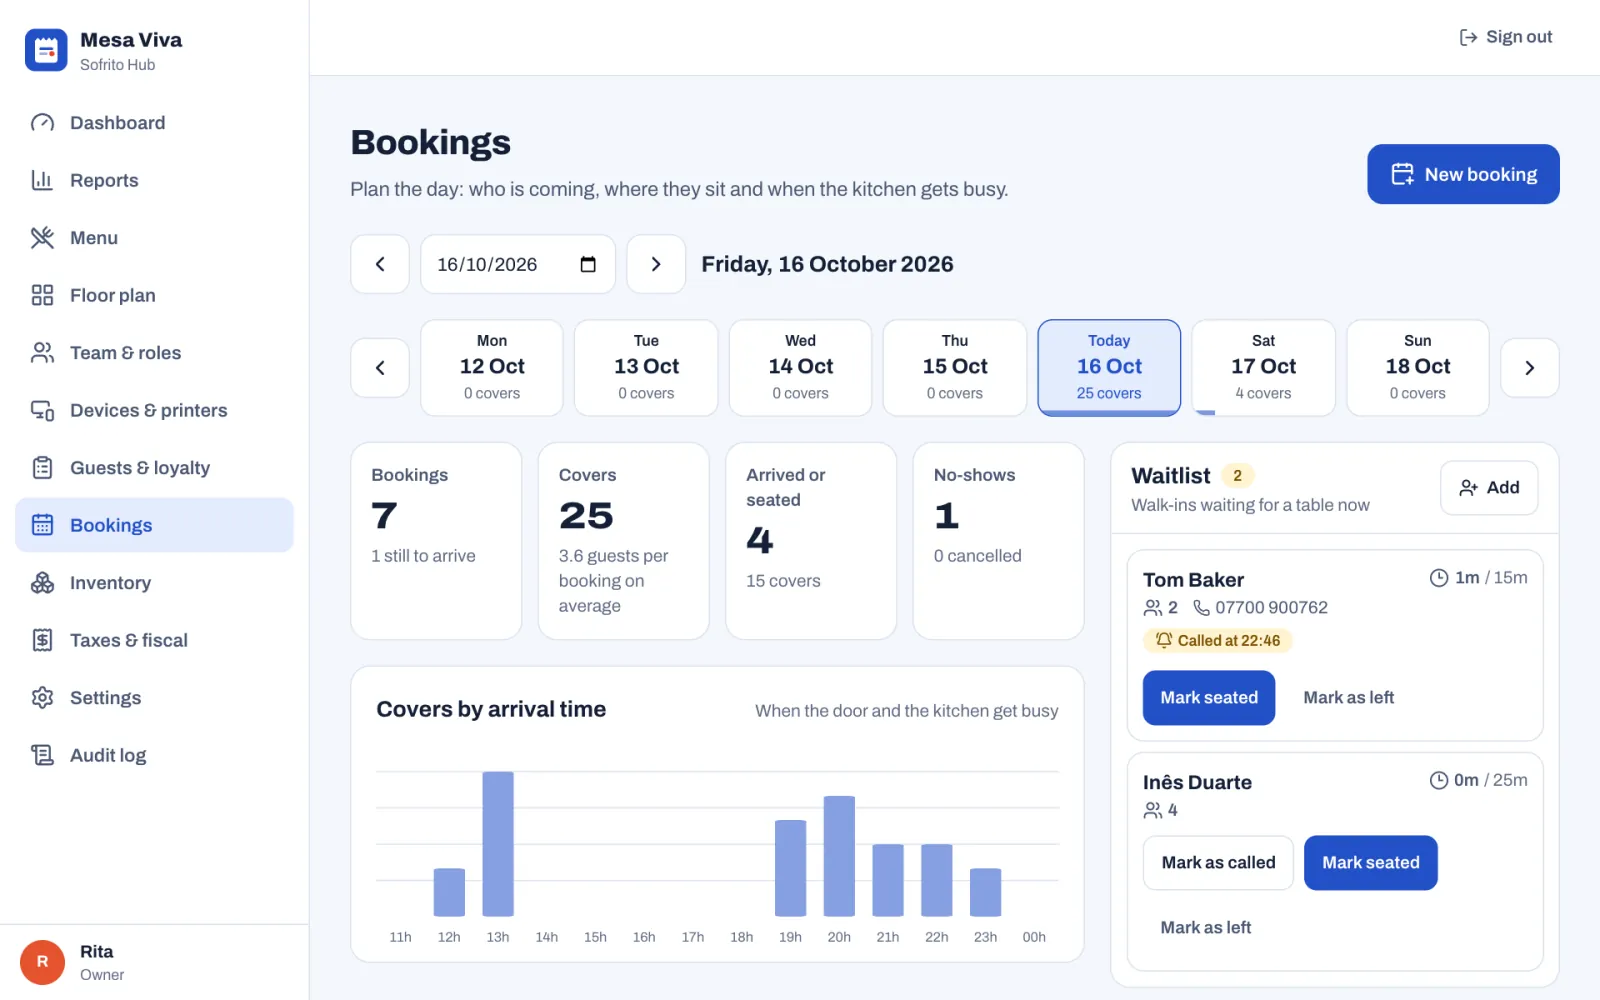
Select Bookings. The page opens on today.
- Choose the day: use the arrows, the date box or the week strip under it, which shows the covers booked for each day. Today takes you back to today.
- The figures: Bookings, with how many are still to arrive; Covers, with the average party size; Arrived or seated, with their covers; and No-shows, with how many cancelled.
- Covers by arrival time: how many guests arrive in each hour, so you can see when the door and the kitchen get busy.
- Waitlist: today's walk-ins, as above.
Under the figures, choose how to see the bookings:
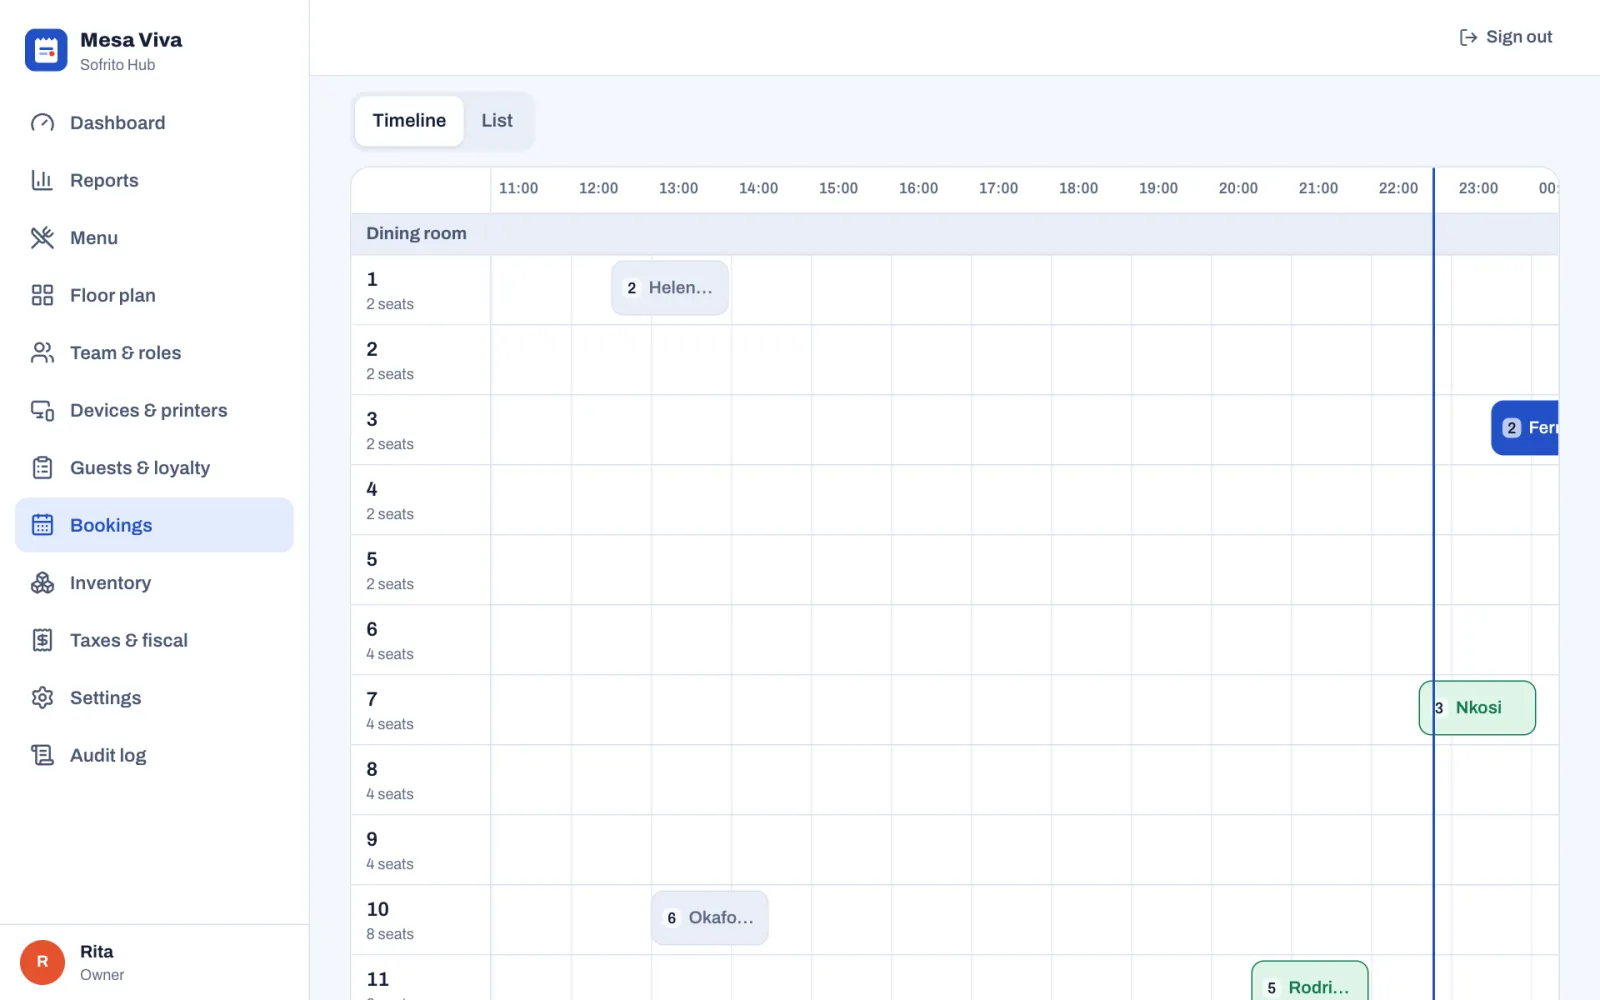
- Timeline: a row for each table, grouped by area, with the hours across the top. Each booking is a bar from its time to the end of its table time, with the party size and the name. A blue line marks the time now, and a red ring marks a late booking. Bookings without a table are in a row of their own at the top, No table yet. Select a bar to open the booking, or select an empty slot to book that table at that time.
- List: every booking in time order, with its time and end time, tags, party size, tables, phone, source and notes, and its status, which you can change from the row. Show no-shows and cancellations adds those to the list.
When Take bookings is off, the page says "Bookings are turned off for this restaurant, so the POS doesn't show them." Select Turn them on in Settings, under Bookings. to go to the booking settings.
Choose your booking times and table times
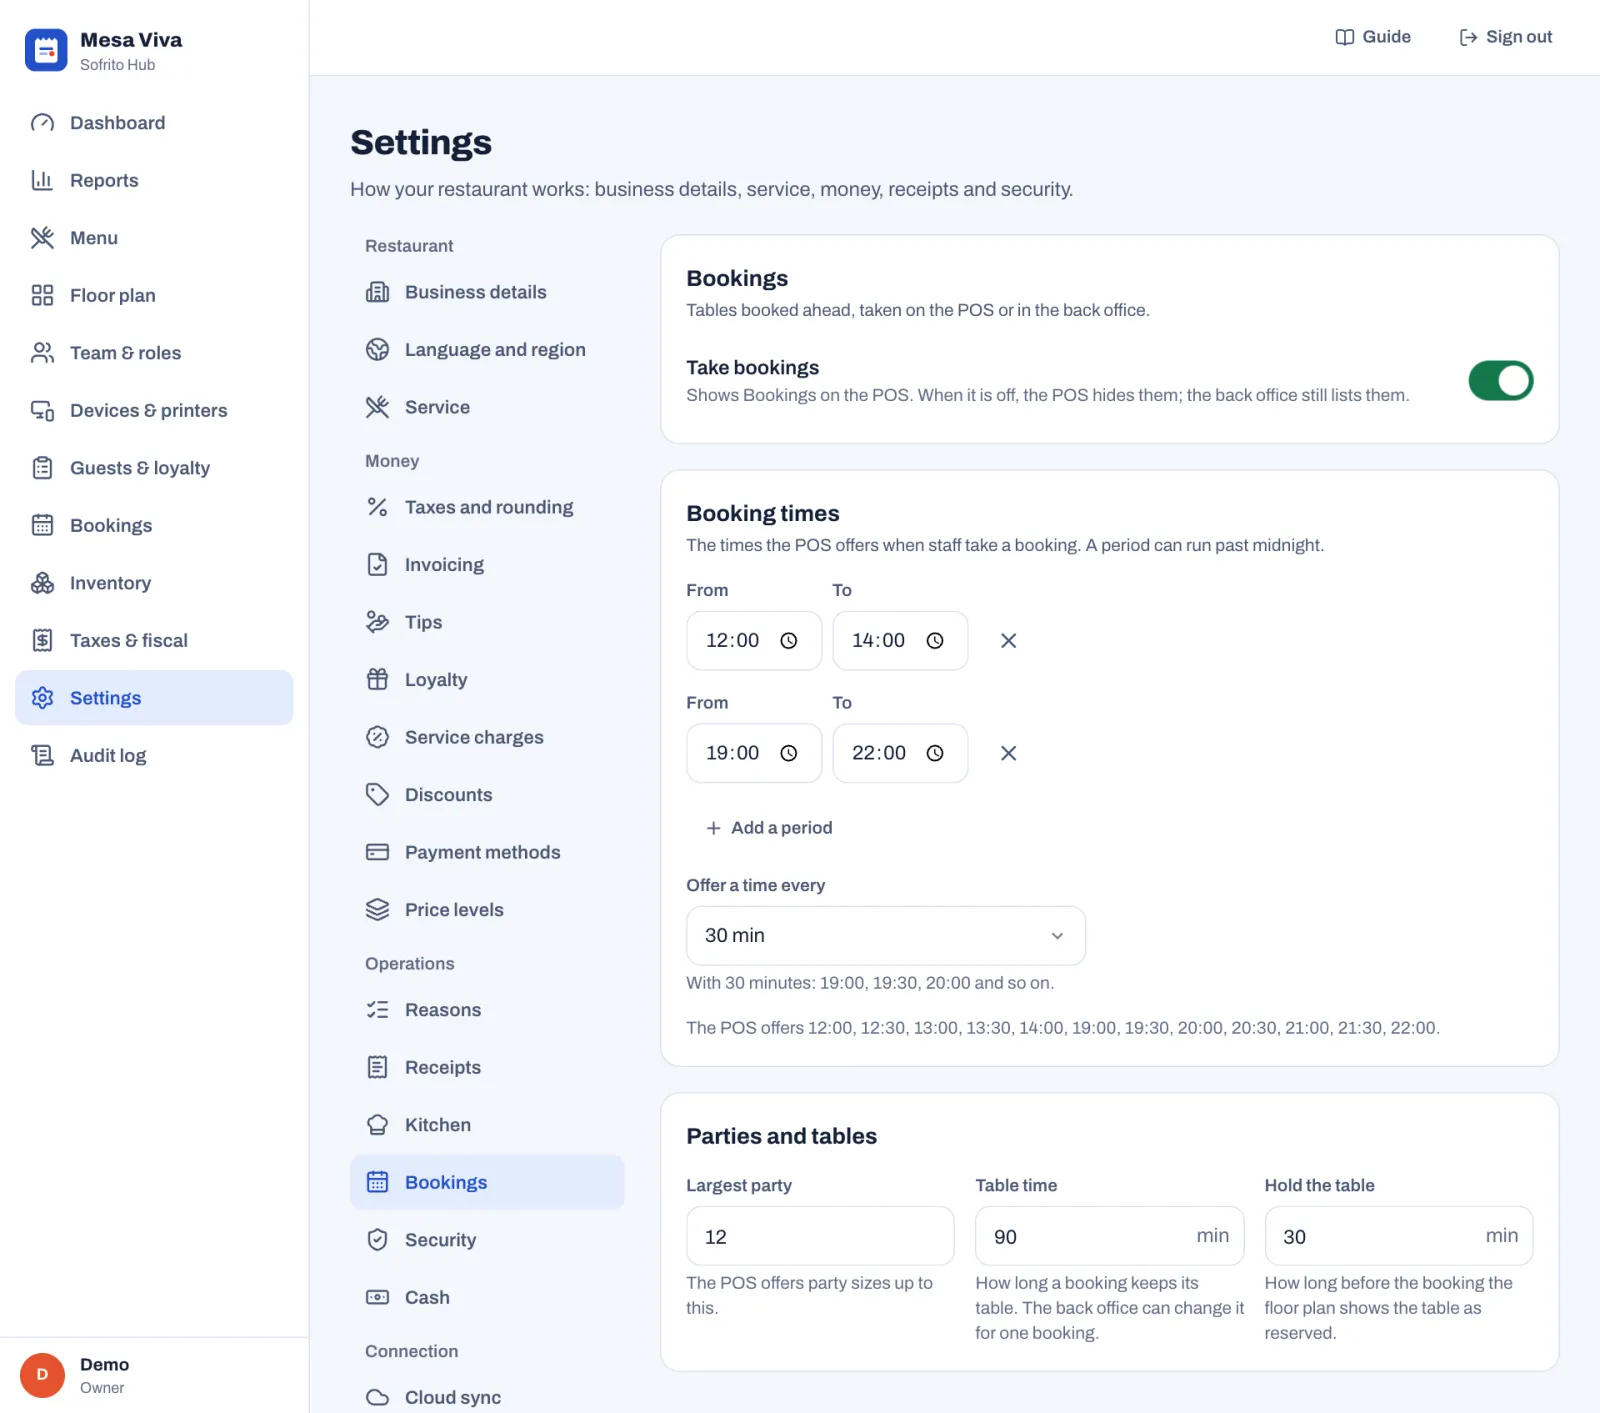
A manager sets how the till takes bookings in Back office › Settings › Bookings, under Operations:
| Setting | What it changes |
|---|---|
| Take bookings | Shows Bookings on the till. When it is off, the till hides it, and the floor plan shows no reserved tables and no Bookings column; the back office still lists bookings. |
| Booking times | The periods the till offers times in, each with a From and a To time. Add a period adds one, and the cross removes it. A period can run past midnight, for example 22:00 to 01:00. With no period, the till offers no times and staff type the time. |
| Offer a time every | 10, 15, 20, 30, 45 or 60 minutes. The line under it shows the times the till offers, for example "The POS offers 12:00, 12:30, 13:00…". |
| Largest party | The party sizes the till offers, up to this number. The back office isn't limited by it. |
| Table time | How long a booking keeps its table: 90 minutes in a new restaurant. The back office can change it for one booking. |
| Hold the table | How long before a booking the floor plan shows its table as reserved: 30 minutes in a new restaurant. |
Select Save changes when you are done. Bookings after midnight belong to the business day until the hour set in Back office › Settings › Language and region › Business day ends at.
Before service
- Look through today's bookings and their notes, and tell the kitchen about large parties and allergies.
- Give every booking a table, so the floor plan shows the table as reserved before the guests arrive, and nobody seats a walk-in there.
- Confirm large parties ahead and set them to Confirmed.
- Use Arrived for guests who wait at the bar, so everyone sees who is in.
- Take a phone number for every walk-in on the waitlist, so you can call them when their table is ready.