Chapters
Guide › Set up
Devices, printers and stations
Every screen that works with Sofrito is a paired device: the till, the servers' handhelds, the kitchen display, the customer display and the pickup board. Printers and cash drawers hang off those devices, and stations decide where each dish goes: a ticket on the kitchen printer, a card on the kitchen display, or both. This chapter is for the owner, a manager or the installer who sets the restaurant up. Everything here is in Back office › Devices & printers.
Before you start
- Decide whether the restaurant runs on Sofrito Cloud or on Sofrito Hub. See Plan your setup.
- Create your restaurant. See Create your restaurant.
- On Sofrito Hub, the devices and the network printers must be on the restaurant network, where they can reach the hub. See Sofrito Hub and working offline.
- Your role needs Manage devices and printers.
Choose what each screen will be
Sofrito calls each kind of device by what it does. You choose the kind when you pair the device, and you can change it later.
| Kind | What it does | Good hardware |
|---|---|---|
| POS terminal (the till) | Tables, orders and payments at the counter or on the floor. | A touch PC, an iPad or an Android tablet, 10 to 15 inches. |
| Handheld | A phone or small tablet servers carry to take orders at the table. | An iPhone, an Android phone, or a handheld terminal such as Sunmi or Senraise. |
| Kitchen display | Kitchen tickets by station. Cooks bump them when they're ready. | A tablet or a screen with a small PC, mounted near the pass. |
| Customer display | Faces the guest and shows the order and the total. | A small tablet or a second screen at the counter. |
| Pickup board | Order numbers being prepared and ready to collect. | A TV or a large screen guests can see while they wait. |
| Print bridge | A computer with the Sofrito desktop app that sends print jobs to network printers. | A computer next to the printers, on the same network. |
Tills and handhelds need staff to sign in with their PIN. The kitchen display, customer display and pickup board work as soon as they are paired. A customer display first asks which till it faces.
On Sofrito Cloud, Pair a new device also offers Sofrito Hub. It is not a screen: it links the restaurant's hub to Sofrito Cloud, and never prints. See Link the hub to Sofrito Cloud.
Pair a new device
Pairing connects a device to your restaurant with a one-time code. In the back office:
- Select Devices & printers.
- Select Pair a new device.
- Choose what the new device will be, for example Handheld.
- Optional: type a Device name, such as "Bar phone". It helps you tell devices apart in the list.
- Select Create pairing code.
Sofrito shows a 6-character code, a QR code and the address of your server. The code works once and expires after 15 minutes. If it expires, select Create a new code.
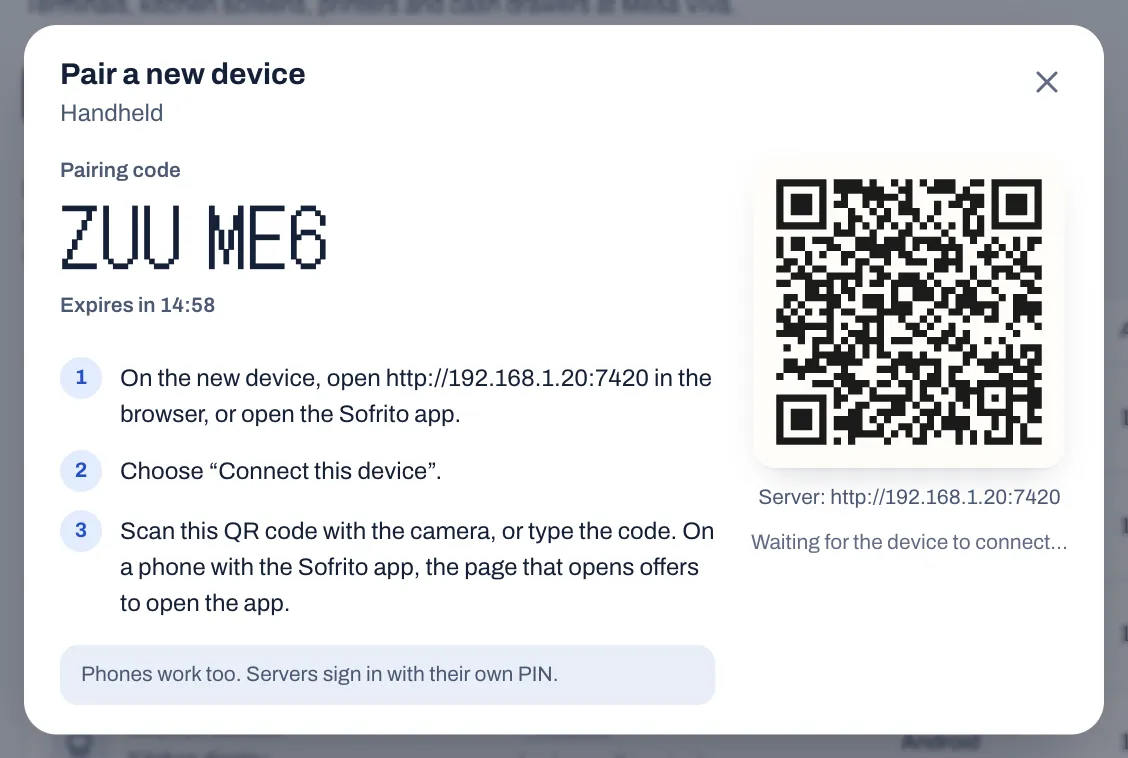
The quickest way is to scan the QR code with the new device's camera. It opens the pairing page with the code already filled in:
- On a computer, the device connects straight away.
- On a phone or a tablet, the page first offers Open in the Sofrito app. Tap it if the Sofrito app is installed: the app opens with the code. To use the browser instead, tap Connect.
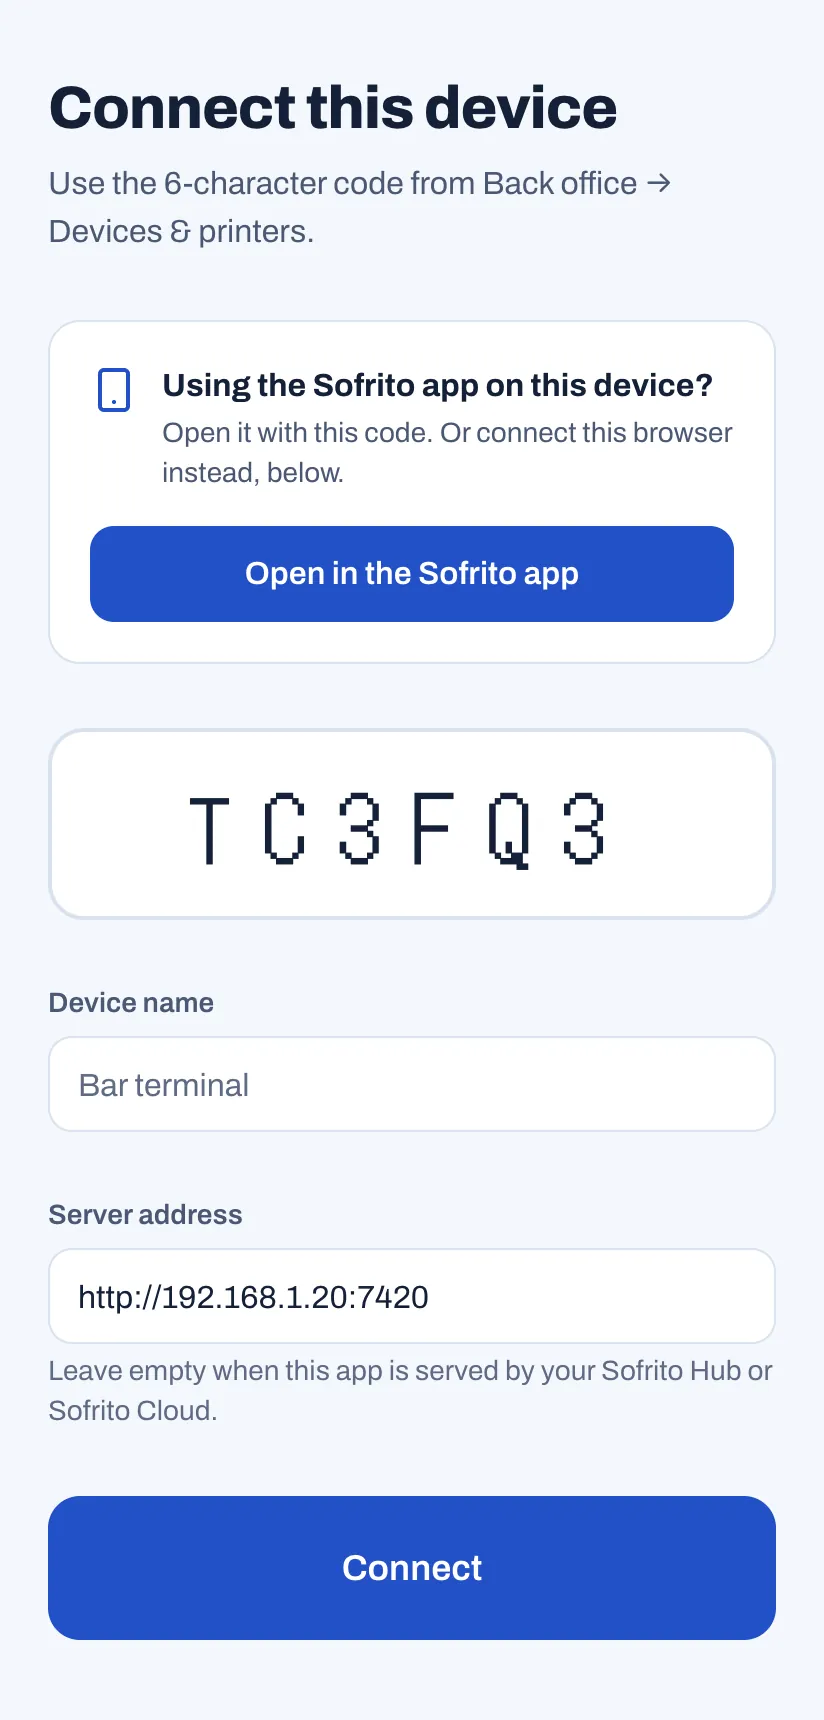
To type the code instead:
- On the new device, open the Sofrito app, or the server address in the browser.
- Choose Connect this device.
- Type the 6-character code.
- Optional: type a Device name.
- Tap Connect.
If the device asks where your restaurant is, tap Server address and type the address shown under the QR code.
When the device connects, the back office says, for example, "Bar phone is connected". Select Set it up to choose its printer and other settings now (for a customer display, the till it faces), Pair another device, or Done.
See which devices are online
Select Devices & printers › Devices. The list shows each device's name and kind, whether it is Online or Offline (with when it was last seen), its Platform and its App version. This device marks the one you are using. In the demo restaurant, its kitchen display, Kitchen pass, shows Demo screen and Part of the demo: no device connects to it, but tickets wait on it as on a real screen.
A kitchen display that hasn't connected for over a day, while stations still send it their tickets, shows Tickets wait on it. Those tickets are never marked served, and they show as late. Select the display to see which stations, then switch it back on, or revoke it if it is no longer used (see Remove a device).
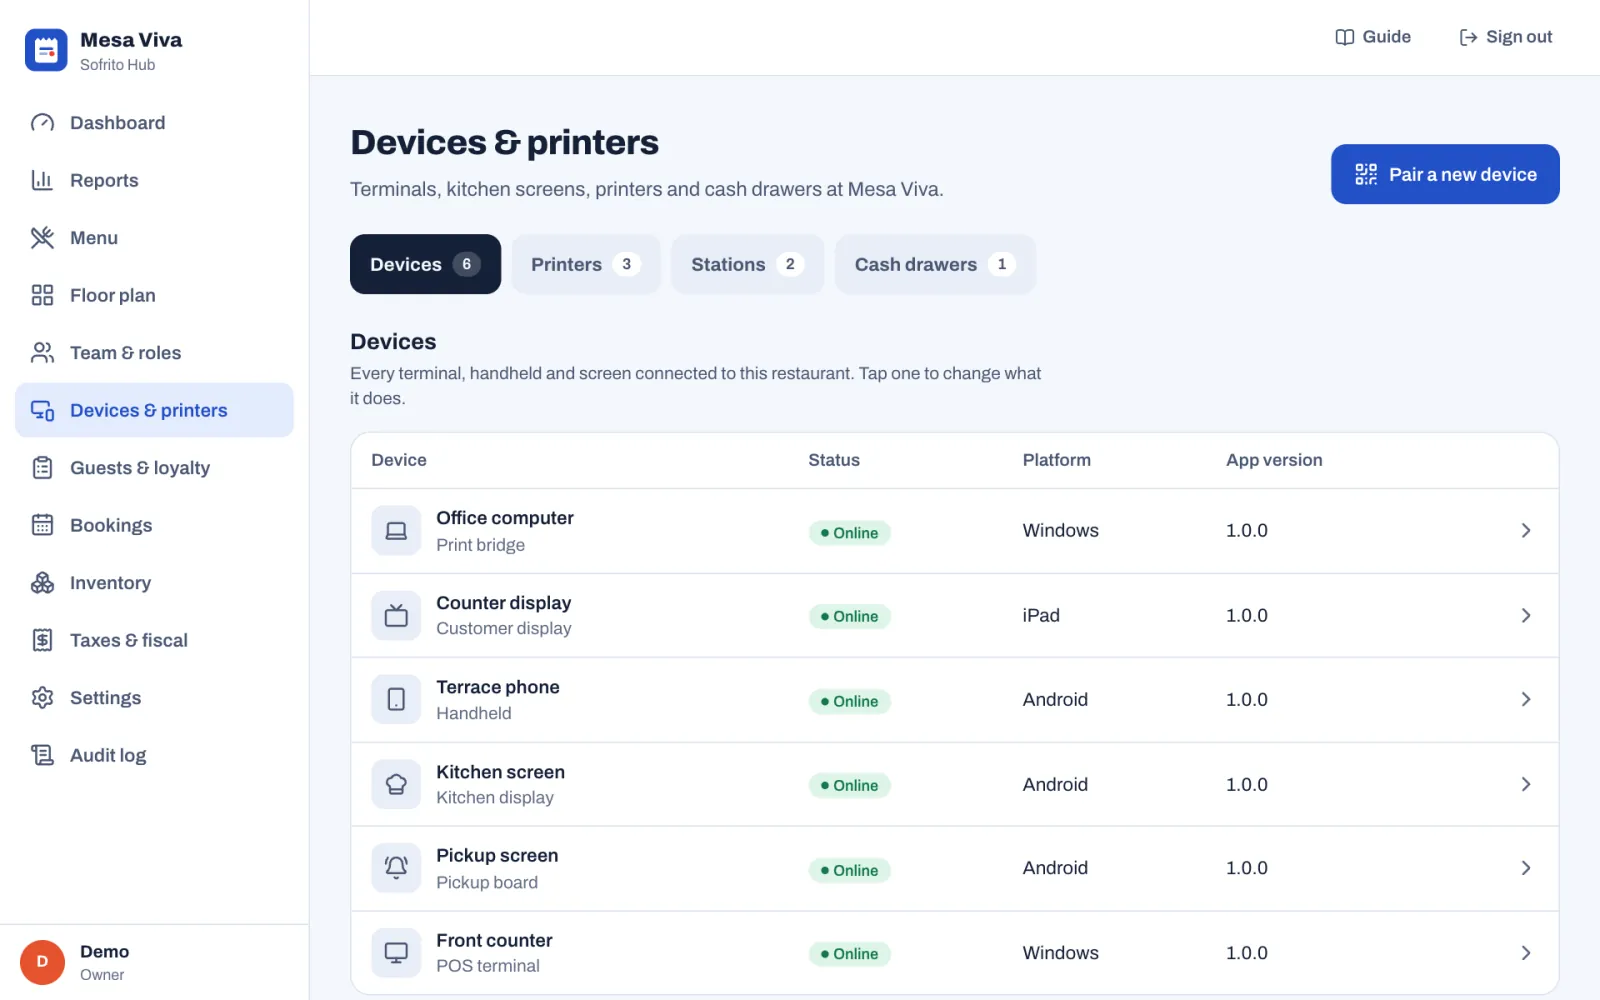
Set up a till or a handheld
- In Devices & printers › Devices, select the device.
- Change the Device name if you need to.
- Under Receipt printer, choose where receipts and checks from this device print. Restaurant default uses the first receipt printer in your list.
- For a till, choose its Cash drawer. Automatic uses the drawer assigned to this till under Cash drawers, or else the first drawer.
- Under Area shown first, choose the part of the floor plan the device opens on, for example the terrace for the terrace handheld.
- Select Save.
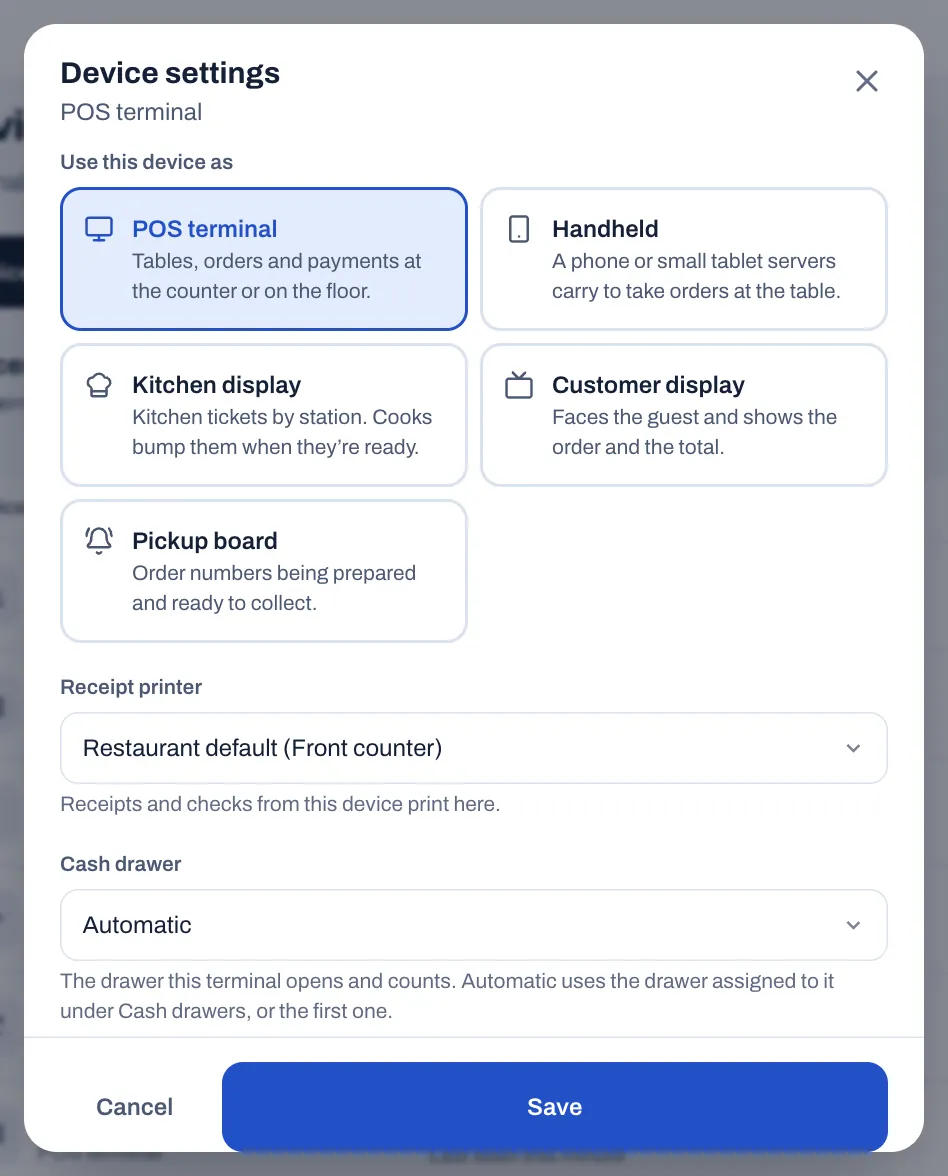
For a kitchen display, the same window has Stations on this screen: choose All stations, or only the stations this screen shows. For a customer display, it has Faces the till (see Use the customer display and the pickup board). A pickup board has nothing else to set up. If you have more than one restaurant, Restaurant moves the device to another one.
Repurpose a screen
Any till, handheld, kitchen display, customer display or pickup board can become one of the others. In the back office:
- In Devices & printers › Devices, select the device.
- Under Use this device as, choose the new kind.
- Select Save.
The screen switches over as soon as you save. A manager can also do it on the device itself: sign in, tap More, and under Use this screen as tap Kitchen display, Customer display or Pickup board.
To turn a screen back into a till:
- Pickup board: press and hold the logo for 2 seconds.
- Customer display: press and hold the restaurant's logo for 2 seconds, then tap Use this screen as a point of sale.
- Kitchen display: press and hold the logo for 2 seconds. The screen asks "Use this screen as a point of sale? Kitchen tickets stop showing on it.": tap Switch to point of sale, or Cancel. Or tap the settings button at the top right (Screen settings), then Use this screen as a point of sale, then Switch to point of sale.
The screen then shows the PIN pad, so it grants nothing until someone signs in.
Use the customer display and the pickup board
The customer display faces one till or handheld, and shows guests the order open on it. To choose which:
- In Devices & printers › Devices, select the customer display.
- Under Faces the till, choose the till or handheld. Until you do, it says Not chosen yet: the screen asks.
- Select Save.
You can also choose on the display itself. Until a till is chosen, it asks "Which till does this screen face?": tap the till. To change it later, press and hold the restaurant's logo for 2 seconds and tap Choose another till.
Between orders, the display shows the restaurant's logo and name with a welcome message. While an order is open on its till, it shows the items that have been sent or saved and the total to pay. On a new counter order, the items appear when you tap Pay. Once the order is paid, it shows "Thank you!". To change the greeting, select Settings › Service and type a Welcome message under Customer display.
The pickup board shows the number of every order that isn't eaten in: under Preparing while the kitchen works on it, and under Ready when it can be collected. A ready number stays up for 15 minutes or until staff mark the order collected, and the board chimes when a new order is ready. For how orders move to Ready, see Counter, takeaway and pickup.
Remove a device
Do this when a device is lost, stolen or replaced.
- In Devices & printers › Devices, select the device.
- Select Revoke access, then Tap again to revoke.
The device signs out at once and needs a new pairing code to connect again.
On the device itself, a manager can tap More, then Unpair this device, then tap again to confirm. It does the same as Revoke access. Only people with Manage devices and printers see that button.
Add a printer
A new restaurant starts with three printers that print on screen only: Front counter for receipts, and Kitchen and Bar for the two stations. Everything works with them before your hardware arrives. When a real printer arrives, you can open the matching printer and change How it connects: the stations and the cash drawer that use it stay as they are. To add another printer:
- Select Devices & printers › Printers.
- Select Add printer.
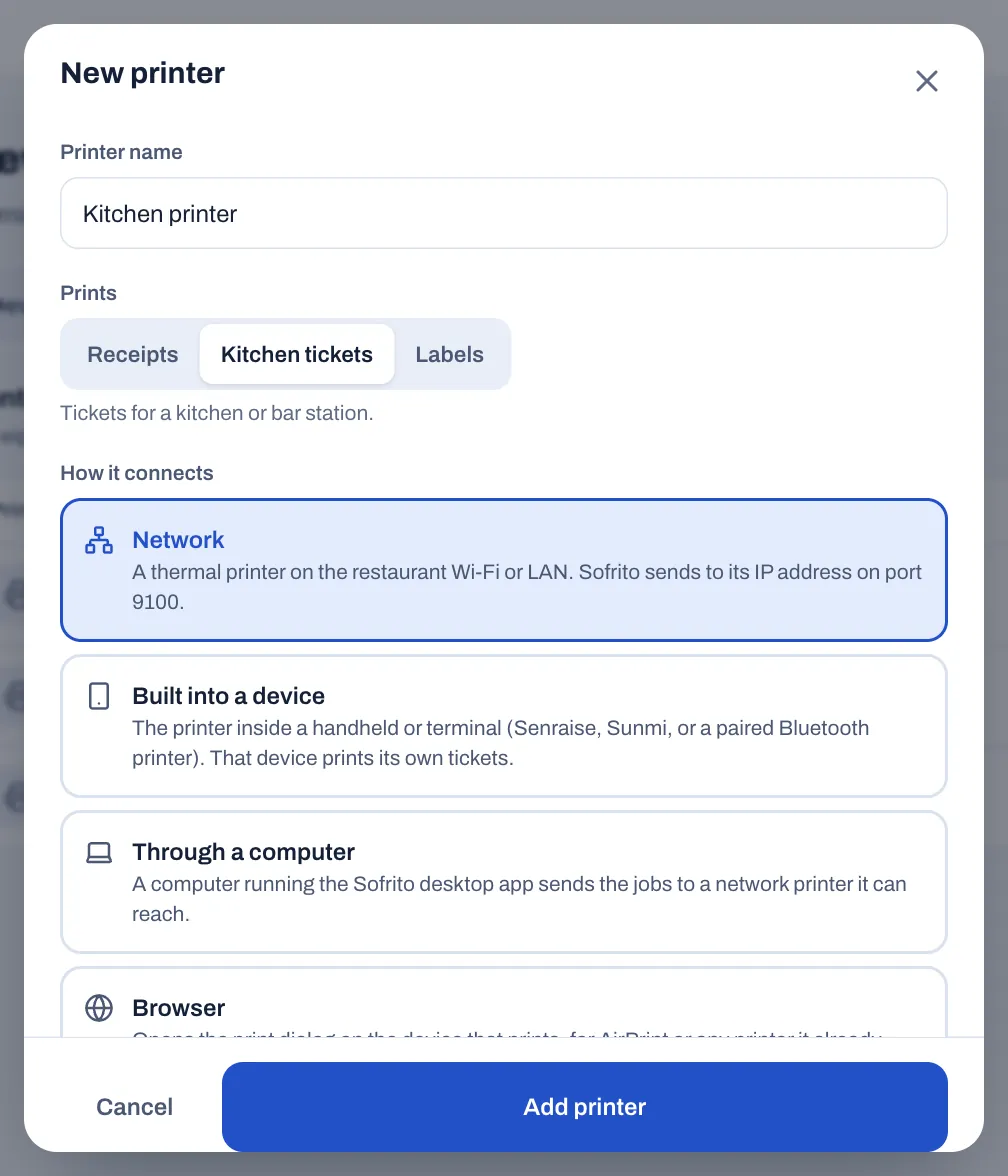
- Type a Printer name, such as "Kitchen printer".
- Under Prints, choose Receipts (receipts, checks and reports at the counter), Kitchen tickets (tickets for a kitchen or bar station) or Labels (sticky labels for takeaway and delivery items).
- Under How it connects, choose the connection. The next sections explain each one.
- Choose the Paper width: 80 mm or 58 mm.
- Check the Printing options (see Choose the printing options).
- Select Add printer.
- Select Print test page on the printer's row.
Sofrito prints ESC/POS, the language of almost every thermal receipt and kitchen printer. A receipt printer prints receipts and checks for the devices that use it. A kitchen printer prints tickets for the stations that use it (see Send each dish to the right station).
A printer on the network
Choose Network for a thermal printer on the restaurant Wi-Fi or cable network. Sofrito sends to its IP address on port 9100.
- Type the printer's IP address, for example 192.168.1.50. To find it, print the printer's self-test page: usually you hold the feed button while you switch the printer on. If the port isn't 9100, add it after a colon.
- On Sofrito Hub, you can select Find printers on the network instead. Sofrito lists the addresses that answer on port 9100: tap the right one.
- Leave Printed by on Sofrito Hub (this server). Choose a print bridge only if the printer is on a network the hub can't reach.
On Sofrito Cloud, the cloud can't reach your restaurant network, so a print bridge in the restaurant sends the jobs. Leave Printed by on Any print bridge, or choose one computer. See Print through a computer.
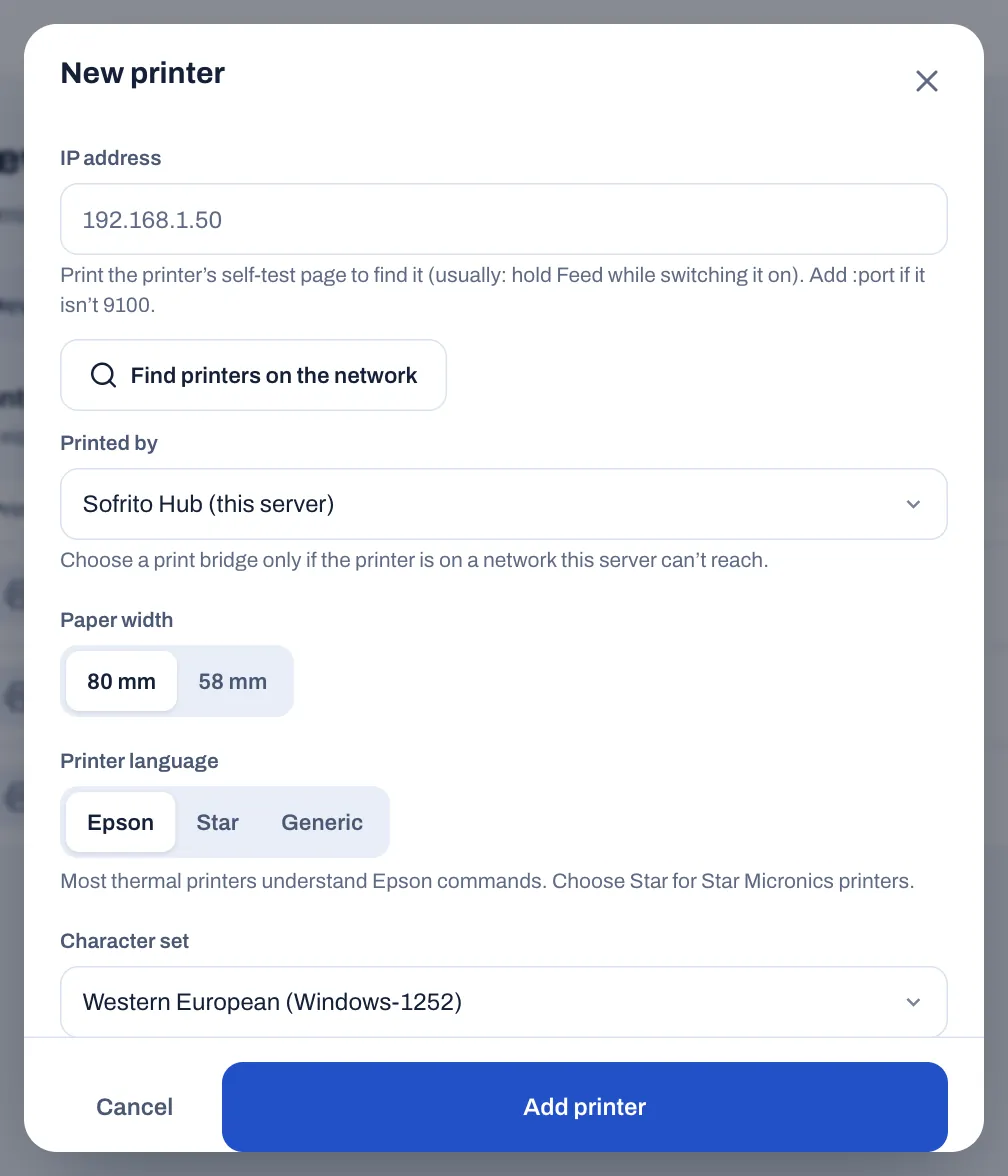
For network printers, two more settings appear:
- Printer language: most thermal printers understand Epson commands. Choose Star for Star Micronics printers.
- Character set: change it only if accented letters or the euro sign print wrong. The choices are Western European (Windows-1252), Western European with euro sign (CP858), Multilingual Latin (CP850), Portuguese (CP860) and US English (CP437).
A printer built into a handheld or terminal
Some handhelds and terminals have a printer inside: Senraise handhelds, Sunmi devices, or a handheld paired with a Bluetooth printer. They print their own tickets through the Sofrito Android app. Sofrito draws each ticket as a picture the width of the paper, so accents, sizes and columns print the same on every make.
- Pair the handheld or terminal first (see Pair a new device).
- In Devices & printers › Printers, select Add printer.
- Type a name and choose what it Prints, usually Receipts.
- Under How it connects, choose Built into a device.
- Under Device, choose the handheld or terminal.
- Under How it prints, leave Find it automatically (recommended). It tries the Senraise print service, then the Sunmi print service, then a paired Bluetooth printer. Choose Senraise print service, Sunmi print service or Paired Bluetooth printer only if the automatic choice picks the wrong one.
- For Paired Bluetooth printer, leave Bluetooth address empty to use the paired printer (Sunmi's InnerPrinter first), or type the address of one printer, like 00:11:22:33:44:55.
- Check the Paper width. Built-in printers start at 58 mm.
- Select Add printer.
A receipt printer built into a device becomes that device's receipt printer, unless the device already has one. In that case, change Receipt printer in the device's settings.
A manager can also do this on the device itself, in the Sofrito Android app:
- Sign in on the device and tap More.
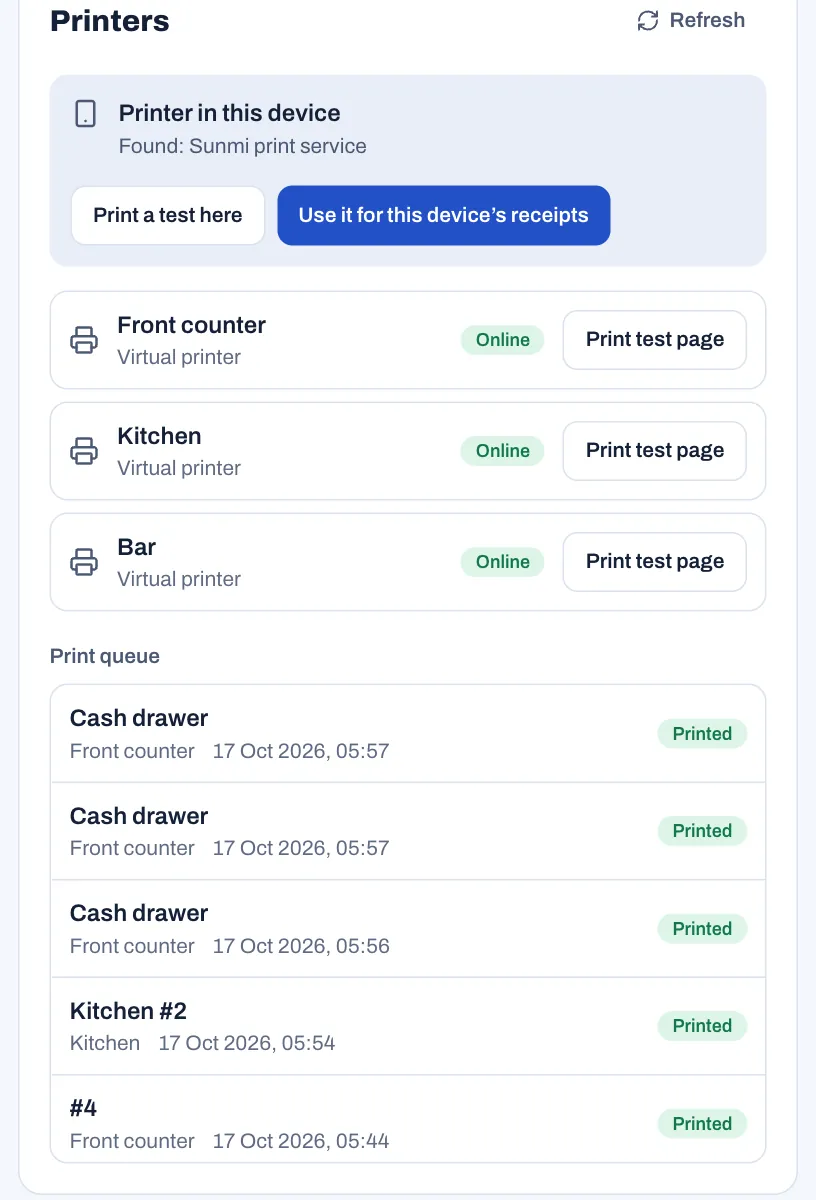
- Under Printers, the Printer in this device panel says what Sofrito found, for example "Found: Sunmi print service".
- Tap Print a test here to check the printer. This prints straight to it, without the server.
- Tap Use it for this device’s receipts. The panel then says "Receipts from this device print here."
If the panel says, for example, "Receipts from this device print on Front counter.", the printer is added but this device's receipts go elsewhere: tap Use it for this device’s receipts to bring them back. Staff without Manage devices and printers see the panel and can print a test, but can't change where receipts print.
Print through a computer
A print bridge is a computer in the restaurant that runs the Sofrito desktop app and sends print jobs to network printers. You need one on Sofrito Cloud, which can't reach your restaurant network. On Sofrito Hub, the hub prints by itself: use a print bridge only for a printer on a network the hub can't reach. A print bridge sends to printers on the network only, not to a printer plugged into the computer by USB.
To set it up:
- In Devices & printers, select Pair a new device, choose Print bridge and select Create pairing code.
- On the computer next to the printers, install the Sofrito desktop app and open it.
- On Connect to your restaurant, type the Server address shown under the QR code and choose Connect, or choose Use Sofrito Cloud.
- Choose Connect this device, type the Pairing code and choose Connect.
The computer then shows the Print bridge screen: its name, the restaurant, Connected, and "Ready. Print jobs go out as they arrive." Below are Problems (printers that are offline, and jobs that didn't print in the last hour, with the reason), the Printers it sends to, and Recent print jobs. Keep Sofrito open on that computer during service.
Then choose, for each printer, how the computer reaches it:
- A network printer: open the printer and, under Printed by, choose the computer. On Sofrito Cloud, Any print bridge also works.
- A printer only that computer can reach: under How it connects, choose Through a computer. Under Computer, choose the computer you paired. Under Printer address on that computer, type the printer's IP address or network name, as that computer reaches it, with
:portafter it if the port isn't 9100. The address is required.
Select Print test page on each printer. The computer's device settings list the printers it serves under Printers sent through this computer.
A Star CloudPRNT printer (Sofrito Cloud only)
Star printers with CloudPRNT collect their jobs from Sofrito Cloud over the internet, so no hub and no computer are needed. This choice appears only on Sofrito Cloud.
- Add the printer and choose Star CloudPRNT.
- Select Add printer.
- Open the printer again. Under Printer setup, select Copy next to the server address.
- On a computer on the same network, open the printer's web page from its IP address. Go to CloudPRNT, switch it on and paste the server address.
- Set the polling interval to 5 seconds, so tickets come out quickly.
The printer needs internet access. Logos don't print on CloudPRNT printers.
The browser's print dialog
Choose Browser to print through the device's own print dialog, for AirPrint or any printer the device already knows. The print dialog opens on the device that sent the job, and someone has to confirm it each time. It suits a small café with one iPad. A cash drawer can't be opened through a browser printer.
A printer on screen only
Choose Virtual for demos and training. Nothing comes out of a printer: the tickets appear in the print queue under More › Printers on a till or a handheld, where you tap one to see it.
Choose the printing options
Open a printer to change these. They depend on how the printer connects.
| Option | What it does |
|---|---|
| Paper cut | Partial, Full or No cut after each ticket. |
| Beep when a ticket prints | Handy in a noisy kitchen. The printer needs a buzzer. It is on for printers that print Kitchen tickets until you turn it off. |
| Copies | Prints every job from this printer 1 to 5 times. Receipts also follow Copies in Settings › Receipts: the higher of the two counts. A reprint is always one copy. |
| Blank lines before the cut | Paper fed before the cut, so the last line clears the tear bar. |
| Characters per line | Leave empty to match the paper width: 48 characters on 80 mm, 32 on 58 mm. Change it only if lines wrap or stop short. |
| Cash drawer connector | For receipt printers with a cash drawer. Most drawers use Pin 2. Try Pin 5 if the drawer doesn't open. |
| Backup printer | If this printer is offline, its jobs go to the backup instead. Sofrito tries this printer again a minute later and goes back to it once it prints. Test pages and the cash drawer always use the printer itself. |
When you open a printer that is in use, Sofrito lists what uses it: stations, devices, cash drawers and other printers that use it as a backup. To remove a printer, select Delete printer, then Tap again to delete.
Test a printer and follow the print queue
Print test page prints a test from the saved settings, so save first if you changed something. The test page checks the connection, the paper width and the accents. It always goes to the printer itself, never to its backup.
In Devices & printers › Printers, each printer shows its status: Online, Offline, Error or Not checked, with the reason when there is a problem, for example "Out of paper.". A virtual printer shows On screen only and a browser printer Print dialog.
When a printer goes offline during service, every till and handheld shows a warning in its own language, for example "Kitchen is offline" with the reason. The device that sent a job that didn't print also shows, for example, "Kitchen #12 didn’t print on Kitchen", with Reprint.
On a till or a handheld, tap More. On a phone or a handheld, More is always the last button of the bottom bar, and it also lists the sections that don't fit in the bar, such as Cash or Bookings, as buttons at the top. The Printers card lists every printer with its status and a Print test page button. Under Print queue, the latest jobs show as Queued, Sending, Printed, Failed or Cancelled. A failed job shows why it didn't print and has Reprint: it prints once more, and the failed job then shows Cancelled. Tap a job to see what it looked like. Refresh at the top of the card updates the list.
Send each dish to the right station
A station is a place where food or drinks are made, such as the kitchen, the bar or the pizza oven. Each dish is sent to one or more stations, and each station sends its tickets to its printers, its kitchen screens or both. A new restaurant starts with two stations, Kitchen and Bar.
- Select Devices & printers › Stations.
- Select Add station, or select a station to change it.
- Type the Station name, such as "Grill".
- Pick a Colour. Kitchen screens show it so cooks spot their tickets.
- Under Tickets print on, tick the printers that print this station's tickets. Pick none if the station only uses kitchen screens.
- Leave Show on kitchen screens on if the station's tickets should wait on the kitchen displays.
- Select Add station or Save.
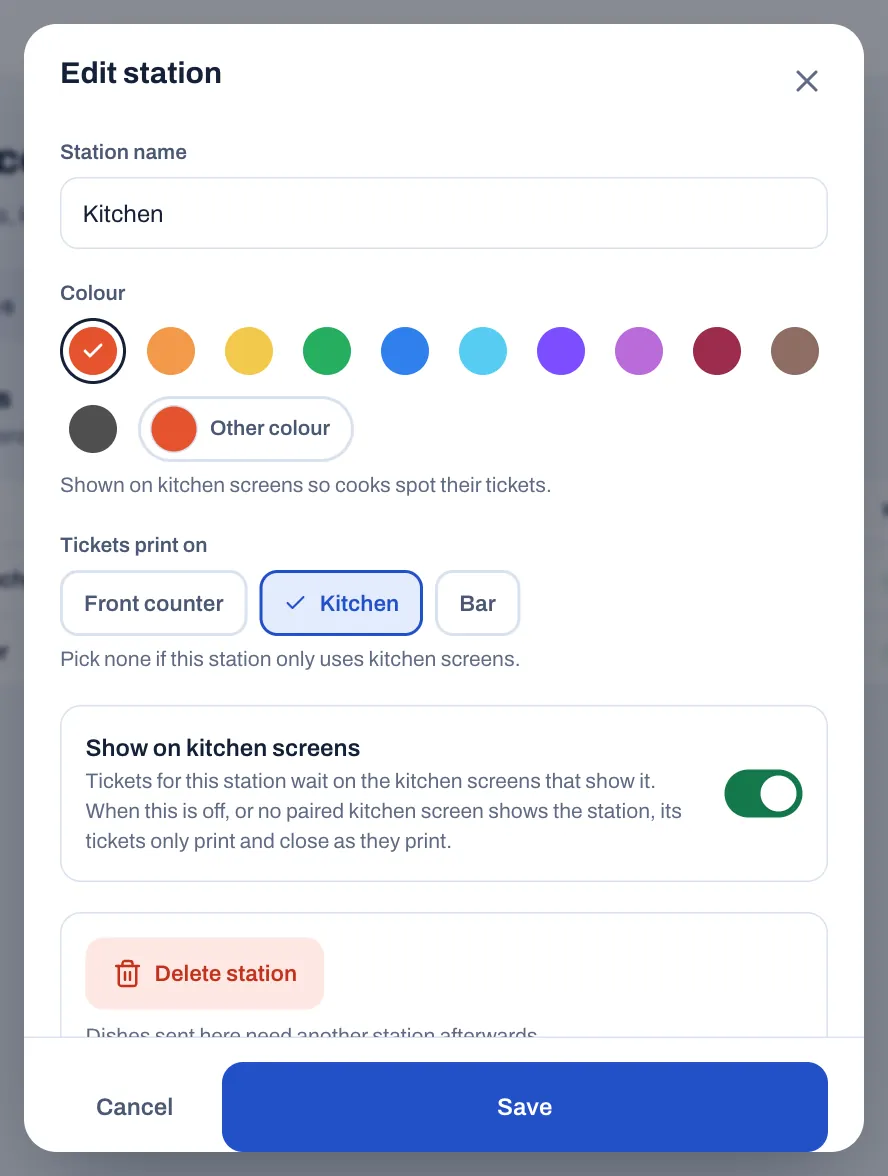
A station's tickets wait on a kitchen screen only when Show on kitchen screens is on and a paired kitchen display shows that station: it is chosen under Stations on this screen, or the display shows All stations. It doesn't matter whether that display is switched on. In every other case, the tickets only print and close as they print: the dishes show Served on the check as soon as they are sent, nothing waits on the till's Kitchen screen and nothing counts as late. A restaurant without kitchen screens has nothing to do. Pairing a kitchen display changes only the orders sent after it.
In the list of stations, the Kitchen screens column shows Shown, Hidden (the switch is off), No screen shows it (the switch is on, but no paired kitchen display shows the station) or Screen not in use (the kitchen displays that show the station haven't connected for over a day, so its tickets wait where nobody sees them; the station's window names the screen).
Then tell Sofrito which dishes go where: you choose the stations of each category and dish in the menu. See Build your menu. On each kitchen display, choose which stations it shows (see Set up a till or a handheld).
A station that no kitchen screen shows says Tickets go nowhere when it has no printer, or when Print kitchen tickets is off in Settings › Kitchen: fix it before service, or its dishes reach nobody. If you delete a station, give its dishes another station afterwards.
To run the kitchen on screens only, without paper, select Settings › Kitchen and turn off Print kitchen tickets. Do it only when a kitchen screen shows every station: with that switch off, a station that no screen shows gets no ticket at all, and the list marks it Tickets go nowhere. For how cooks use the screen, see The kitchen display.
Print labels for takeaway and delivery
A printer whose Prints is set to Labels prints one sticky label for each takeaway and delivery item when the order is sent to the kitchen. Each label shows the order number and its place in the order (for example 2/3), the guest's name, the dish with its options, notes and allergens, and the time. Every label printer in the restaurant prints them.
Set up cash drawers
Plug the cash drawer into the drawer port of the receipt printer (the RJ11 or RJ12 socket, often marked DK). The printer opens it.
- Select Devices & printers › Cash drawers.
- Select Add cash drawer, or select a drawer to change it.
- Type the Drawer name, such as "Front counter".
- Under Terminal, choose the till the drawer sits under, or Any terminal.
- Under Opened by, leave The terminal’s receipt printer, or choose the printer the drawer is plugged into.
- Select Add cash drawer or Save.
Each till's Cash screen counts its own drawer: the one chosen as Cash drawer in the till's settings, else the drawer assigned to it under Terminal, else the first drawer. With several drawers, buttons at the top of the Cash screen switch between them. Cash taken on a handheld goes into a drawer that is open.
Staff count each drawer when they open and close a shift (see Open for service and Close the day). The drawer opens when a shift starts, for pay-ins, pay-outs and cash drops, for No sale, for cash refunds, when tips are paid out from it, and for every payment method with Open the cash drawer turned on (see Payment methods, tips and service charge).
To retire a drawer and keep its history, turn off In use. Close it on the till first if it is open: the list marks it Open now.
Before you go live
- Pair every till, handheld and screen, and give each one a clear name.
- Choose the till each customer display faces.
- On Sofrito Cloud with network printers, set up a print bridge and keep it running.
- Print a test page on every printer, and check the accents and the euro or pound sign.
- Send a test order with one dish for each station and check that each ticket comes out in the right place, on paper and on screen.
- Open the cash drawer from a test cash payment.
- Give each kitchen printer a backup printer.
- Revoke any device you no longer use.