Chapters
Guide › Set up
Build your menu
Your menu is what staff tap on the till and the handhelds, what the kitchen reads on its tickets and screens, and what guests see on their receipt. This chapter takes you through it in the order most restaurants work: categories first, then dishes, then options, allergens, kitchen routing and prices. You build the menu in the back office, with a role that can edit it (usually the owner or a manager). Marking a dish sold out is also for servers, bartenders and cashiers on the till, and for the kitchen on the kitchen display.
Before you start
- Create your restaurant. See Create your restaurant.
- Sofrito starts you with two stations, Kitchen and Bar. If some dishes are made somewhere else, such as a pizza oven or a grill, add those stations first. See Devices, printers and stations.
Open the menu editor
- In the back office, select Menu.
- Select a tab: Dishes, Categories or Modifiers.
Dishes shows every dish exactly as staff see it on the till, with an On sale switch under each one. Categories are the tabs along the top of the till's menu. Modifiers are the questions the till asks when a dish is ordered, such as how a steak is cooked. Every change you save reaches all tills and handhelds straight away.
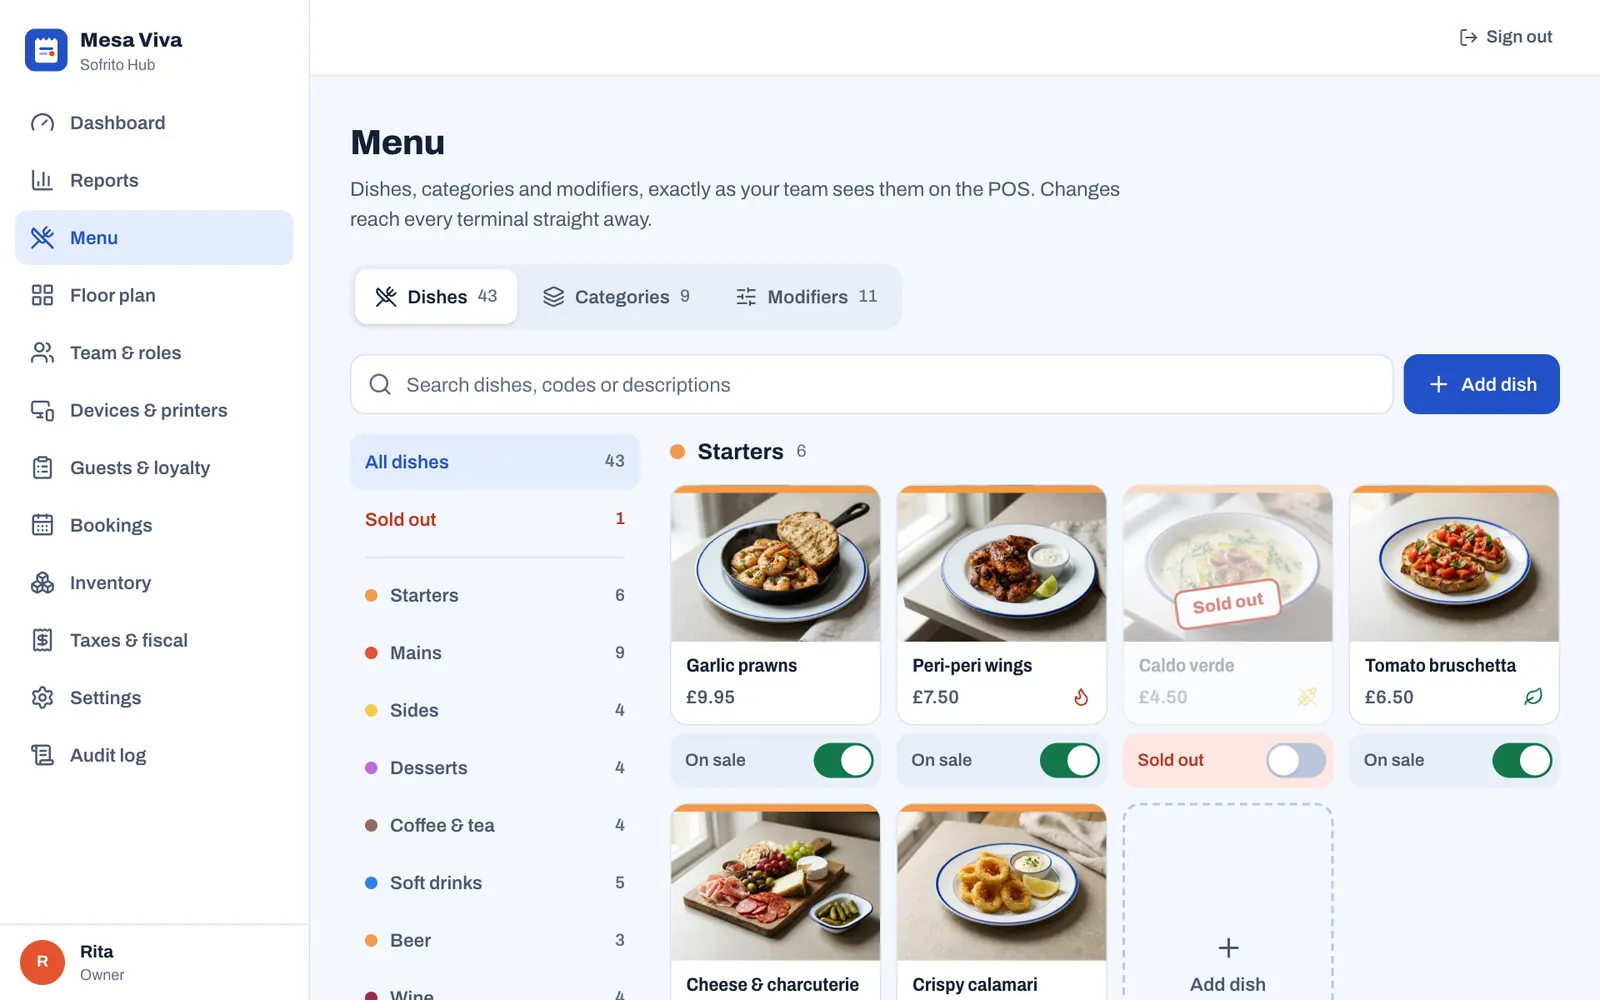
If your role can look at the menu but not change it, a message at the top says so. Ask the owner to give your role Edit the menu (see Your team, roles and PINs).
Clear the sample menu
If you turned on Add sample dishes and a sample team when you created your restaurant, your menu holds the dishes of a sample restaurant. The quickest way to clear it is the banner at the top of the back office: select Remove sample data, then Tap again to remove. In one step, Sofrito removes the sample dishes and guests, archives the sample team, and removes the sample categories, options and price level that none of your own dishes uses. Once something has been sold, even a practice sale, it archives them instead, so the sales already made with them stay in your reports. Anything you changed stays. See Remove the sample data.
To keep some of the sample dishes, change them before you remove the sample data: anything you changed stays. Or clear the menu by hand, here in the menu. Deleting a category deletes its dishes too.
- Select Menu › Categories.
- Select a category you don't need.
- Select Delete category.
- Select the button again to confirm. It now says Tap again to delete it and its 6 dishes, with your number of dishes.
- Repeat for each category you don't need.
- Select Modifiers.
- Select a group you don't need.
- Select Delete modifier group.
- Select the button again to confirm.
The sample menu also has a Happy hour price level. To remove it, see Set special prices with price levels.
Add your categories
Categories are the tabs staff tap on the till, such as Starters, Mains or Drinks. Every dish belongs to one category and takes its colour, course, stations and tax, unless you change them on the dish.
- Select Menu › Categories.
- Select Add category.
- In Name, type the name staff should see, for example “Starters”.
- Under Colour, select a colour, or leave Automatic.
- Under Course, choose when these dishes are served, for example Drinks for a drinks category.
- Under Stations, tick where these dishes are made, for example Kitchen or Bar.
- Under Tax, choose the tax category for these dishes.
- Select Add category.
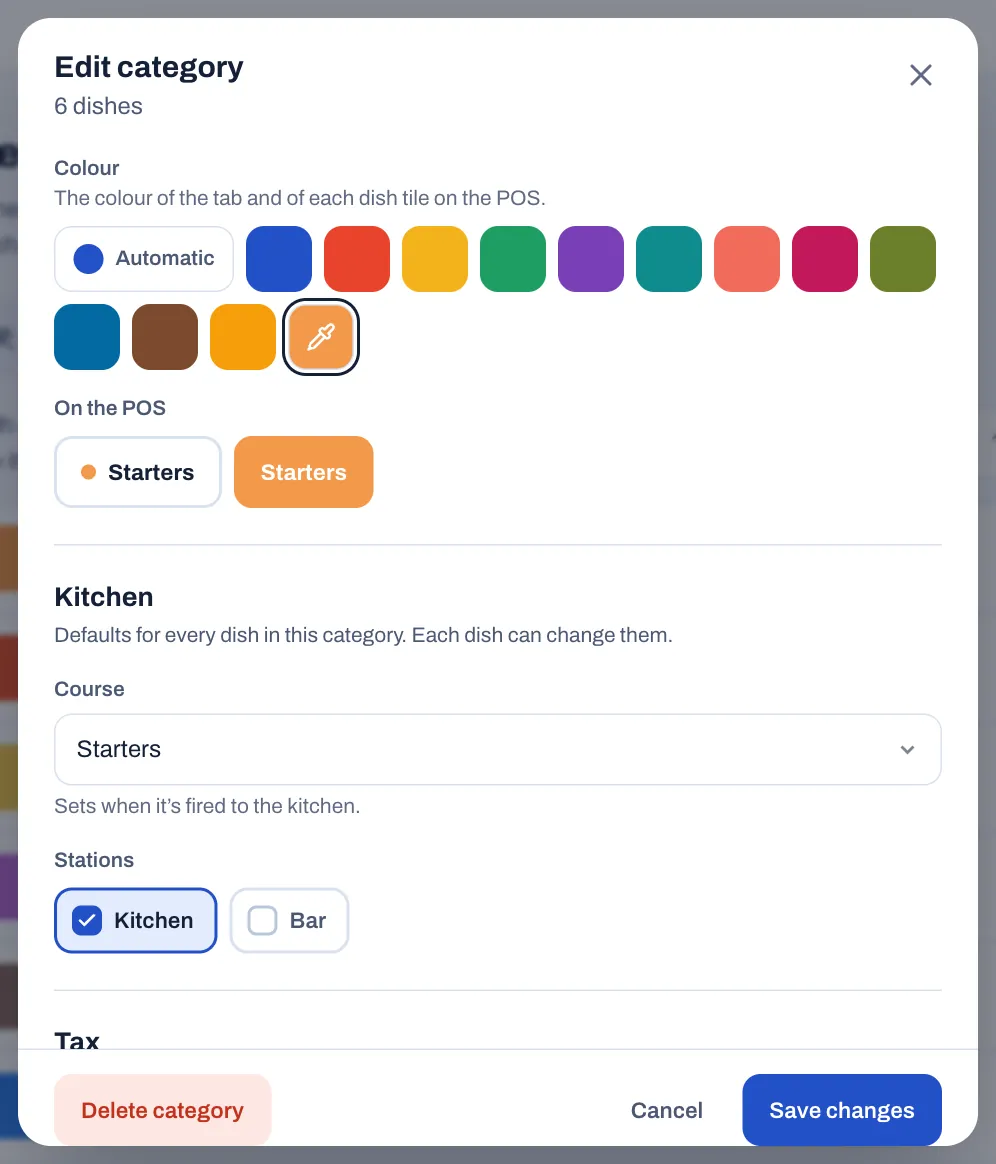
- The colour fills the category's tab on the till and runs along the edge of each of its dish buttons. Automatic takes the next colour of Sofrito's palette. For a colour of your own, select the pipette swatch at the end. On the POS shows how the tab will look.
- If you leave Course on Default (Starters), the dishes count as Starters. Set drinks categories to Drinks, and so on.
- With no station ticked, the category's dishes are never sent to the kitchen, unless a dish has stations of its own. That suits things staff serve themselves, such as bottled water.
Put categories and dishes in order
The till shows categories and dishes in the order you set here. The till's first tab is always Popular (see Mark allergens and diet labels).
To change the order of the categories:
- Select Menu › Categories.
- Select Rearrange.
- Use the arrows to move each category up or down.
- Select Save positions.
To change the order of the dishes in a category:
- Select Menu › Dishes.
- In the list on the left, select the category.
- Select Rearrange.
- Use the arrows to move each dish earlier or later.
- Select Save positions.
Add a dish
- Select Menu › Dishes.
- Select Add dish. To add a dish straight into a category, select the Add dish button at the end of that category instead.
- In Name, type the dish's name as it is on your printed menu. The receipt shows this name.
- If the name is long, type a shorter Kitchen name, for example “Burger” for Mesa smash burger. Kitchen tickets and the kitchen display show it instead. Leave it empty to use the full name.
- Check the Category.
- In Description, write the ingredients and how the dish is served. Staff can read it on the till.
- Under Price and tax, type the Price.
- If you know it, type the Cost to make. Sofrito shows the food cost as a share of the price and uses it in food cost reports.
- Add a photo (see Add dish photos).
- Select Add dish. To go straight on to the next dish in the same category, select Save and add another instead.
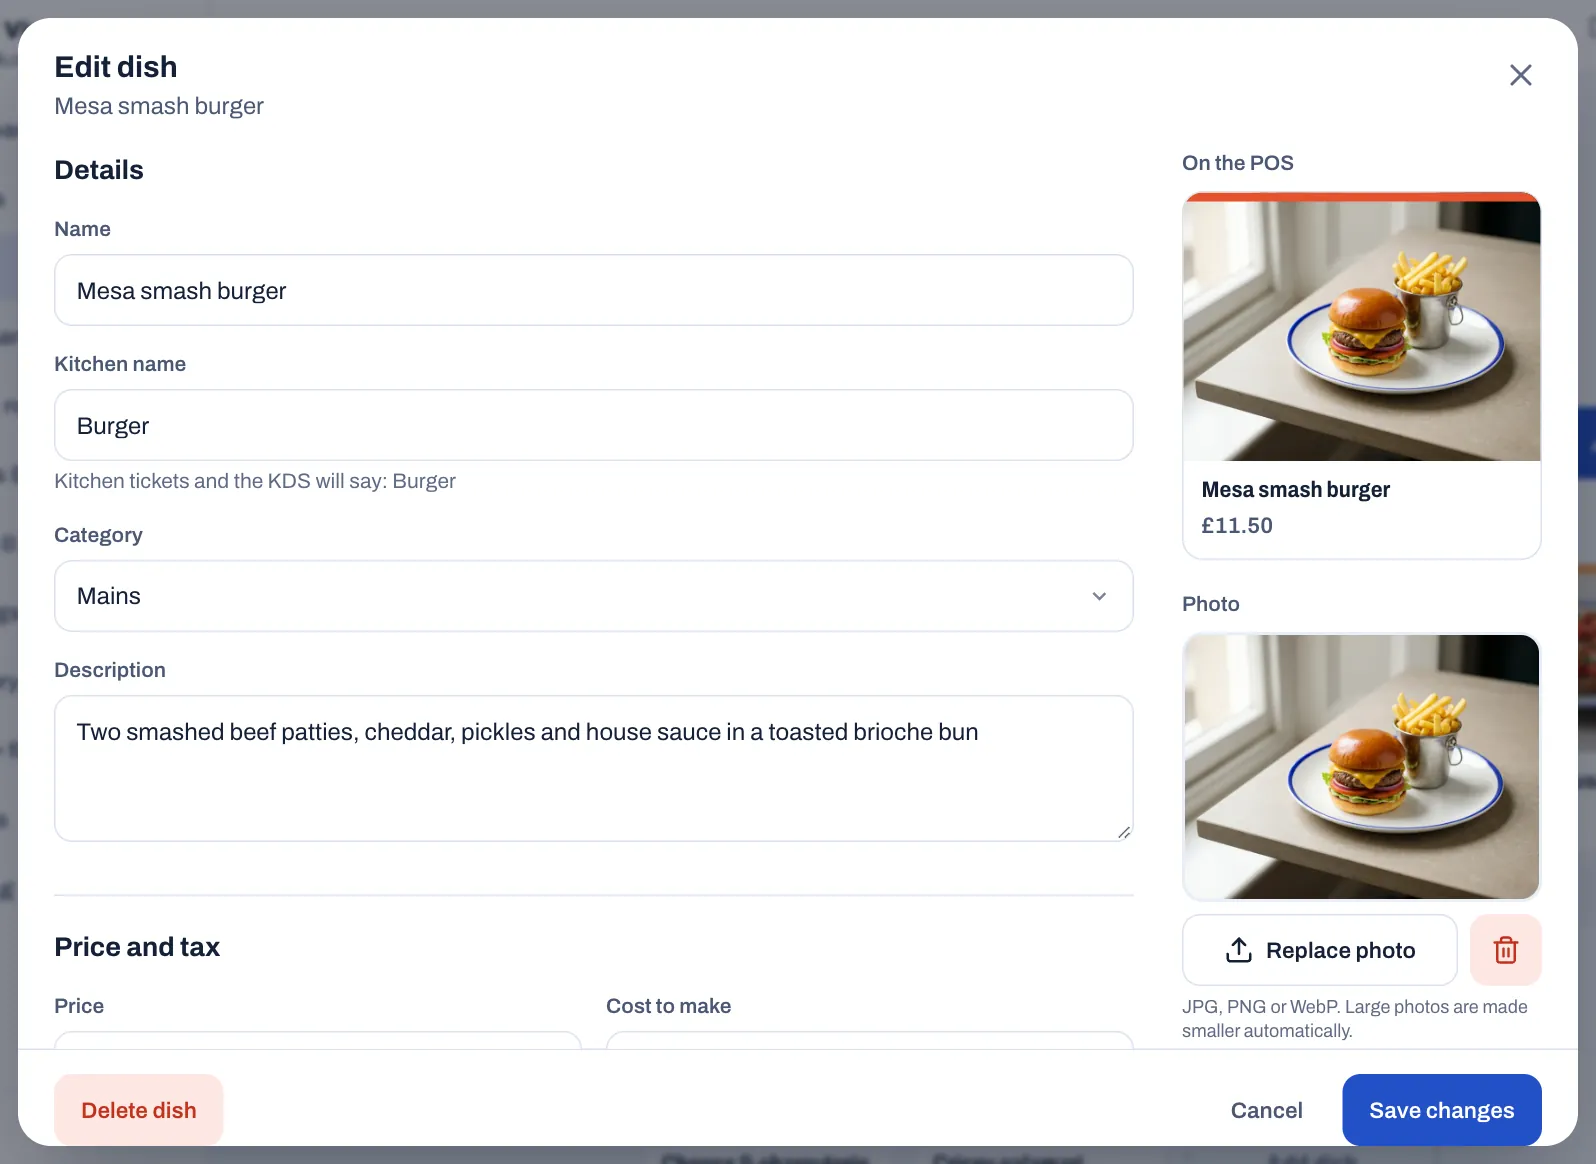
On the POS, on the right of the sheet, shows the dish button exactly as staff will see it. The rest of the sheet, from Price levels to Codes, is explained in the sections below. Fields you leave alone follow the category.
Add dish photos
Photos help staff find dishes faster. They show on the dish buttons, when staff choose options, and when they touch and hold a dish.
- Open the dish in Menu › Dishes.
- Under Photo, select Add photo, or drag a photo file onto the box.
- Wait until the photo appears.
- Select Save changes.
To change the photo, select Replace photo. To take it off, select the bin button next to it.
- Use JPG, PNG or WebP files. Sofrito makes large photos smaller before it uploads them. If a photo is still too large, choose a smaller one.
- Dish buttons show photos in landscape (4:3) and crop them to fill the space.
- The till shows photos only while Show dish photos on the POS is on, in Settings › Service. It is on unless you turn it off. Without photos, the buttons are smaller and more dishes fit on the screen.
Ask for options with modifier groups
A modifier group is a question the till asks when a dish is ordered: how the steak is cooked, which side, which extras. You make each group once and add it to every dish that needs it.
- Select Menu › Modifiers.
- Select Add modifier group.
- In Name, type a name your team will recognise in lists, for example “Burger cooking point”.
- In Question on the POS, type the question staff should see, for example “How would you like it cooked?”. If you leave it empty, the till shows the name.
- Under Rules, select Must choose one, May choose one or May choose any.
- For any other rule, set At least and At most yourself. At most at zero means No limit.
- To give some options away, set Free choices. For example, with 1, the first sauce chosen is free.
- For things like extra shots or double cheese, turn on Allow the same option more than once.
- Under Options, type the first option in Option.
- If the option costs more, type the extra in Price change. For an option that lowers the price, type a minus sign first.
- Select Add option for each further option.
- If most guests choose the same option, tick Selected by default on it.
- Under Dishes, tick every dish that should ask this question. To find a dish, type in Find a dish.
- Select Add modifier group.
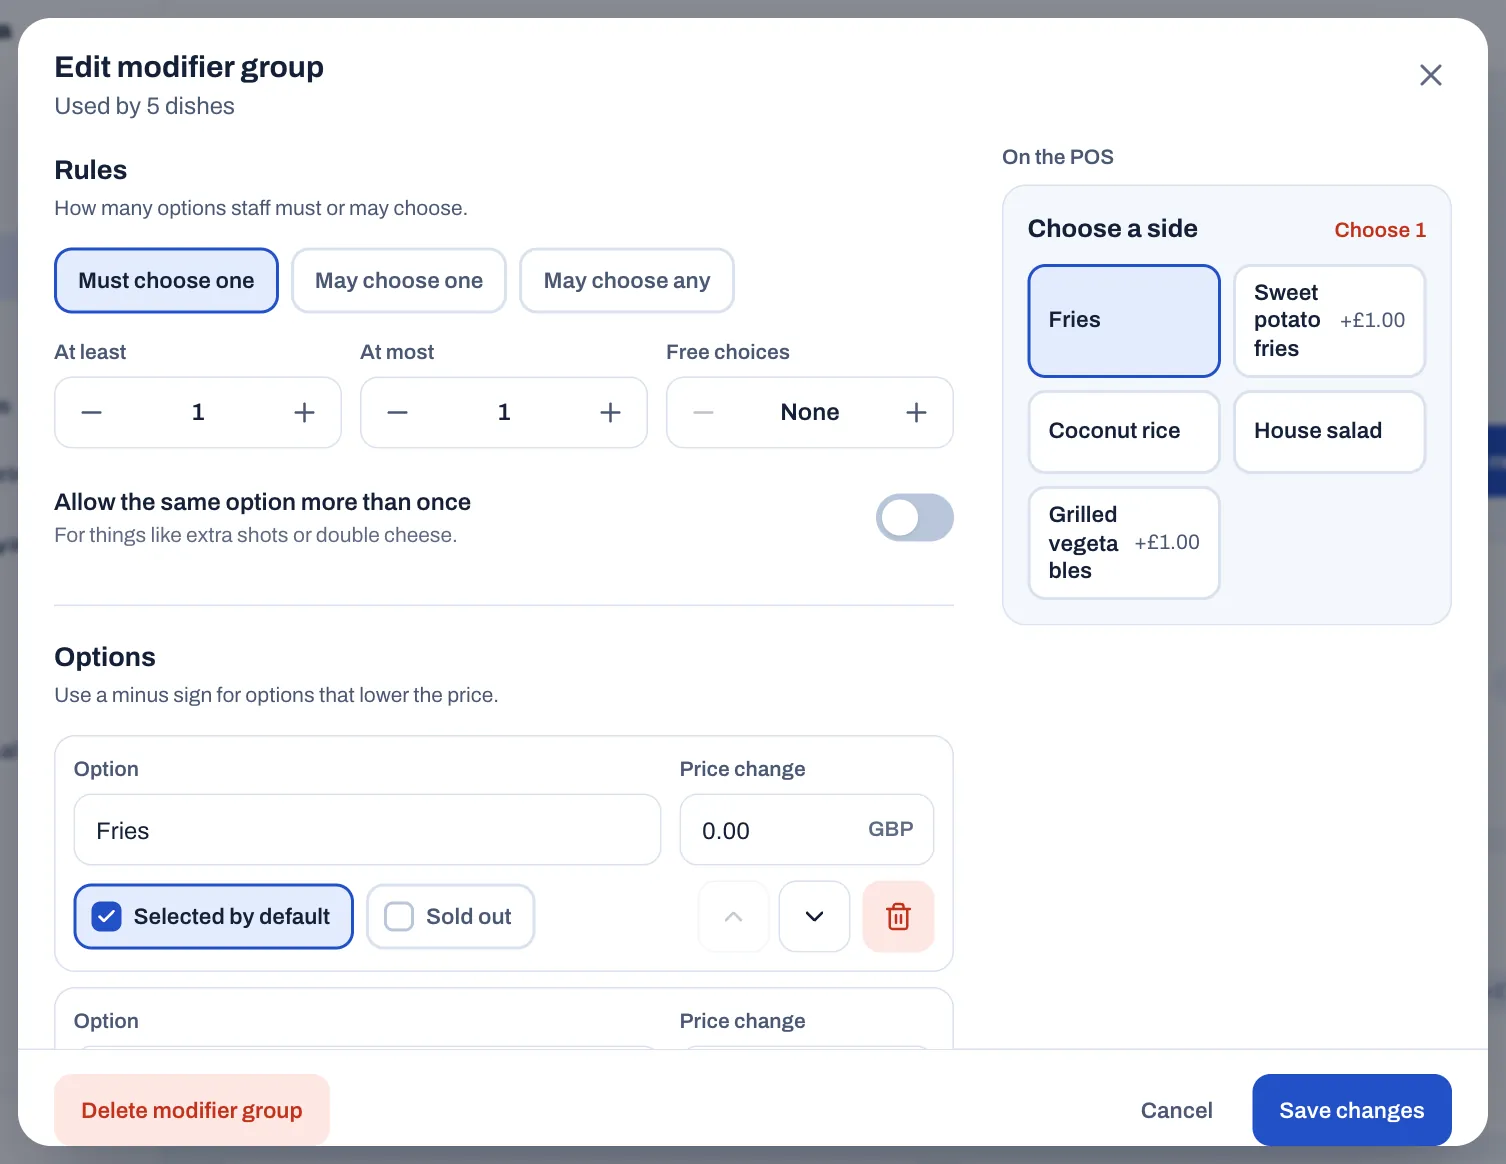
On the till, tapping a dish with modifier groups opens its options. Options selected by default are already chosen, so the usual order takes one tap. A group staff must answer shows its rule in red, for example Choose 1, and Add to order stays unavailable until they answer it. Price changes are added to the dish price, and the options print under the dish on kitchen tickets.
To change which questions a dish asks:
- Open the dish in Menu › Dishes.
- Under Modifiers, select a group under Add a modifier group to add it.
- Use the arrows to change the order the till asks the questions in.
- To stop asking a question, select the cross next to its group.
- Select Save changes.
Mark allergens and diet labels
- Open the dish in Menu › Dishes.
- Under Dietary and allergens, tick the Tags that apply.
- Under Allergens, tick every allergen the dish contains.
- Select Save changes.
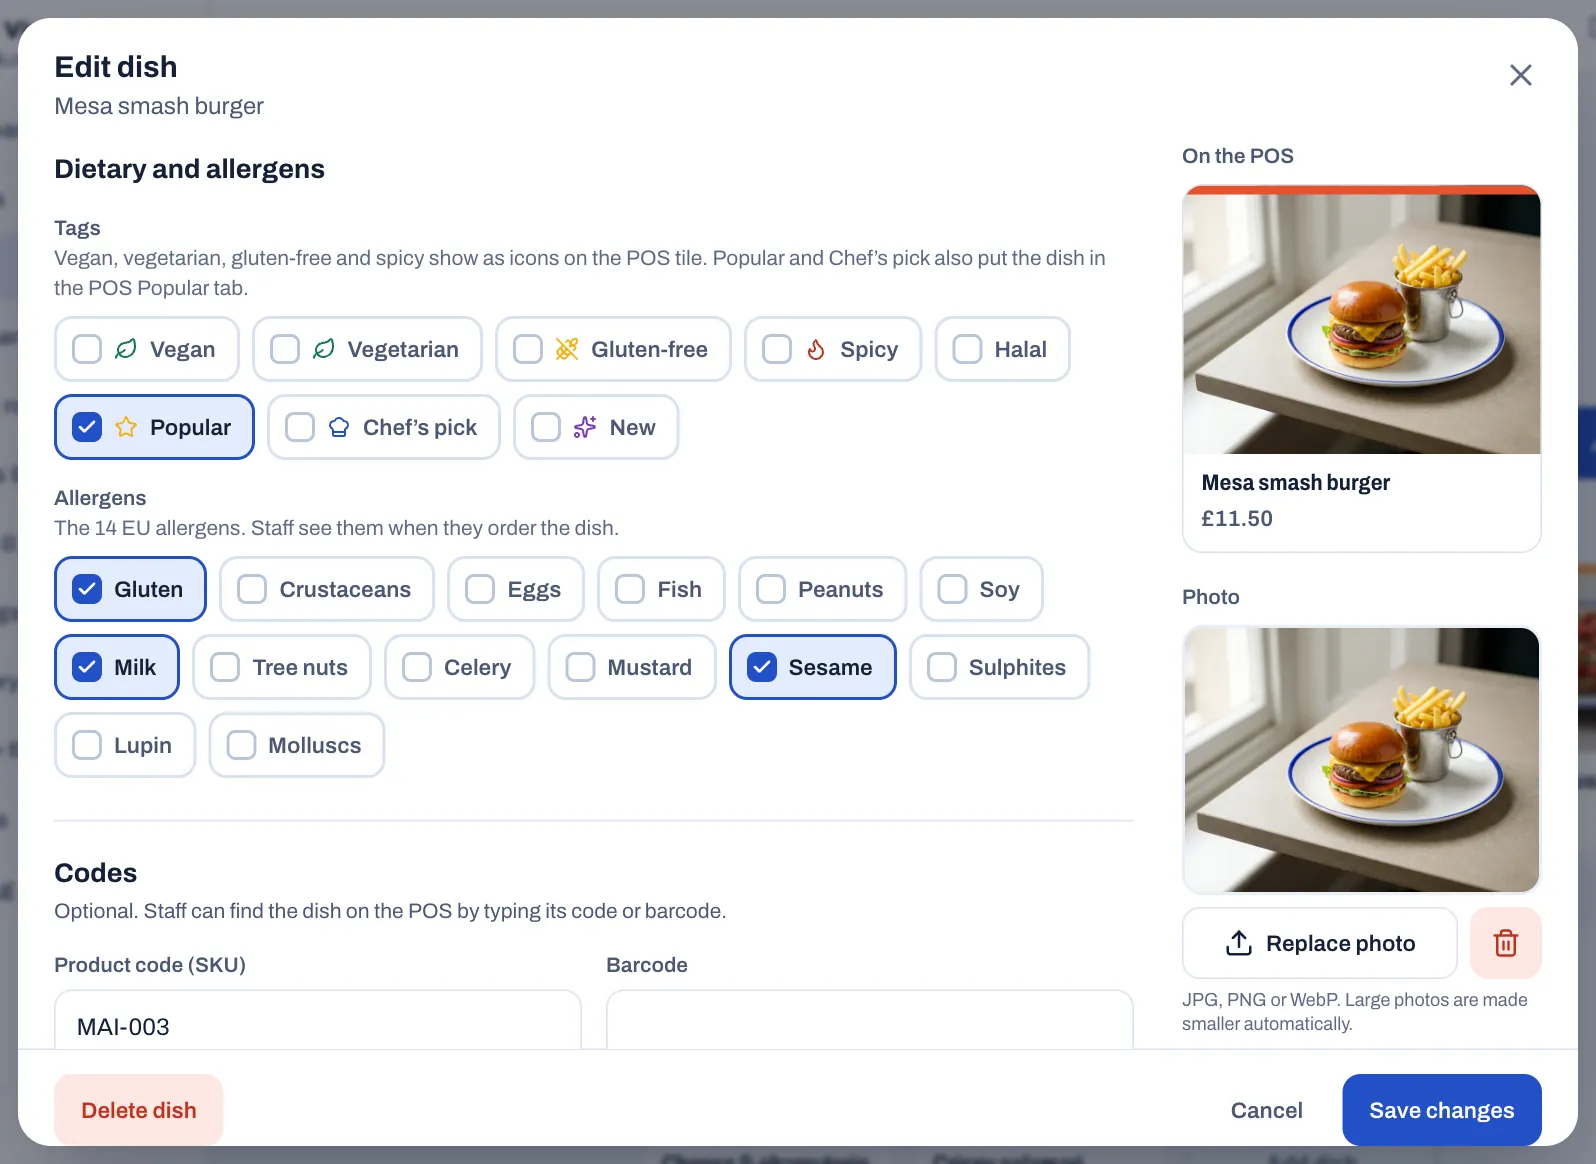
The Allergens list holds the 14 allergens that EU and UK law name: gluten, crustaceans, eggs, fish, peanuts, soy, milk, tree nuts, celery, mustard, sesame, sulphites, lupin and molluscs. Staff see a dish's allergens when its options open on the till, and whenever they touch and hold the dish. The kitchen display and printed kitchen tickets show them next to the dish.
The Tags work like this:
- Vegan, Vegetarian, Gluten-free and Spicy show as small icons on the dish button, up to two per dish.
- Popular and Chef's pick put the dish in the till's Popular tab, the first tab staff see. If no dish has either tag, that tab shows the first dishes on your menu.
- Between orders, the customer display shows the photo of a Chef's pick dish behind your welcome message.
- Halal and New are saved with the dish but don't show on the till.
Set the course
Courses group dishes on the order and on kitchen tickets, so the kitchen knows what goes out first. The courses are Drinks, Starters, Mains and Desserts unless you rename them in Settings › Service.
- Open the category in Menu › Categories.
- Under Course, choose the course for its dishes.
- Select Save changes.
To give one dish a different course, open the dish and change Course under Kitchen. Same as category follows the category. Staff can still choose another course when they order; see Table service. If courses are turned off in Settings › Service, the field says so.
Send each dish to the right station
A station is a place where food or drinks are made, such as the kitchen or the bar. The stations you tick decide which printer prints a dish's ticket and which kitchen display shows it. You set up stations, their printers and their screens in Back office › Devices & printers › Stations (see Devices, printers and stations).
To choose the stations for a whole category, tick them under Stations in the category (see Add your categories). To send one dish somewhere else:
- Open the dish in Menu › Dishes.
- Under Kitchen, turn off Use the category's stations. While it is on, Currently shows the category's stations.
- Tick the stations for this dish.
- Select Save changes.
- A dish can go to more than one station. Each station gets its own ticket.
- A dish with no station ticked is never sent to the kitchen.
- A station's tickets wait on a kitchen display only when the station's Show on kitchen screens is on and a paired kitchen display shows it. Otherwise they only print, and the dishes show Served on the check as soon as they are sent. See The kitchen display.
Set the tax for categories and dishes
Each dish needs a tax category, which decides the tax rate on the receipt. Sofrito creates the tax categories for your country when you create the restaurant. You can see and change them in Back office › Taxes & fiscal (see Taxes, receipts and legal documents).
- Open the category in Menu › Categories.
- Under Tax, choose its tax category.
- Select Save changes.
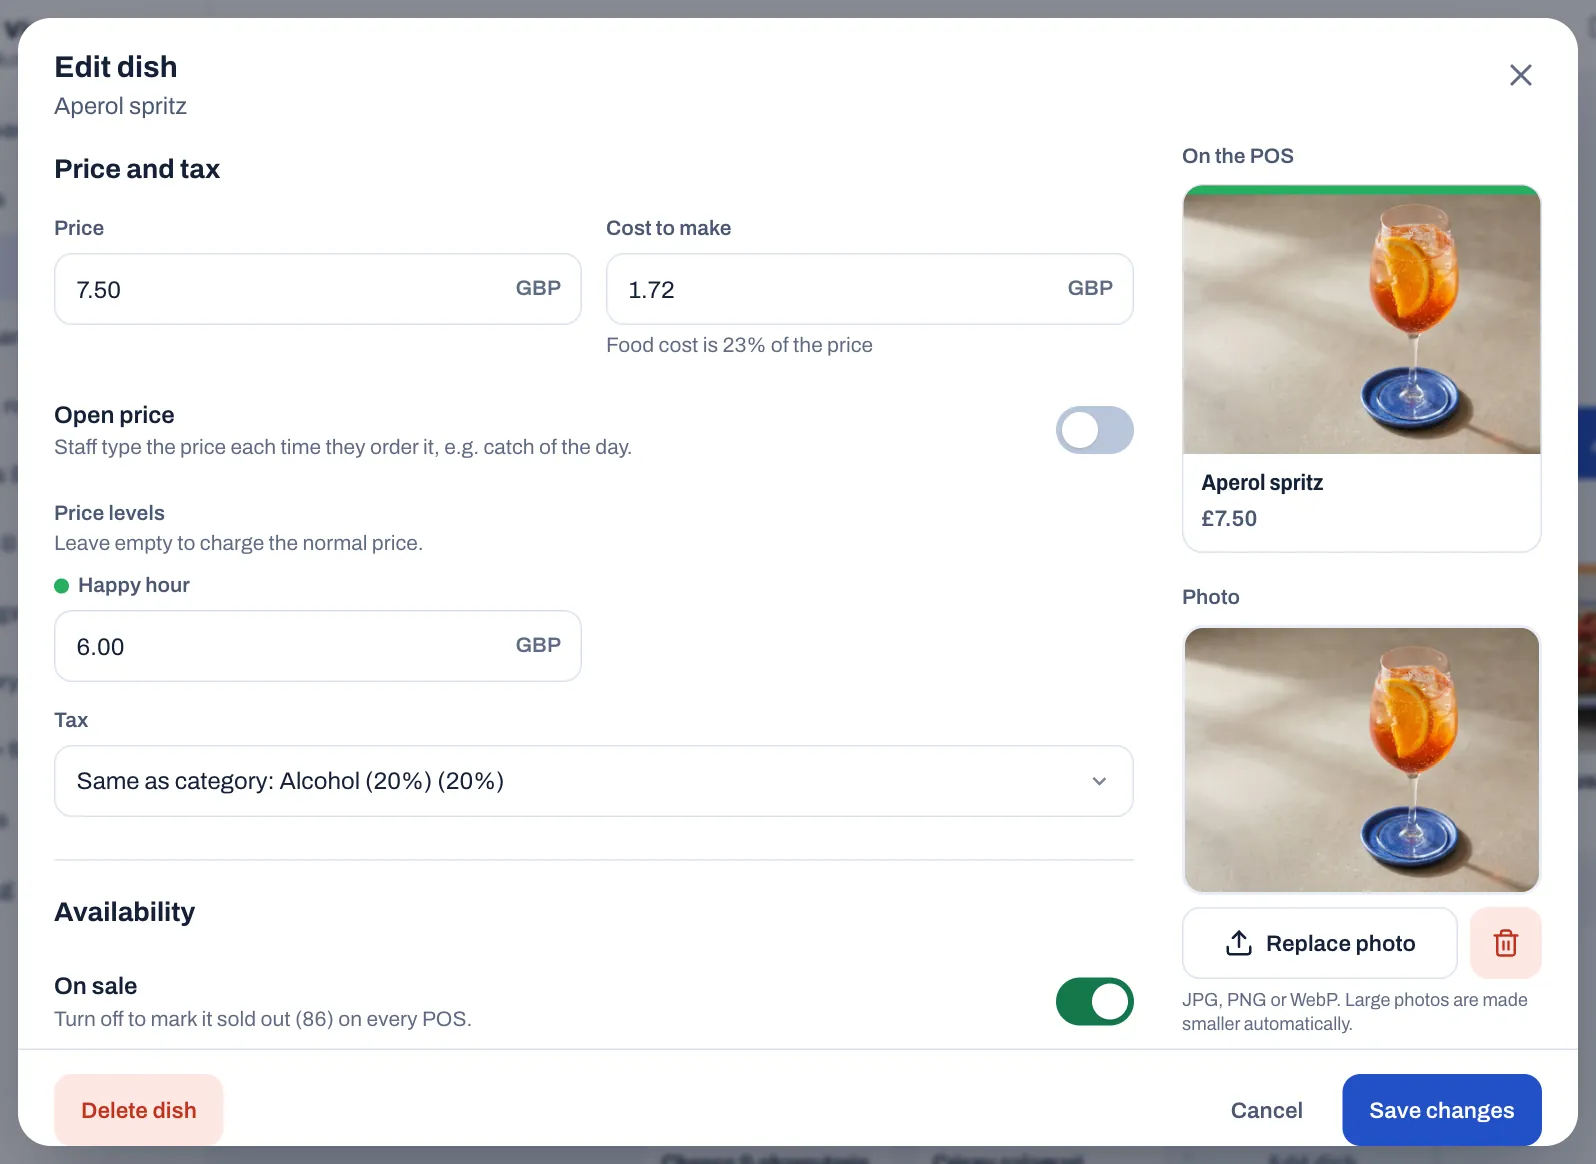
For a dish taxed differently from its category, open the dish and choose another Tax under Price and tax. Same as category follows the category. A tax category can charge a different rate by order type, for example for takeaway.
Let staff type the price
For dishes whose price changes, such as the catch of the day, staff can type the price each time.
- Open the dish in Menu › Dishes.
- Under Price and tax, turn on Open price. You can leave Price empty.
- Select Save changes.
On the till, the dish button shows a dash instead of a price. When staff tap it, the till asks them to Enter price on a keypad before they can add it.
Set special prices with price levels
A price level is a second set of prices for the same dishes: happy hour, takeaway prices, terrace prices. You create the level once, then give each dish its price at that level. Dishes without a price at the level keep their normal price.
To create a price level:
- In the back office, select Settings › Price levels.
- Select Add price level.
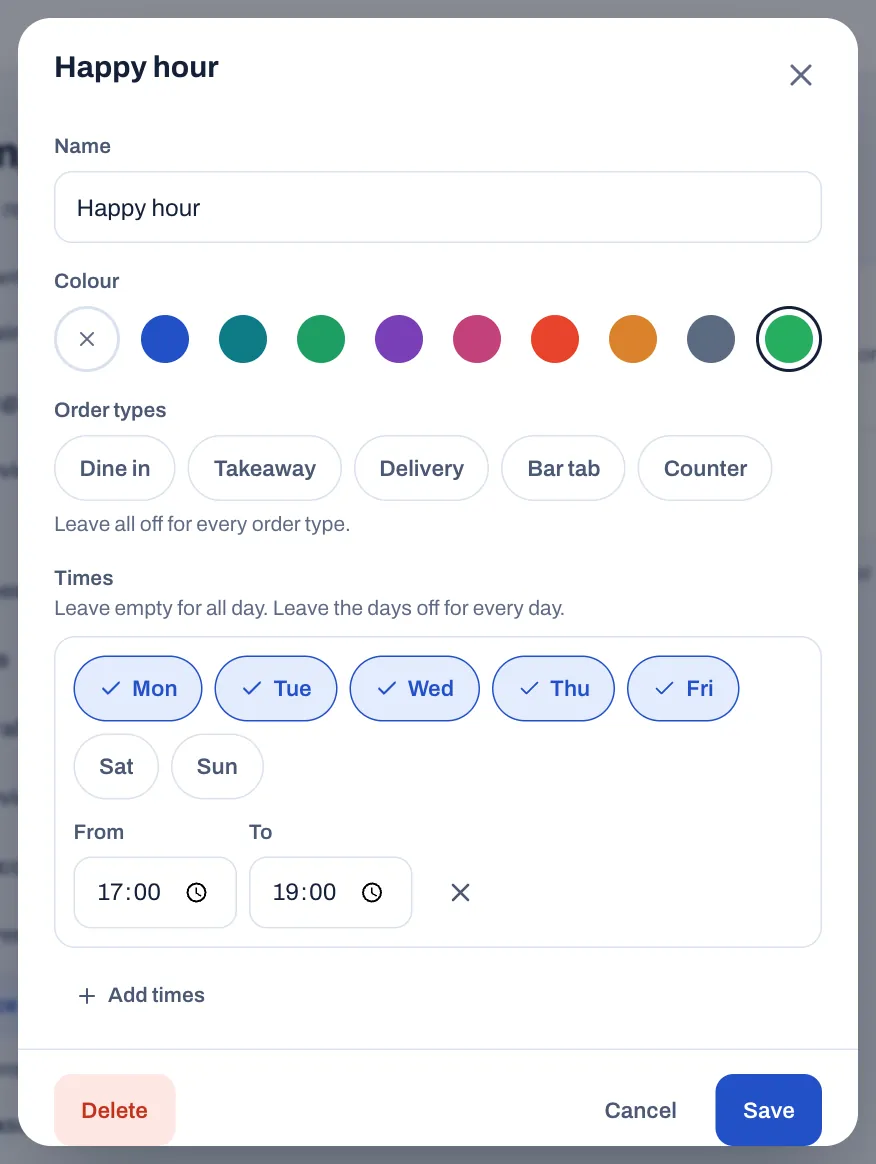
- Type a Name, for example “Happy hour”.
- Select a Colour.
- Under Order types, select the order types it is for, for example Takeaway. Leave them all off for every order type.
- To limit it to certain times, select Add times.
- Select the days, or leave the days off for every day.
- Set From and To.
- Select Add price level.
To price dishes at the level:
- Select Menu › Dishes.
- Select a dish.
- Under Price levels, type the dish's price at each level. Leave a level empty to charge the normal price.
- Select Save changes.
How the till chooses the prices:
- A level with order types or times applies by itself when both match: for example every takeaway order, or weekdays from 17:00 to 19:00. If two levels match, the one higher in the list wins.
- A level with neither applies only to the tables of a floor area that uses it. Choose it as the area's Price level (see Draw your floor plan). Orders on those tables always use that price level, even during happy hour.
- While a level applies, the dish buttons on the till show its prices and the order shows its name at the top.
- Each dish keeps the price it had when staff sent it, so a round sent at 18:55 keeps its happy hour price after 19:00.
To change a level, select it in Settings › Price levels. To delete it, select Delete, then select it again to confirm.
Count how many are left
For dishes you only have a few of, such as a daily special, Sofrito can count down what is left.
- Open the dish in Menu › Dishes.
- Under Availability, turn on Count stock.
- In How many are left, type how many you have.
- Select Save changes.
The count goes down each time staff send the dish. When 5 or fewer are left, the dish button on the till shows how many, for example 3 left. Staff can't order more than are left, and at zero the dish shows as sold out. To sell it again, change How many are left. The kitchen and the till can change the count too, without the back office: see Mark a dish as sold out.
This is a simple count for one dish. To track ingredients and recipes, see Stock, recipes and suppliers.
Mark a dish as sold out
When the kitchen runs out of a dish, mark it sold out (86 it). Every till and handheld shows it as sold out straight away, and nobody can order it until it is back on sale. Owners, managers, servers, bartenders and cashiers can do this unless you change their roles (the permission is Mark dishes as sold out), and so can every kitchen display.
From the back office:
- Select Menu › Dishes.
- Find the dish.
- Under the dish, turn off On sale. The switch now says Sold out.
To put it back on sale, turn the switch on again. Sold out, in the list on the left, shows every dish that is sold out.
From the till or a handheld:
- Touch and hold the dish for about half a second. With a mouse, right-click it. The dish's details open, with the price the check will charge.
- Tap Mark sold out.
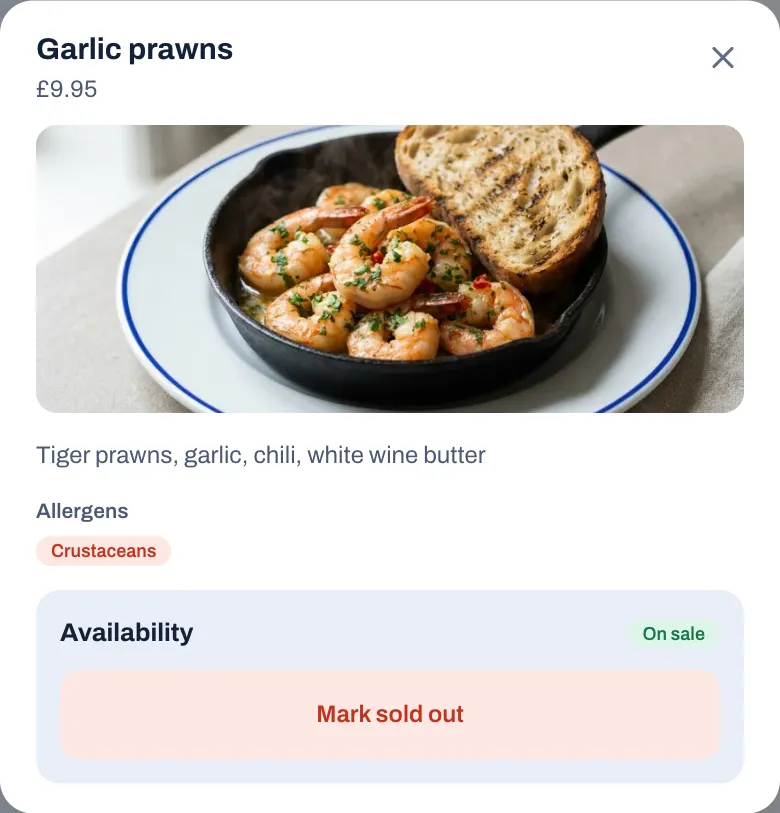
To put it back on sale, touch and hold the dish again and tap Put back on sale.
For a dish whose stock is counted, the same window shows How many are left. Change the number with − and +, or type it, and tap Save count. When none are left, type how many you have and tap Put back on sale.
From the kitchen display:
- Tap Sold out at the top of the screen. The number next to it is how many dishes are sold out.
- Find the dish in the list, or type part of its name in Find a dish. The list shows the dishes this screen's stations make, with the sold-out ones first.
- Tap the dish, then tap Mark sold out, Put back on sale or Save count, as on the till.
When one option runs out, such as sweet potato fries, open its group in Menu › Modifiers, tick Sold out on that option and select Save changes. The till greys the option out.
Closing the day puts every dish marked sold out back on sale, so each day starts with the full menu. Dishes whose stock is counted keep their count. To keep sold-out dishes off the menu overnight, turn off Put sold-out dishes back on sale each day in Settings › Service.
Find dishes by code
If you use product codes or barcodes, add them to each dish.
- Open the dish in Menu › Dishes.
- Under Codes, type the Product code (SKU).
- Type the Barcode.
- Select Save changes.
On the till, staff can type the full code or barcode in Search the menu to find the dish. In the back office, the search box finds dishes by name, description or code.
Change or delete dishes
- To change a dish, select it in Menu › Dishes, make your changes and select Save changes. To move it to another category, change its Category.
- To add a dish like one you already have, open it and select Duplicate. A new dish opens with the same settings and a name such as Garlic prawns (copy), but without the product code, barcode or stock count. Change what differs and select Add dish. Save any changes to the original first: Duplicate waits until you have.
- If you close a dish with unsaved changes, Sofrito asks whether to Keep editing or Discard changes.
- To delete a dish, open it, select Delete dish, then select the button again (Tap again to delete). The dish disappears from every till. Orders already taken keep it as it was sold.
- Deleting a category deletes all its dishes (see Clear the sample menu).
- If you have more than one location, a Locations section on each dish lets you choose where it is sold.
- New dishes and price changes are recorded in Back office › Audit log, and so is every dish marked sold out or back on sale, wherever it was done, and the dishes put back on sale when the day is closed. See Security, the audit log and your data.
Good practice
Names
- Use the names on your printed menu, so staff and guests recognise them on the till and the receipt.
- Keep names short. A dish button shows two lines of text.
- Add a Kitchen name when the menu name is long: Burger is quicker to read at the pass than Mesa smash burger.
- Name options the way staff say them out loud. Start removals with NO in capitals, as in NO onion, so they stand out on the kitchen ticket.
- Give each modifier group a clear Name for your team and a friendly Question on the POS for the till.
- Make one modifier group per question and reuse it: a single Choose a side group can serve every main course.
Photos
- Shoot in landscape and keep the dish in the middle: the till crops photos to 4:3.
- Use the same plate, background and light for every dish, so the menu looks like one set.
- Photograph the real portion, so staff know what they are selling.
Before you go live
- Open each category and check the price, tax, station, course and allergens of every dish.
- On the till, order one dish of each kind and check where its ticket prints or shows.
- Check that Sold out in Menu › Dishes is empty.