Chapters
Guide › Run service
Table service
This chapter is for servers and anyone who takes orders at tables, on the till or on a handheld. It covers the floor plan and its colours, opening and blocking tables, ordering by seat and by course, options, notes and allergies, sending to the kitchen and holding courses back, every action in the order's More menu, and what changes on a phone.
Before you start
- You can unlock the till with your PIN: see Open for service.
- The floor plan is drawn: see Draw your floor plan.
- Guest count, seat numbers and courses are set in Back office › Settings › Service: see Settings, section by section.
Read the floor plan
Tap Floor. Each area has its own button at the top, for example Dining room, Terrace and Bar. The number on an area is how many of its tables are busy.
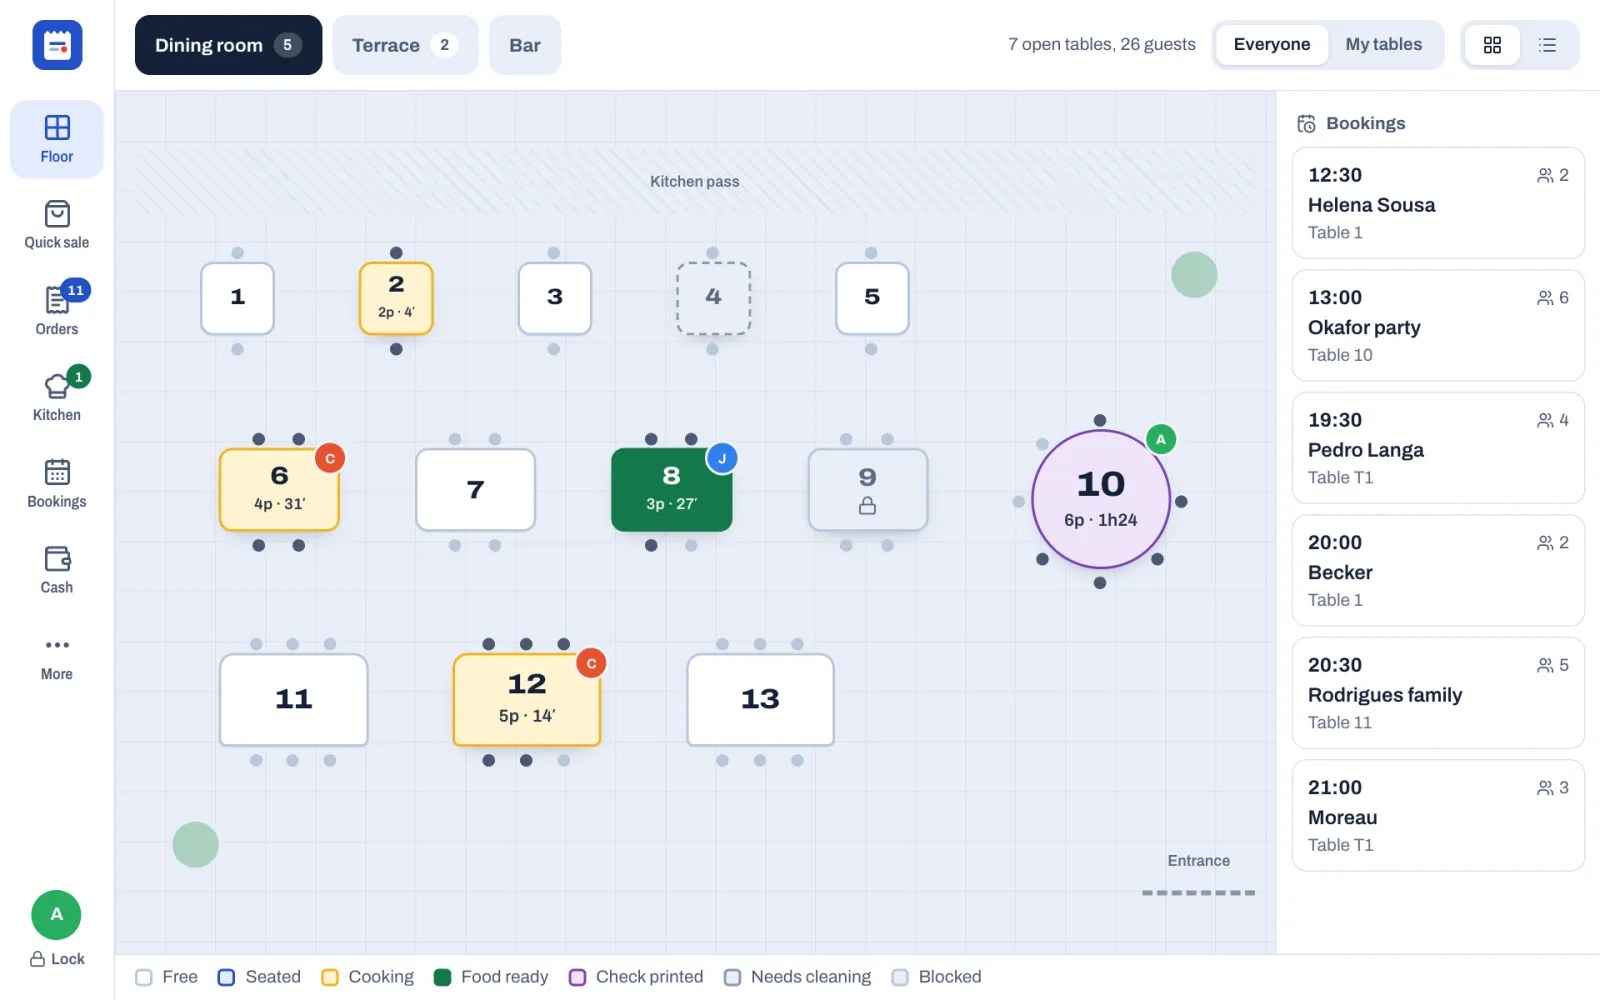
At the top right:
- Everyone shows every table. My tables keeps your own tables bright and greys out the others (in the list, it hides them).
- The two buttons with squares and lines switch between the plan and a list of table cards.
- On wide screens, a summary such as "7 open tables, 26 guests".
On wide screens, the day's next bookings are listed on the right of the plan, if your role can see bookings and the restaurant takes bookings.
The legend along the bottom explains the colours:
| Colour | Status | What it means |
|---|---|---|
| White | Free | No open check. The list shows the number of seats. |
| Blue | Seated | A check is open. Nothing is cooking or waiting on the pass. |
| Amber | Cooking | Items are with the kitchen and not ready yet. |
| Green | Food ready | The kitchen has marked food ready. Take it to the table. |
| Purple | Check printed | The check has been printed for the guests. |
| Grey, dashed | Needs cleaning | The bill is paid. Clear the table. |
| Grey, with a padlock | Blocked | The table is kept free. See Keep a table free. |
On the plan you also see:
- the number of guests and the time since the table opened, for example 4p · 37′;
- the server's initials in a coloured circle, on tables big enough to show them;
- the chairs as dots around the table, darker for each guest seated;
- a red, pulsing border when something has been in the kitchen longer than the late time (20 minutes in a new restaurant);
- a purple time on a free table when a booking for it starts soon. See Bookings and the waitlist.
Open a table
- Tap a free table.
- The window Open table 1 asks How many guests? Tap the number. The table's own number of seats is highlighted.
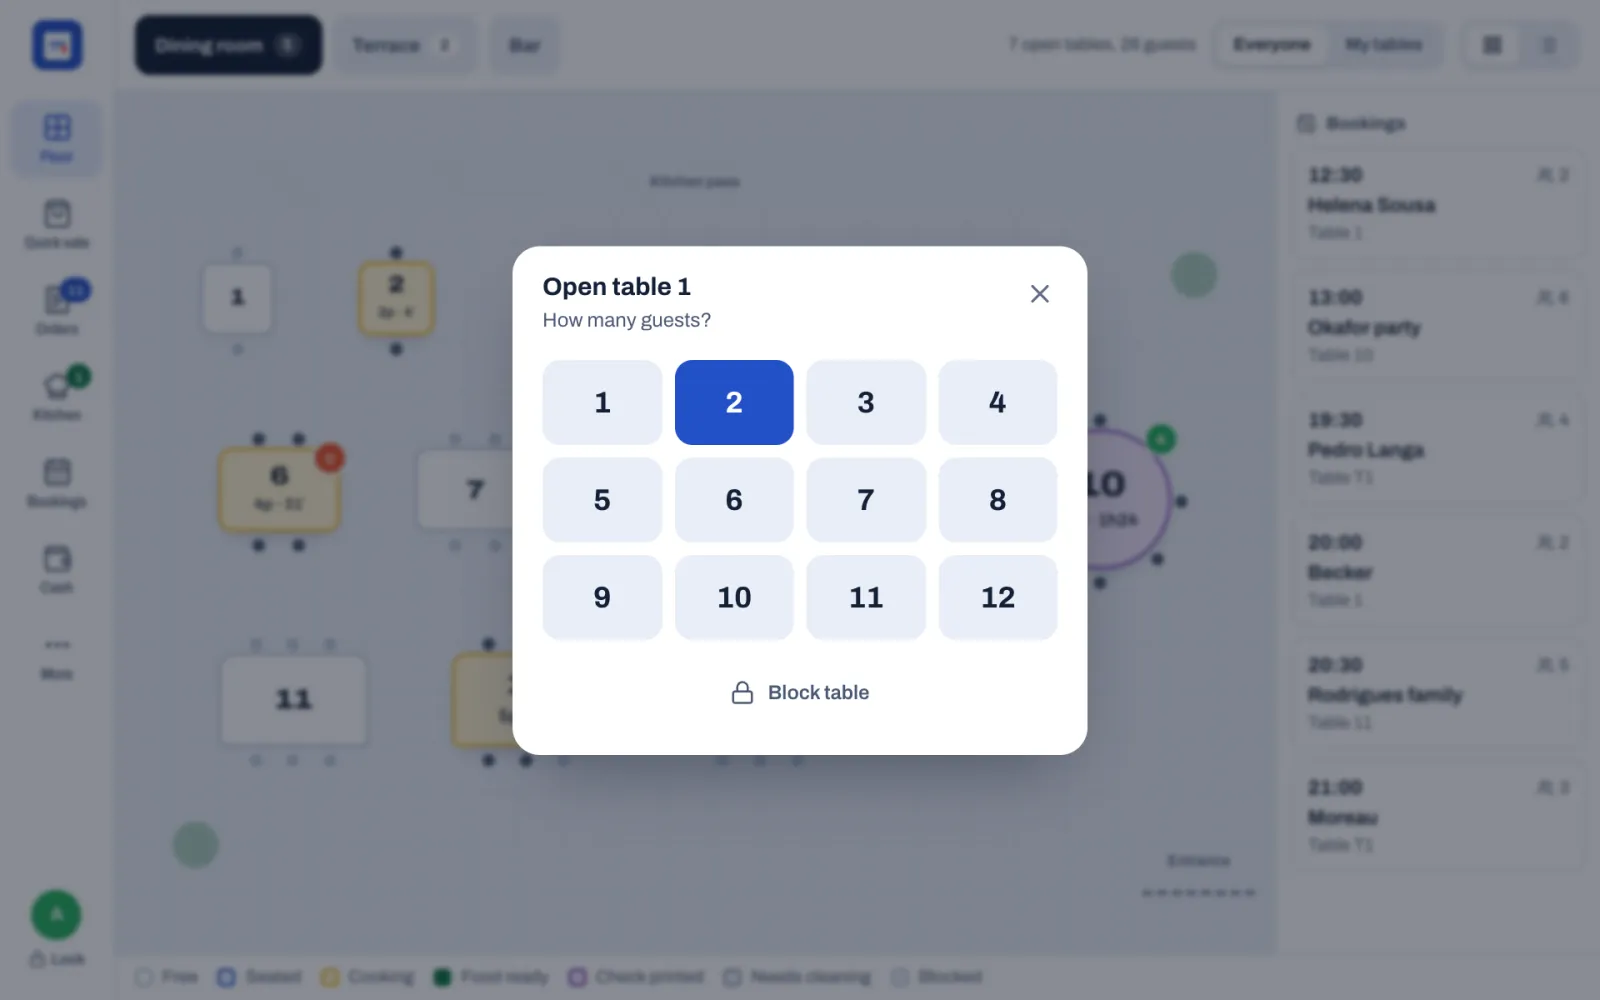
The order screen opens for that table. If Ask how many guests is off in Back office › Settings › Service, the table opens straight away with its number of seats. To choose the number of guests anyway, touch and hold the table instead of tapping it.
A host, or anyone whose role can't take orders, seats guests the same way. The till then stays on the floor plan and shows Seated with the table, for example "Table 3", and the table turns blue. The first server to add dishes to that check takes it over, without a manager's PIN.
Tapping a busy table opens its check. If the table has more than one check, Sofrito lists them with their numbers, guests and totals: tap one, or tap New separate check to start another. See Start a separate check.
Keep a table free
Block a table that must stay empty for now, for example one kept for a regular or one with a wobbly leg. While it is blocked, nobody is seated there.
- Tap the free table. If Ask how many guests is off, touch and hold it instead: a tap would open it.
- Tap Block table at the bottom of the window.
The table turns grey with a padlock, on every till and handheld. To use it again, tap it, then:
- tap Unblock table; or
- tap Open check to seat guests there straight away. Opening the check unblocks the table too.
Take the order
The order screen shows the menu on the left and the check on the right.
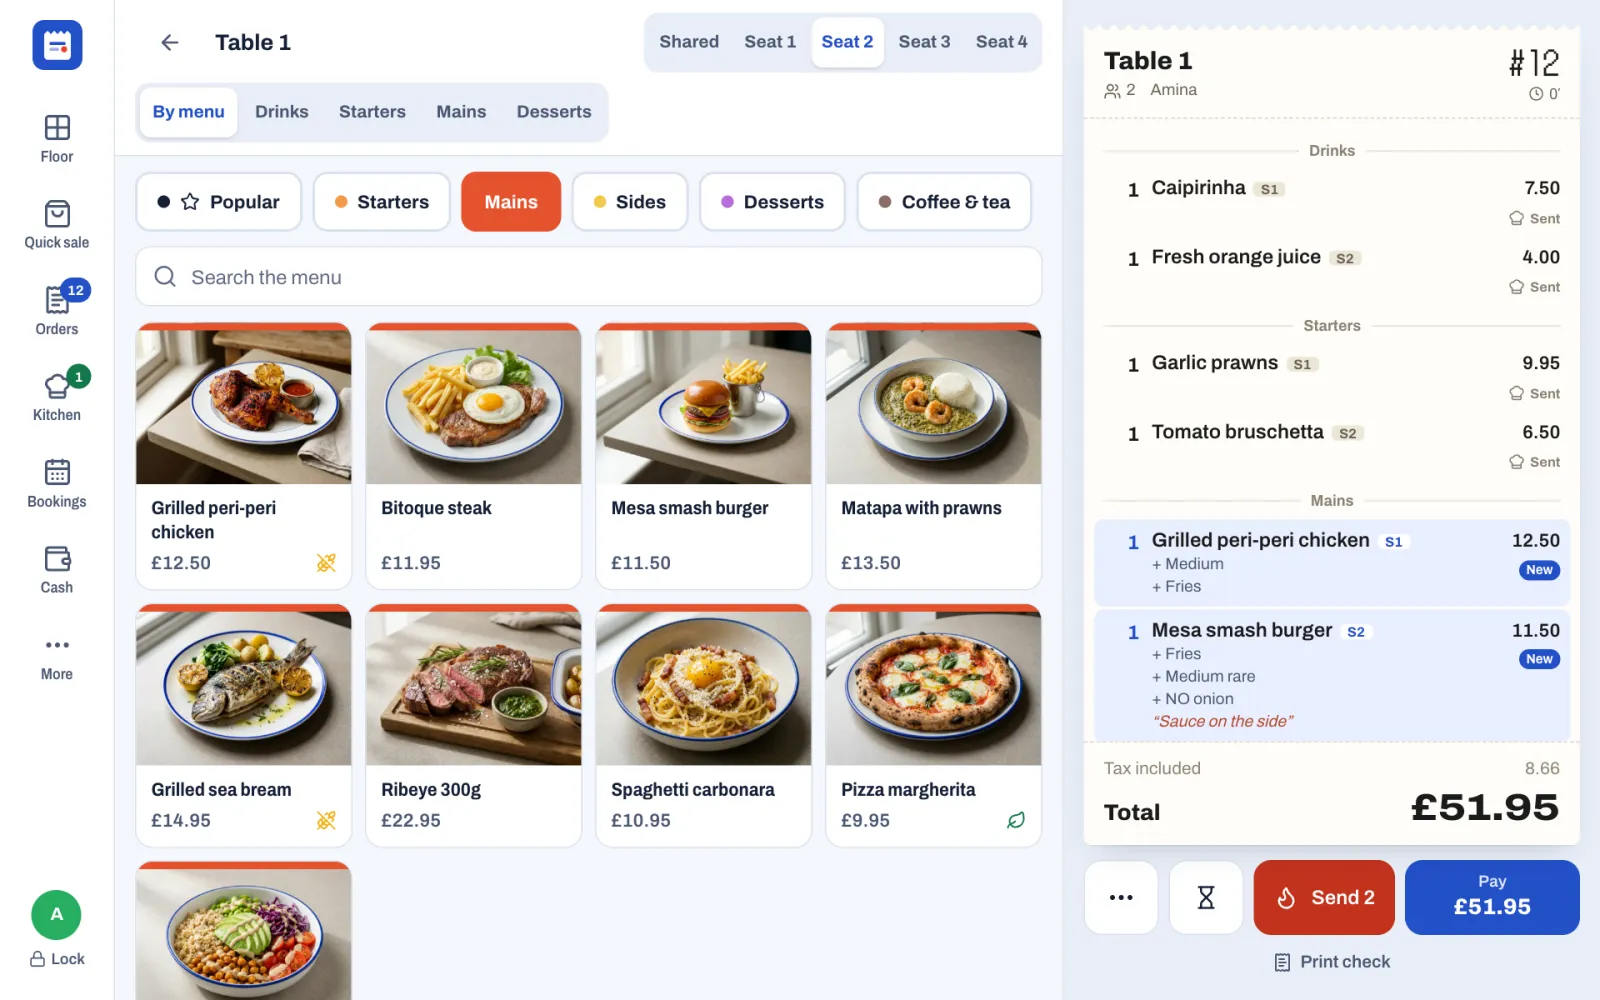
At the top of the menu:
- Shared, Seat 1, Seat 2 and so on choose the seat for the next items. There is one seat for each guest, and at least four.
- By menu, Drinks, Starters, Mains and Desserts choose the course. By menu uses each dish's own course: a drink goes with Drinks, a starter with Starters. The course buttons need a wide screen; on a phone or a tablet held upright, change the course on the item instead (see below).
- The categories, starting with Popular, and Search the menu. You can search by name, or by a dish's code or barcode.
To order:
- Tap the seat.
- If you want a course other than the menu's, tap it.
- Tap the dishes. Each one goes on the check with a blue New badge, under its course, with its seat (S1, S2).
- Tap a simple dish again to add one more.
The seat and course stay selected until you change them. Seats and courses only appear when Seat numbers and Courses are on in Back office › Settings › Service.
When a price level applies, such as Happy hour or takeaway prices, its name shows at the top of the menu. The dish buttons, the check and Pay all show the same prices. Dishes marked Sold out can't be tapped. To see a dish's description and allergens, press and hold it.
Choose options and add a note
When you tap a dish with options, its window opens first.
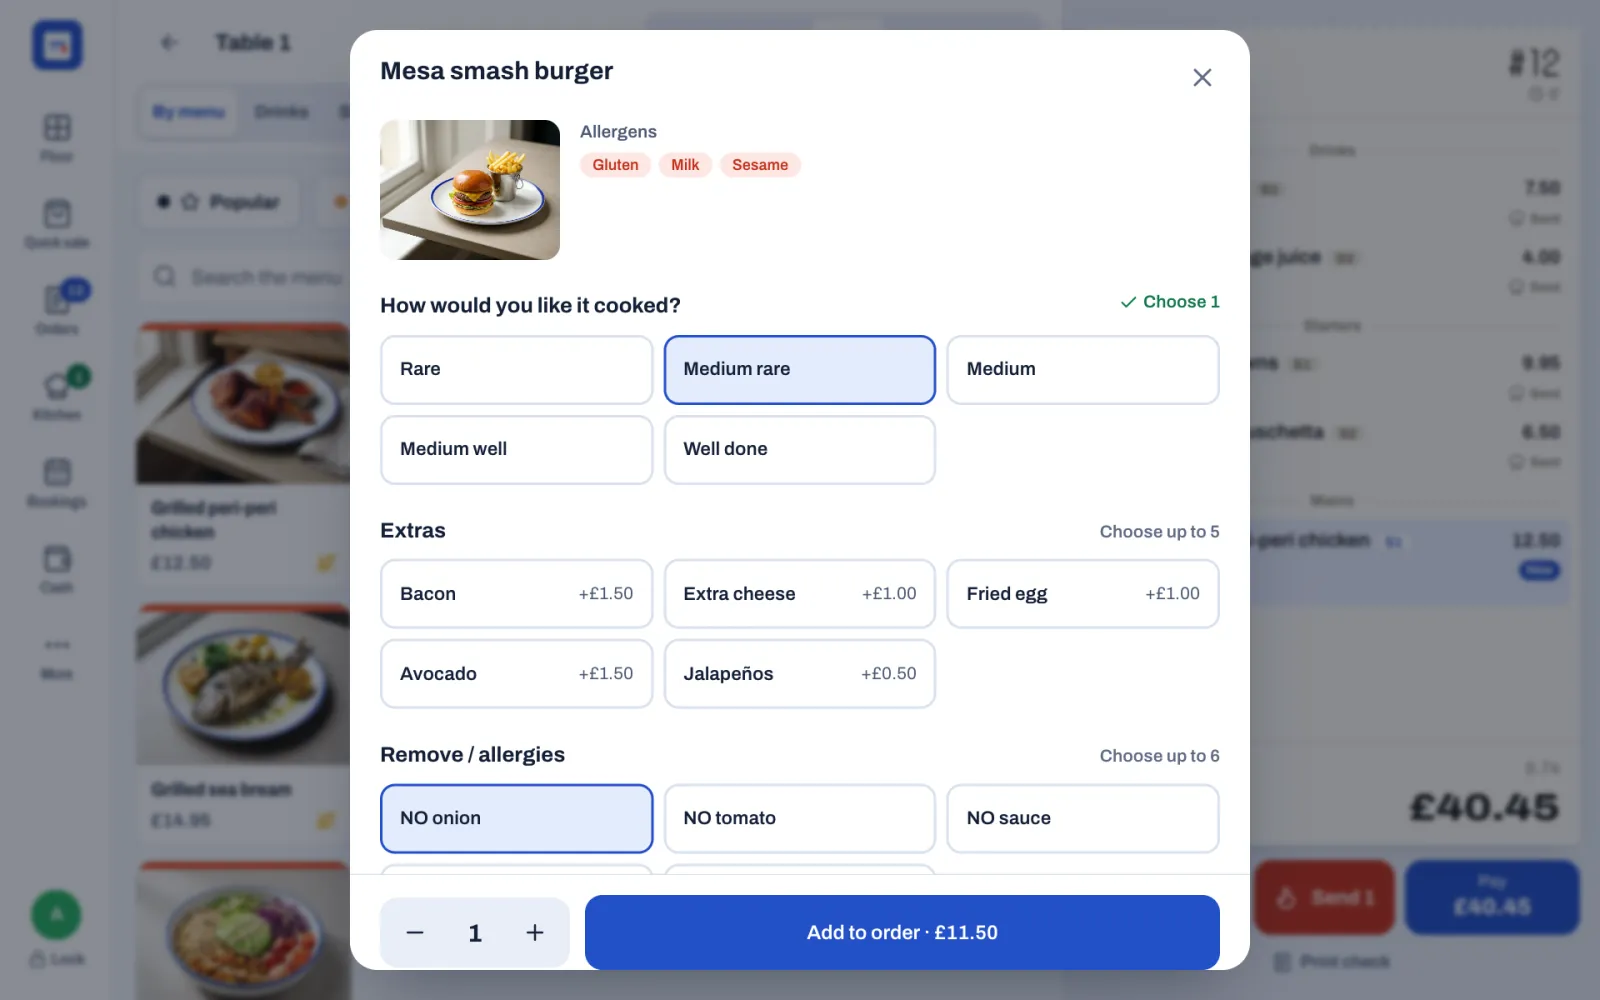
- Each group says what it needs: Choose 1 (exactly one), Choose 1 to 3, Choose up to 3, Choose at least 2 or Optional. A group that needs a choice turns green with a tick once it has one.
- The usual choice is already selected, so for most guests you only confirm.
- Options that cost more show the extra, for example +£1.50. Options that lower the price show the difference, for example -£0.50.
- Allergens show at the top.
- Under Notes, type anything the kitchen should know, for example "Sauce on the side".
- Set the quantity with − and + at the bottom.
Tap Add to order. The button shows the price, and stays grey until every required group has a choice. For a dish without a fixed price, type the price under Enter price first.
See the guest's allergies
When the guest on the check has allergies on their profile, a red band under the check's header lists them, for example "Allergies: Peanuts". This happens when you add the guest with ••• › Add guest, and when the table was seated from the guest's booking. Every kitchen ticket for the order shows the allergies too, on the kitchen display and on paper. In the demo restaurant, table T2 on the terrace shows "Allergies: Gluten".
Allergies are kept on the guest's profile in Back office › Guests & loyalty: see Guests, loyalty and gift cards.
Change an item before you send it
Tap an item with the New badge.
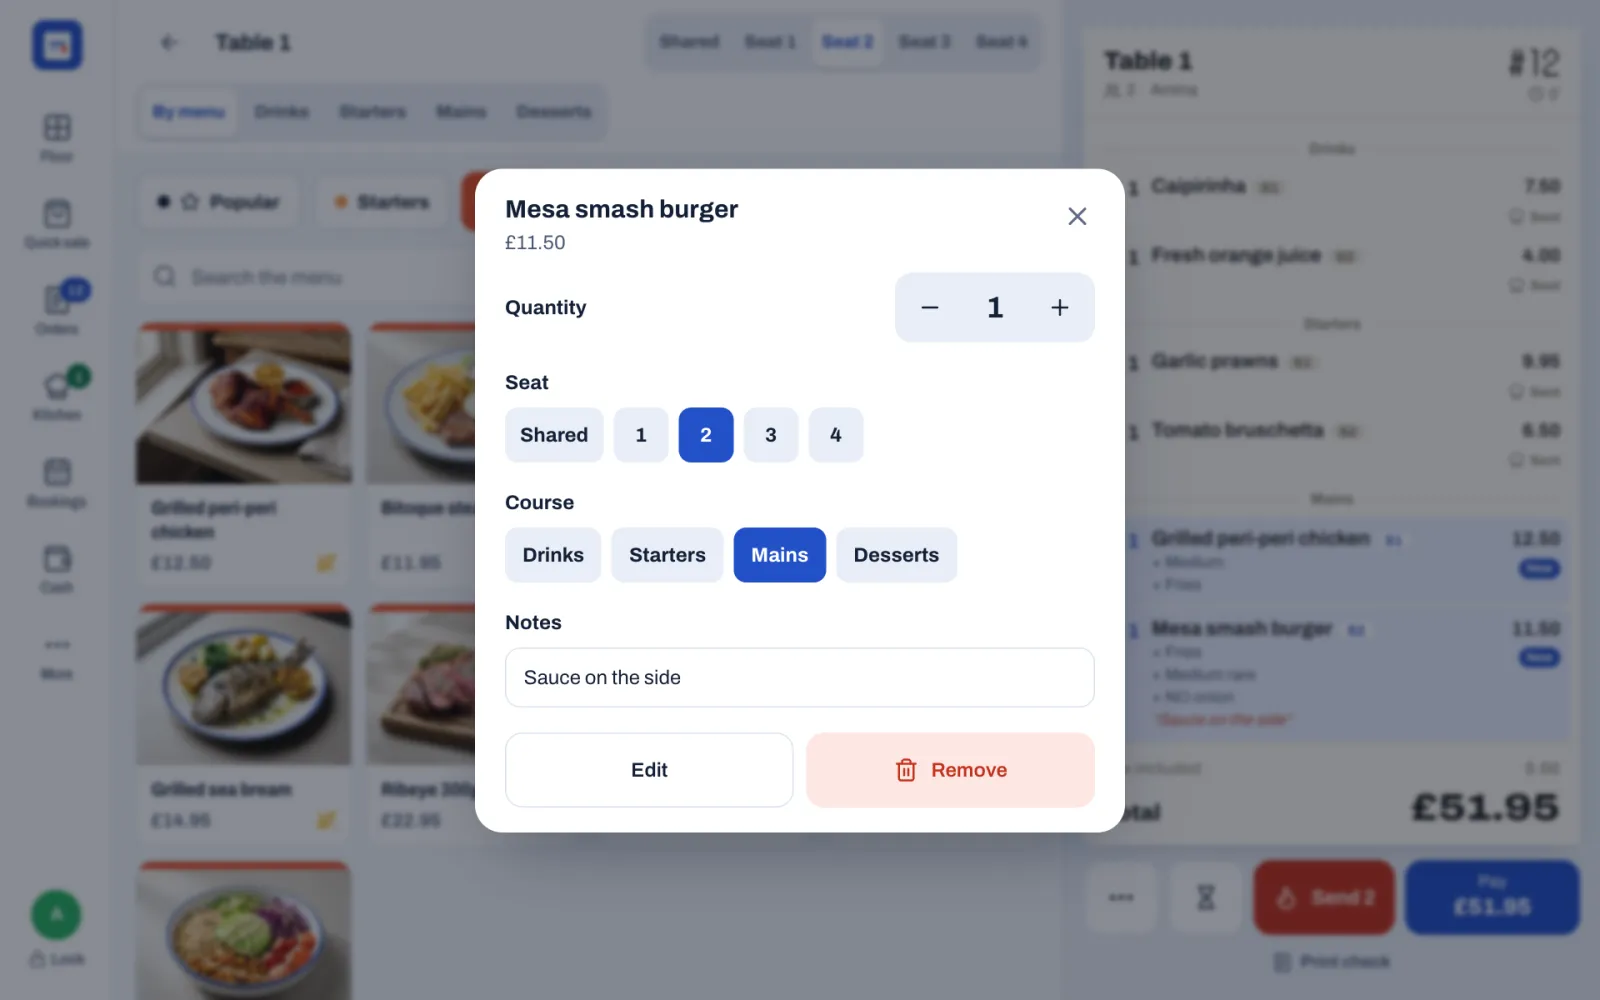
- Quantity: − and +. Going below 1 removes the item.
- Seat: move it to another seat, or to Shared.
- Course: move it to another course.
- Notes: the note for the kitchen.
- Edit: change its options.
- Remove: take it off the check.
Close the window to keep your changes.
New items stay on this device until you send them or hold them. Other tills and handhelds don't see them yet.
Once an item is sent or held, tapping it opens other choices: Void or Remove, Comp, Change price, the restaurant's item discounts and Split item. See Voids, discounts, refunds and approvals and Split the bill.
Send the order to the kitchen
Tap Send. The button shows how many items will go, for example Send 4.
Sofrito shows "Sent to the kitchen". The items go to the kitchen display and the kitchen printers of their stations, and the table turns amber. On the check, each sent item shows how far it has got: Sent, Cooking, Ready and then Served. On phones and small tablets you see only the icon.
Some items show Served as soon as they are sent: dishes with no station, and dishes whose station isn't shown on any kitchen display. Their tickets only print. See The kitchen display.
To add another round, tap the table, add the items and tap Send again. Only the new items go.
On a phone, Sofrito goes back to the floor after you send, ready for the next table.
Hold items and send them later
The hourglass button next to Send (Hold) saves new items on the check without sending them. They wait until you fire them. Use it to take the whole order at once but have the mains cooked later. The hourglass appears when a dine-in check has new items.
- Add the drinks and starters.
- Tap Send.
- Add the mains.
- Tap the hourglass. Sofrito shows "Held — sent to the kitchen when you tap Fire". On the check, the mains show Held, and a Fire Mains button appears above Send.
- When the table is ready for the mains, tap the table on the floor.
- Tap Fire Mains. The mains go to the kitchen.
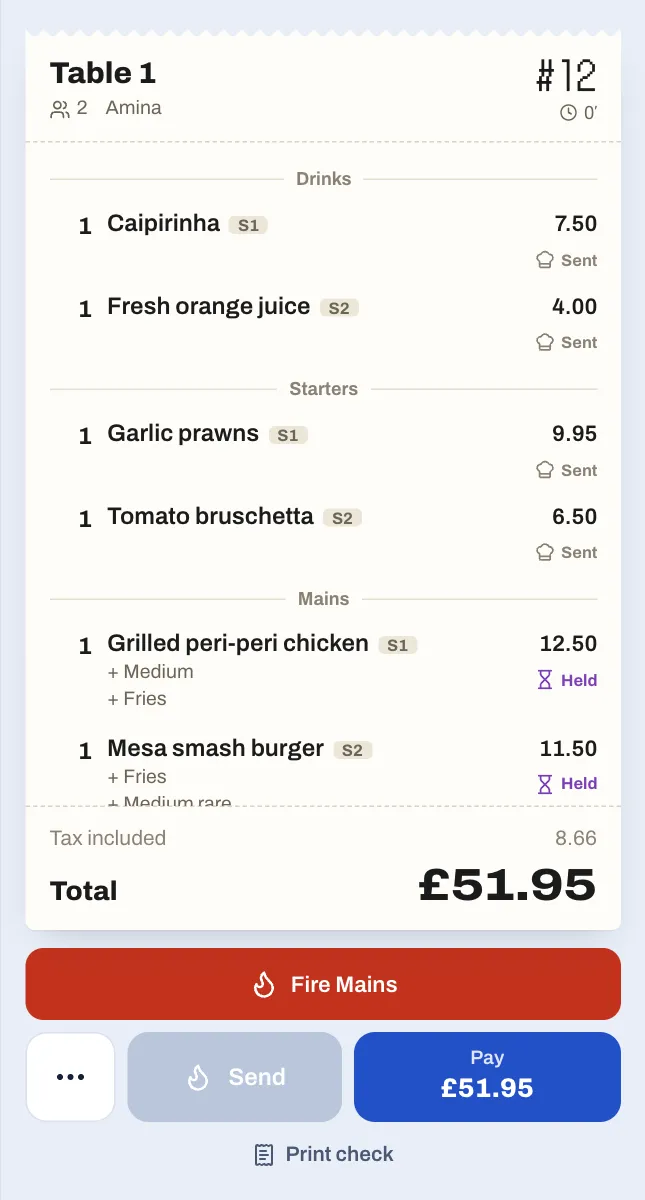
Send never sends held items. If the guests order another drink while the mains are held, Send sends the drink, and the mains keep waiting for Fire Mains. While a course is held, the kitchen display shows "Mains to follow" on the table's tickets. In the demo restaurant, table 12 has its mains held.
When the bill is paid in full, anything still held goes to the kitchen, as long as Send to the kitchen on payment is on in Back office › Settings › Service.
To hold later courses on every table without tapping the hourglass, turn on Hold later courses in Back office › Settings › Service (it needs Courses on). The first course (Drinks) always goes straight away. Send then sends the course being served, and later courses wait on the check with a Fire button. Only dine-in checks are held this way: takeaway, delivery and counter orders, bar tabs, and orders from online shops go to the kitchen at once.
Serve the food when it's ready
- When the kitchen marks your food ready, your devices chime and show, for example, "Table 8 is ready", with the station that finished it. A manager turns this on or off in Back office › Settings › Kitchen (Tell the server when food is ready).
- The table turns green: Food ready.
- On the check, a green button shows, for example, Served: 6 ready on the pass. Tap it when you take the food out. The items show Served and the table turns blue.
- Kitchen lists the tickets under Food ready and Cooking. Tap Done on a ready ticket when you take it.
For the kitchen's side, see The kitchen display.
Use the More menu on a check
Tap the ••• button at the bottom left of the check. Its menu is called More.
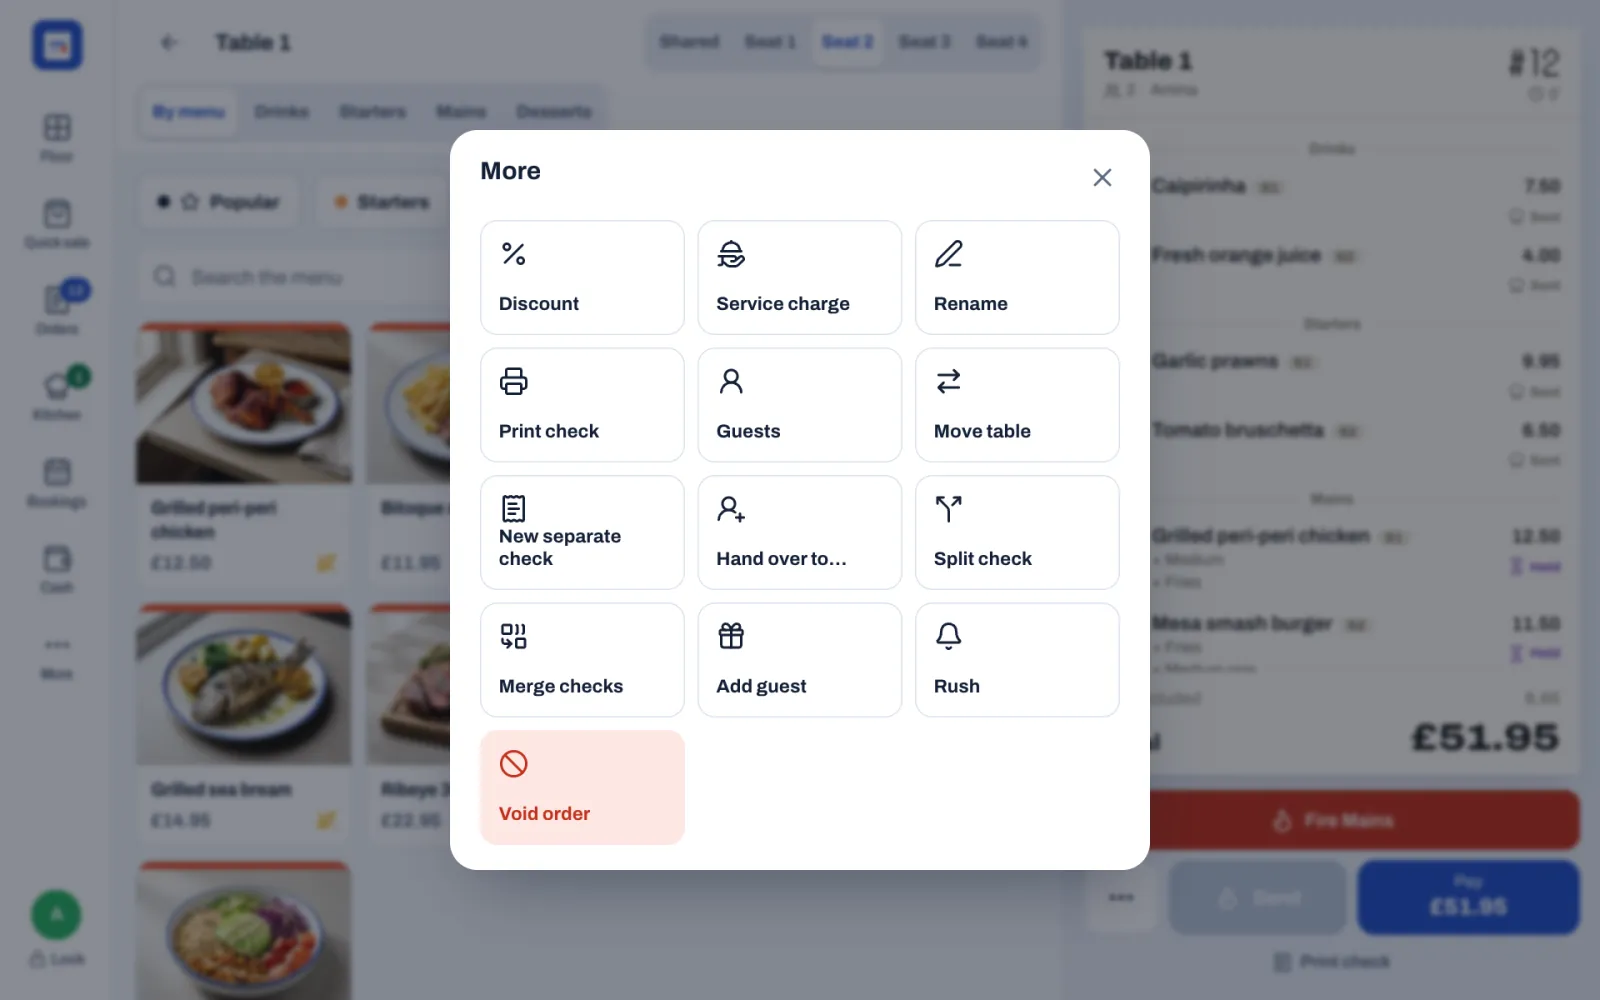
| Button | What it does |
|---|---|
| Discount | A discount on the whole check, or a promo code. See Apply a discount. |
| Service charge | Lists the restaurant's service charges, for example Service 10%: tap one to add it. A charge already on the check shows On the check. Shows when the restaurant has a service charge available on the POS. |
| Rename | Changes the name on the check. See Rename a check. |
| Print check | Prints the check for the guests and turns the table purple. |
| Guests | Changes the number of guests, from 1 to 16. Dine-in checks only. |
| Move table | Moves the check to another table. Dine-in checks only. |
| New separate check | Opens another check at the same table. See Start a separate check. |
| Hand over to… | Gives the check to another member of staff. |
| Split check | Moves items to new, separate checks. Shows when the check has two lines or more and nothing has been paid. See Split the bill. |
| Merge checks | Brings another open check into this one. Shows when there is another open check. |
| Add guest | Links a guest profile to the check, for loyalty points, allergies and the guest's details on the receipt. Once linked, the button shows the guest's name, with a warning triangle if they have allergies. See Guests, loyalty and gift cards. |
| Rush | Marks the check's tickets RUSH on the kitchen display. Shows once something has been sent. |
| Void order | Cancels the whole order. On a check with payments, it lists the payments to void first. See Void a whole order. |
On a check another server opened, most of these need Change other people's orders, or a manager's PIN. Print check and Rush never do, and neither does taking payment. A check with nothing on it yet, such as one a host opened, can be handed over without a manager, and becomes yours when you add its first items. See Know what needs a manager.
When a guest is linked, tapping their name opens their card: their visits, their loyalty points and, if they have one, their house account, for example "House account: £0.00 owed, £200.00 left". If they have allergies, the card adds that every kitchen ticket for the order shows them.
Print the check
- Tap Print check under the Pay button, or ••• › Print check.
The check prints on this device's receipt printer. It is headed Pro forma and says "This is not a receipt". When tipping is on, it also suggests tips. The table turns purple (Check printed), so the team knows the guests have the bill. After the first print, the link under Pay disappears; reprint from ••• › Print check.
Rename a check
- Tap ••• › Rename.
- Type the name under Name on the order.
- Tap Save.
On a table, the name shows next to the check's number when the table has more than one check, so you can tell them apart. On a takeaway order, it is the name at the top of the check, in Orders and on the pickup board. To take the name off, empty the box and tap Save.
Move a check to another table
- Tap ••• › Move table.
- Tap the new table. The tables are grouped by area; tables with an open check are amber, and the current one is greyed out.
The check, its kitchen tickets and the guests move to the new table. If the new table already had a check, it now has two: tap the table to choose between them. To move tables, your role needs Move orders and tables; otherwise a manager approves with their PIN.
Hand a check to another server
- Tap ••• › Hand over to….
- Tap the person who takes over.
The table now shows their initials and appears under their My tables. Do this before you leave at the end of your shift.
Start a separate check
When some guests at a table want to pay on their own from the start, give them their own check.
- Open the table's check.
- Tap ••• › New separate check.
- Tap the number of guests on the new check. If Ask how many guests is off, this step is skipped.
The new check opens, with its own number. From then on, tapping the table lists its checks: tap the one you want.
Merge two checks
- Open the check you want to keep.
- Tap ••• › Merge checks.
- Tap the other check. The list shows each open check without payments, with its number, table or name, and total.
The items of the other check move into this one, its guests are added, and the other check closes. A check that has a payment can't be merged into another. Merging needs Move orders and tables, or a manager's PIN.
Change the number of guests
Tap ••• › Guests and tap the new number.
Clear the table after payment
Once the bill is paid, the table shows Needs cleaning (when Mark tables for clearing is on in Back office › Settings › Service). When it's ready, tap the table and tap Mark as clean. To seat new guests straight away, tap Open check instead.
Take orders on a handheld
Servers can take orders at the table on a phone or a small tablet paired as a Handheld. See Devices, printers and stations. Everything works as on the till. On a phone, the screens are arranged differently:
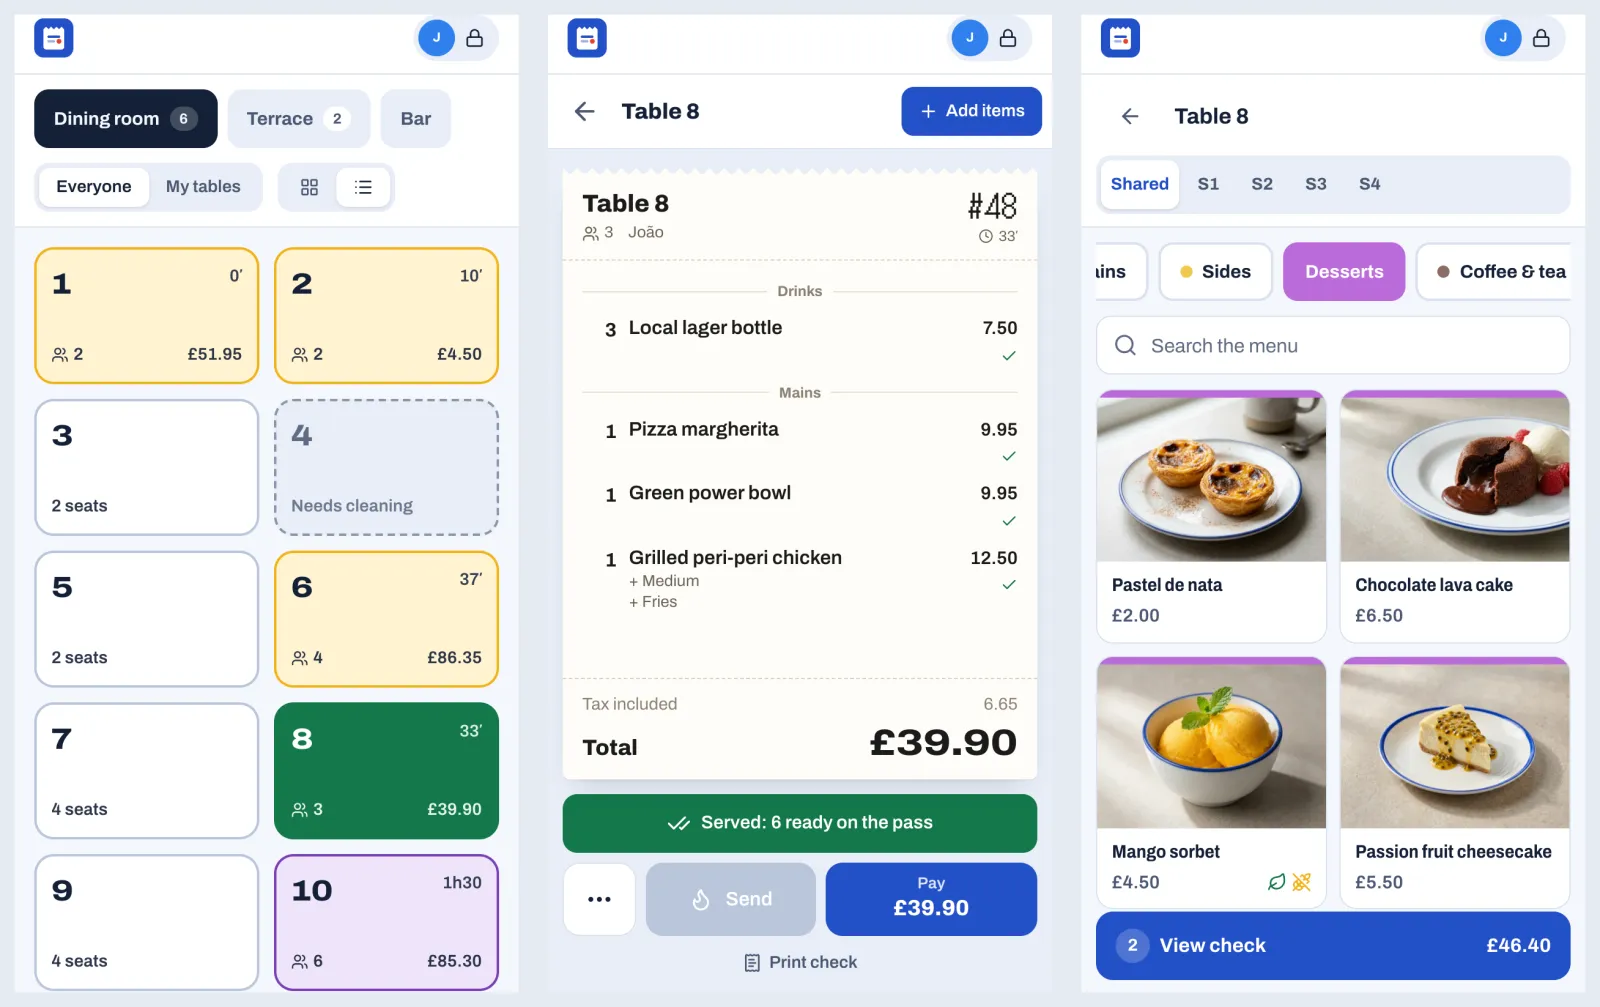
- Floor opens as a list of table cards. The plan button switches to the plan. The colours are the same as on the till, without the legend.
- A table opens on its check. Tap Add items to see the menu. An empty check says "Tap Add items to start the order." The blue View check bar at the bottom shows how many new items there are and the total: tap it to go back to the check.
- The seats show as S1, S2 and so on. There are no course buttons: tap a new item on the check to change its course.
- After Send, the phone goes back to the floor.
- Your picture with a padlock at the top right locks the phone.
- The bottom bar shows the first four sections and More. More lists the other sections, such as Bookings and Cash, as buttons at the top.
A tablet shows the same screens as the till: the left-hand bar with every section, and the menu and the check side by side. The course buttons need a wide screen, so on a tablet held upright, change the course on each item.
Busy nights
- Use seats from the first round. Splitting the bill later takes seconds.
- Send drinks and starters as soon as you have them. Hold the mains with the hourglass, and tap Fire Mains when the starters are cleared.
- Keep My tables on, and watch for green tables and red borders.
- Tap Served as you take food out, so the pass and the floor stay accurate.
- Block the tables you are keeping, so nobody seats walk-ins there.
- Lock the till every time you walk away from it.
- Hand your open tables over before you leave.