Chapters
Guide › Set up
Draw your floor plan
The floor plan is the map of your restaurant on the till and the handhelds. Staff tap a table on it to open that table's check, and the table's colour shows how it is doing. You draw the plan in the back office, one area at a time: a dining room, a terrace, a bar. Owners and managers draw it; the last section, on what the colours mean, is for everyone who works the floor.
Before you start
- Create your restaurant with Dine in as one of its order types. See Create your restaurant. If you chose Table service, Café / bakery or Bar, Sofrito has already drawn a starter floor plan: a Dining room with 13 tables and, for table service and bars, a Terrace and a Bar. Change it to match your room.
- If an area needs its own prices or its own service charge, create the price level or the service charge first. See Build your menu and Payment methods, tips and service charge.
Open the floor plan editor
- In the back office, select Floor plan.
- At the top, select the area you want to change, for example Dining room.
The editor draws the area the way servers see it on the till. On the right, Add a table and Add to the room add things to the area. When you select a table, the same panel shows that table's details. Everything you change stays a draft until you select Save layout at the bottom.
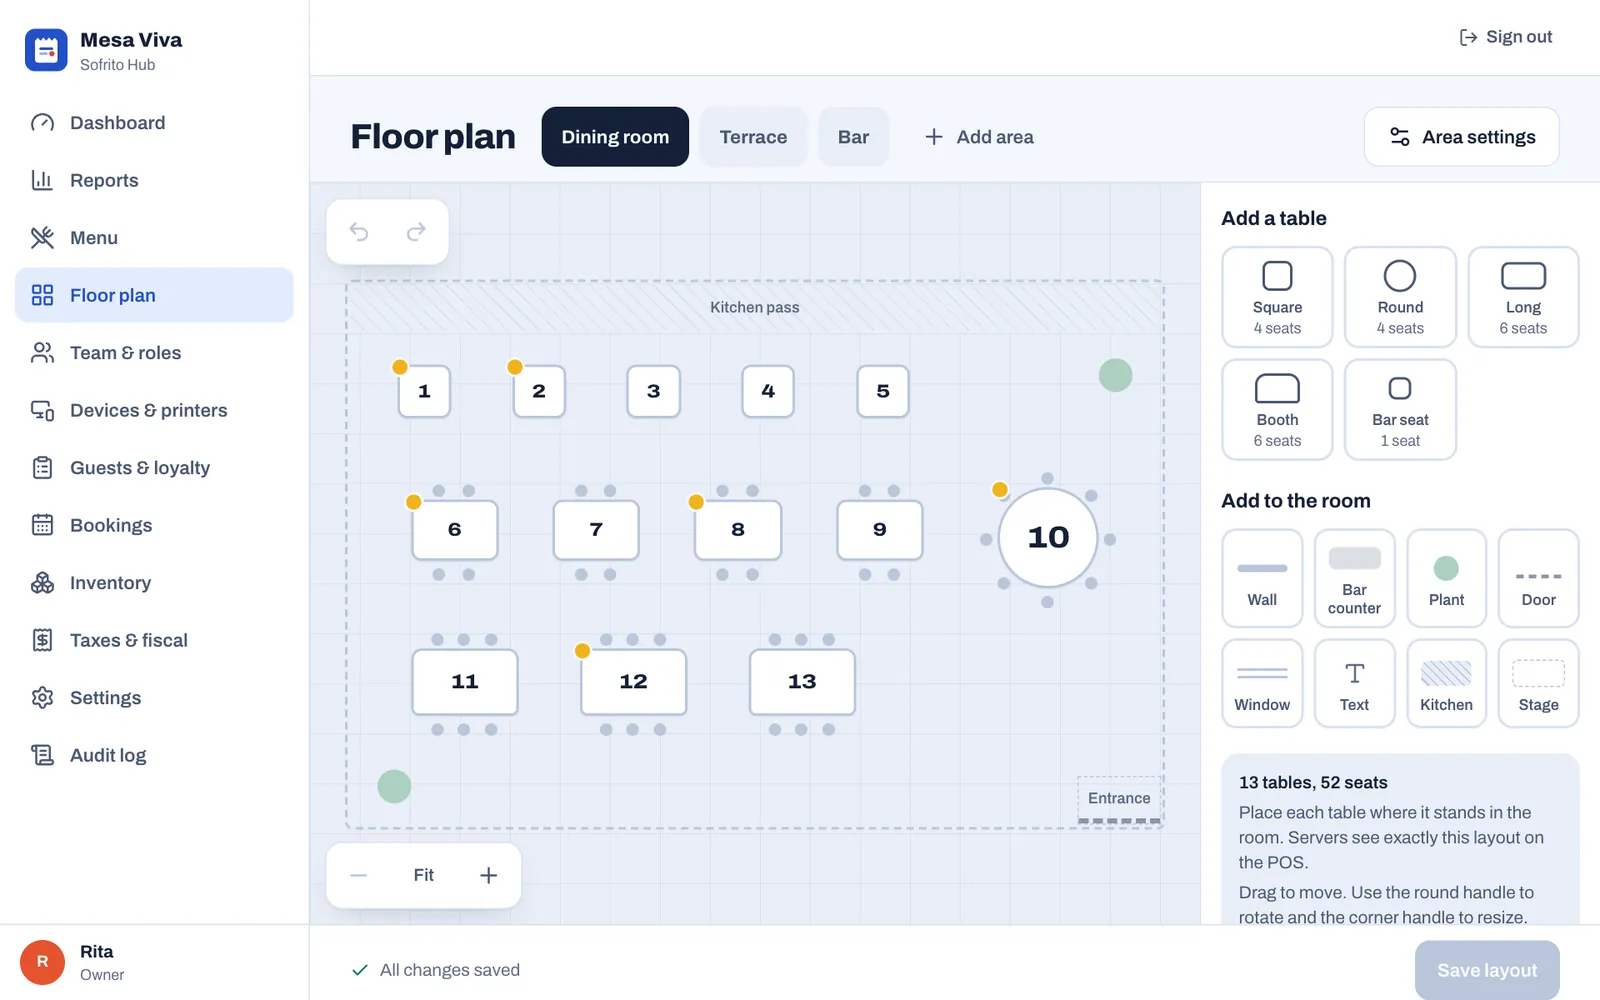
A yellow dot on a table means it has an open order right now. You can move that table, but you can't remove it until the order is closed.
Add an area
Make one area for each room, terrace or bar that has its own tables. Each area becomes a tab on the till's floor.
- Select Add area.
- In Area name, type the name staff use, for example “Terrace”.
- Select Create area. The new area opens, empty.
- Add its tables (see Add tables).
- Select Save layout.
A new area starts the same size as the area you were looking at, and its tab comes last on the till. To change the order of the tabs, see Put the areas in order.
Set the size, prices and service charge of an area
- Select the area's tab.
- Select Area settings.
- Change the Area name if you need to.
- Set the Width and Height of the room, from 300 to 5,000 floor units. A table for four is about 90 units wide.
- To charge different prices on these tables, choose it under Price level. Standard prices charges your normal prices.
- To add a service charge to every order on these tables, choose it under Service charge.
- Select Done.
- Select Save layout.
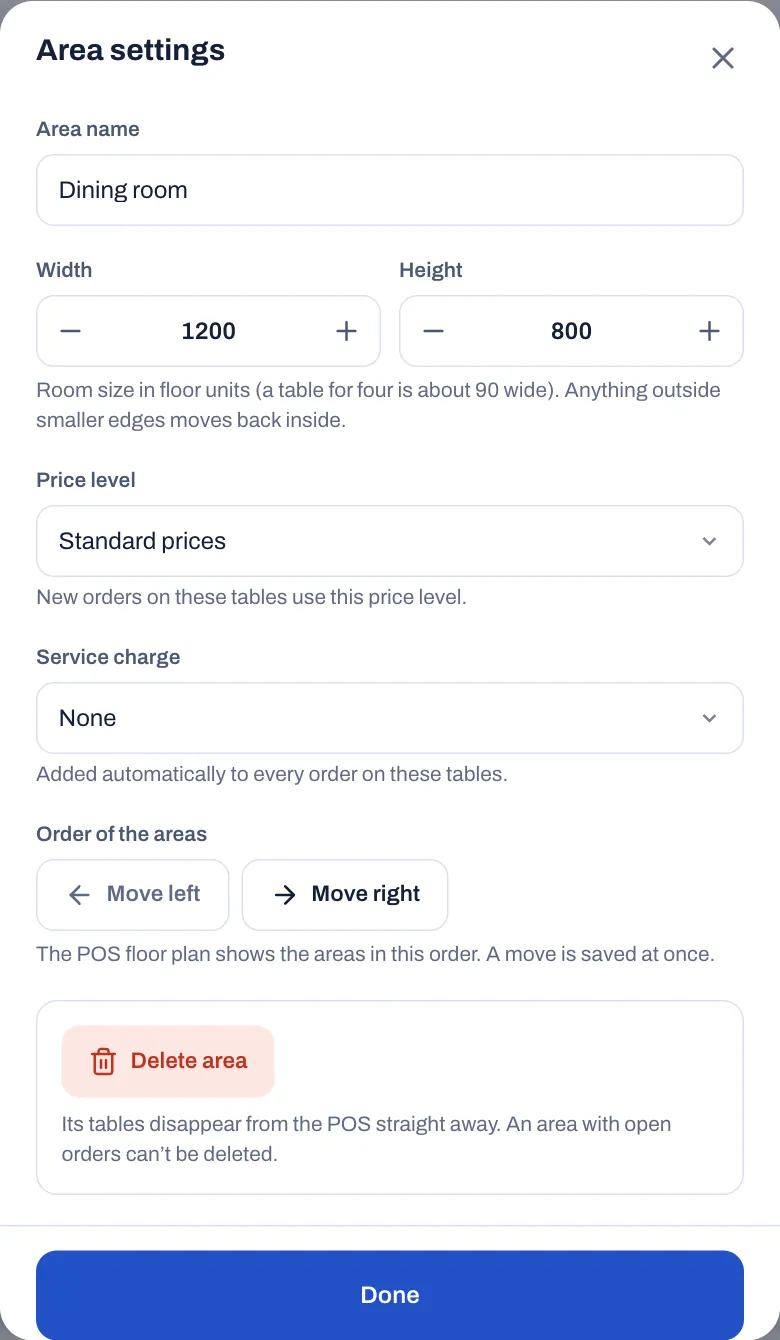
- Draw the area roughly the shape of the real room. If you make it smaller, tables and other things outside the new edges move back inside.
- Price level shows the price levels you created in Settings › Price levels. New orders on these tables use the area's price level, even during happy hour.
- Service charge shows the service charges that are available on the POS in Settings › Service charges. See Payment methods, tips and service charge.
Put the areas in order
The till shows one tab for each area, in the order you set here. Put the area your servers use most first.
- Select the area's tab.
- Select Area settings.
- Under Order of the areas, select Move left or Move right. Each move is saved straight away, and Sofrito shows "Order of the areas saved".
- Select Done.
A new area must be saved with Save layout before you can move it. Until then, the sheet says "Save this new area first, then put it in order." Each till opens on the first area, unless that device has its own Area shown first (see Devices, printers and stations).
Add tables
- Select the area's tab.
- Under Add a table, select a shape: Square (4 seats), Round (4 seats), Long (6 seats), Booth (6 seats) or Bar seat (1 seat).
- Drag the new table into place. It appears in a free spot with the next number, already selected.
- Repeat for each table.
- Select Save layout.
On a phone or a small tablet, select Add at the bottom right to see the same choices.
To add several tables of the same kind, select a table and select Duplicate. The copy appears next to it with the next number. An area holds up to 300 tables.
Name and seat each table
- Select the table.
- In Table name, type its name or number, for example “12” or “T4”. Names can be up to 20 characters long.
- Under Shape, change the shape if you need to.
- Set Seats to the number of guests the table usually takes.
- Select Save layout.
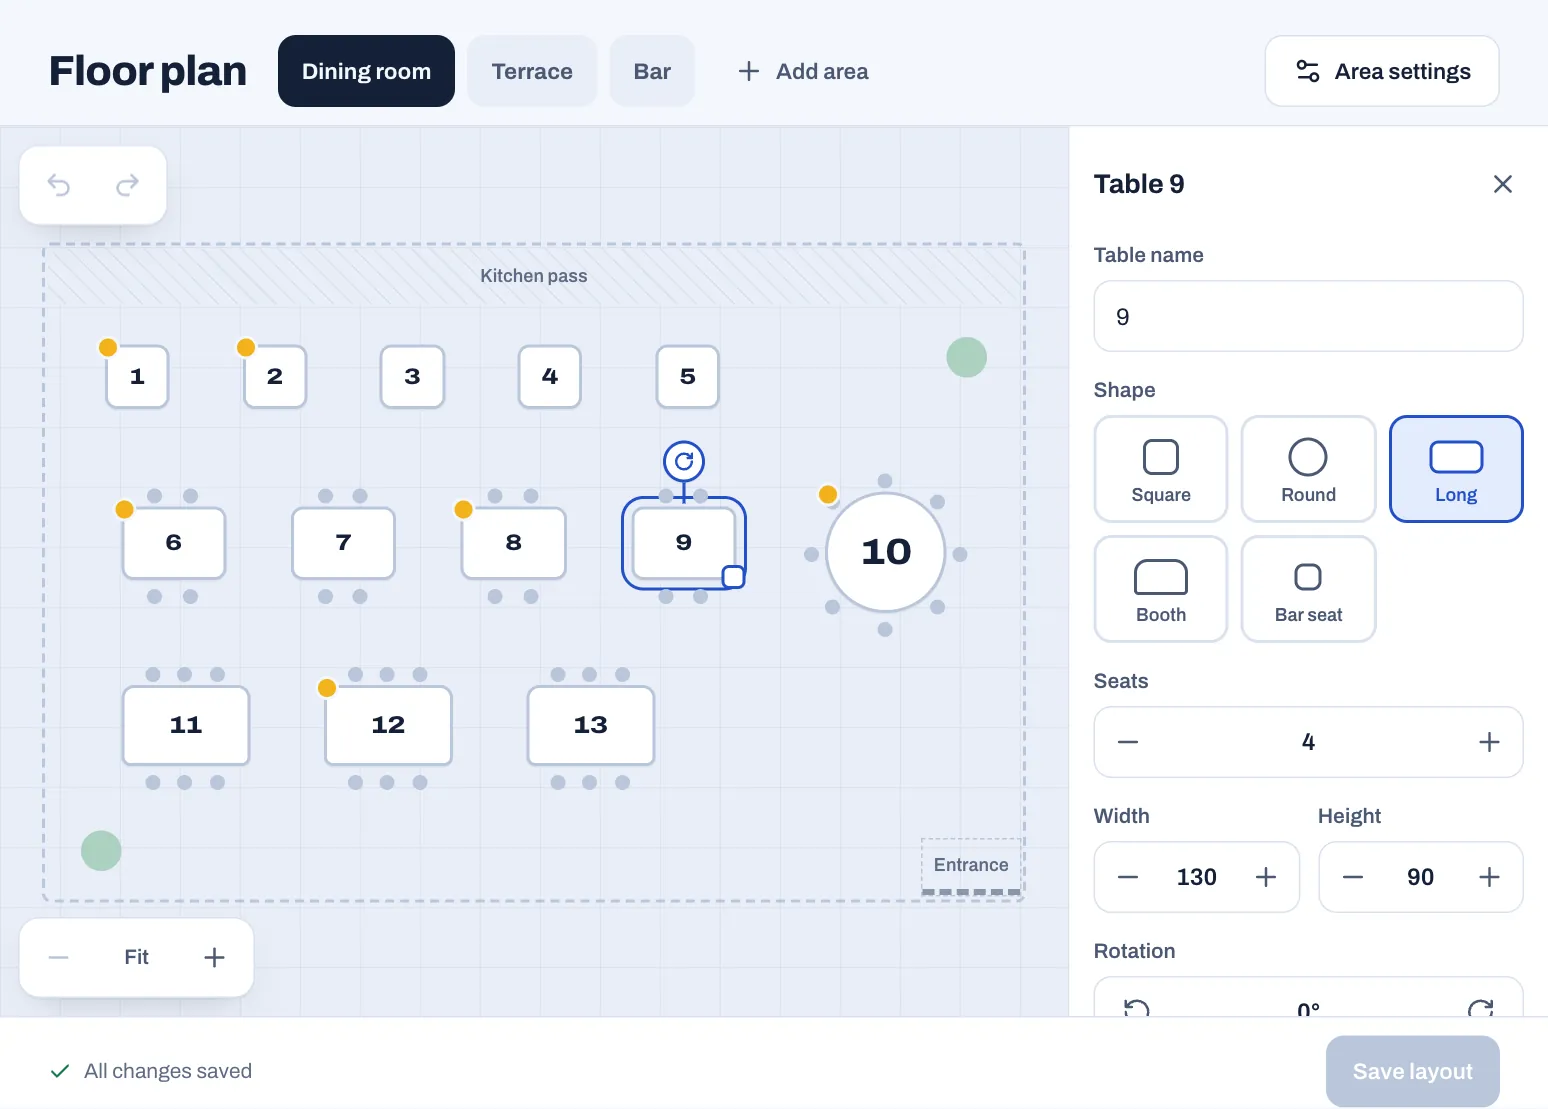
- Every table needs a name. If two tables share a name, Sofrito warns you, because servers find tables by name.
- New tables follow your numbering: after 11 comes 12, and after T4 comes T5.
- Seats draws the chairs around the table on the till, for tables of up to 12 seats. When staff open the table, the till suggests this number of guests.
Move, resize and rotate tables
- Move: drag the table. It snaps to a grid of 10 units and always stays inside the room.
- Resize: drag the square handle at the table's corner, or change Width and Height in the panel. Round tables keep their shape.
- Rotate: drag the round handle above the table, or use the arrows under Rotation. Tables turn in steps of 15°.
- Change the shape: switching between Square and Round keeps the size. Any other shape gives the table that shape's usual size.
- Zoom: use − and + at the bottom left. Fit shows the whole area again. When you are zoomed in, drag the background to look around.
- Undo: the arrows at the top left undo and redo your last changes in this area.
Add walls, the bar and other things
Draw what guests and staff walk around, so the plan is easy to read: walls, the bar, the doors.
- Under Add to the room, select Wall, Bar counter, Plant, Door, Window, Text, Kitchen or Stage.
- Drag it into place.
- Resize and rotate it the same way as a table.
- In Text on the floor, type the words servers should see on it, for example “Entrance” or “Garden side”.
- Select Save layout.
To turn it into something else, for example a wall into a window, choose another Type.
Remove a table or an area
To remove a table, or anything else in the room:
- Select it.
- Select Remove.
- Select Save layout.
Right after you remove something, a message offers Undo for a few seconds. You can't remove a table that has an open order: close the order, or move it to another table, first (see Table service).
To delete a whole area:
- Select the area's tab.
- Select Area settings.
- Select Delete area.
- Select the button again to confirm. It now says Tap again to delete.
The area and its tables disappear from every till straight away, without Save layout. You can't delete an area while any of its tables has an open order.
Save your changes
- Save layout saves every area you changed. Until you save, the bar at the bottom says Unsaved changes in, followed by the areas, and a dot marks each changed area's tab.
- Saved changes reach every till and handheld straight away.
- Discard changes throws away everything since you last saved. Select it again to confirm.
- If you leave the page with unsaved changes, Sofrito asks whether to Save and leave, Leave without saving or Keep editing.
Read the floor on the till
On the till and the handhelds, Floor shows your floor plan, one tab per area. Each table's colour shows how it is doing, and the key along the bottom of the till's screen repeats the colours.
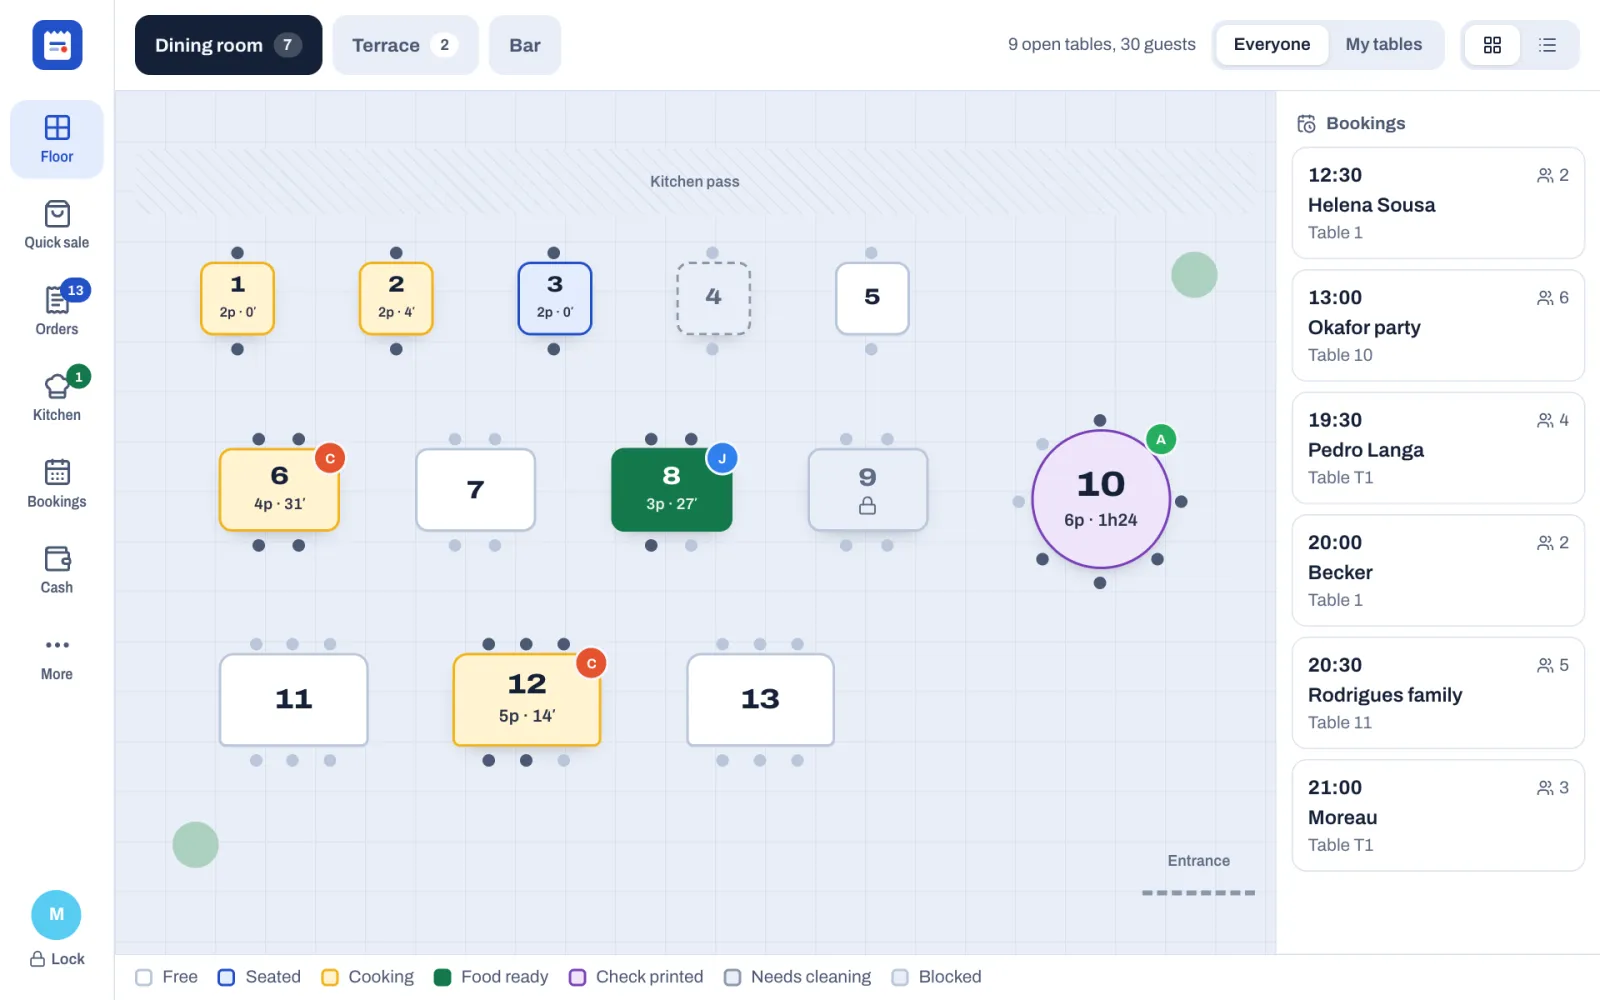
| Colour | Name on the key | What it means |
|---|---|---|
| White | Free | No open order. |
| Light blue | Seated | The table is open, and nothing is waiting in the kitchen. |
| Yellow | Cooking | Something the table ordered is being prepared. |
| Green | Food ready | The kitchen has marked something ready. Take it to the table. |
| Purple | Check printed | The table's check has been printed. |
| Grey, dashed | Needs cleaning | The check is paid. Tap the table, then tap Mark as clean when it is ready for the next guests. |
| Grey, with a padlock | Blocked | Staff have kept the table free. Nobody is seated there until someone unblocks it. See Keep a table free. |
There is more on each table:
- A red border that pulses means something has waited in the kitchen longer than Late after, in Settings › Kitchen (20 minutes unless you change it).
- A purple dashed border with a time means a booking for that table is due: from Hold the table minutes before its time (30 unless you change it in Settings › Bookings) until 30 minutes after.
- A busy table shows its guests and how long it has been open, for example 4p · 41′. Larger tables also show the initials of the server who opened them. Dark chairs are seated guests.
- The number on each area tab counts its open tables.
- My tables fades out every table except the ones you opened. In the list, it shows only yours.
- The grid and list buttons at the top right switch between the plan and a list of tables in the same colours. Handhelds open on the list.
- On wide screens, the day's next bookings are listed on the right of the plan, for staff whose role can see bookings. With Take bookings off in Settings › Bookings, the plan shows no bookings and no reserved tables.
Tables turn grey after payment only while Mark tables for clearing is on, in Settings › Service. It is on unless you turn it off. To choose the area a till opens on, set Area shown first for that device (see Devices, printers and stations). For opening tables and the rest of service, see Table service.
Good practice
- Draw the room as it is, so new staff can find table 14 on their first night.
- Number tables the way staff say them. Give each area its own letter, such as T1 on the terrace and B1 at the bar, so names never repeat.
- Keep names short. The name is written in the middle of the table, and kitchen tickets print it too.
- Set Seats to the usual number of guests, not the most you can squeeze in.
- Add the bar, the doors and the walls. They make the plan easy to read at a glance.
- Change the plan before or after service. During service, tables with open orders can move but can't be removed.
- After you save, check the plan on a till and on a handheld.